
# Workspace Setup Guide

A guide for admins setting up their CustomerIQ workspace

Welcome to CustomerIQ!

You've taken the first step toward saving your team hours per week and organizing every conversation in one place.

We work to establish thoughtful defaults throughout your workspace. This is your guide to reviewing and adjusting your workspace to fit your team perfectly.

***

#### The Setup Sequence

You'll want to get familiar with these six areas to make your workspace work best for your team:

{% stepper %}
{% step %}
**Configure your CRM or AMS**
{% endstep %}

{% step %}
**Set Properties & Automation Rules**
{% endstep %}

{% step %}
**Review Email Categories and Logging**
{% endstep %}

{% step %}
**Review Call Types and Coaching Criteria**
{% endstep %}

{% step %}
**Review Ticket Pipelines and Stages**
{% endstep %}

{% step %}
**Invite Members and Set Responsibilites**
{% endstep %}

{% step %}
**Add Knowledge to Knowledge Base**
{% endstep %}

{% step %}
**Connect VoIP Provider for Call Logging**
{% endstep %}
{% endstepper %}

*Let's get started!*


# CRM Properties & Automation

Your Properties & Automation settings determine how CustomerIQ updates and creates objects and properties in your CRM

After conversation (calls, meetings, emails, and voice notes) CustomerIQ's Object Planner agent determines what to create, update, and associate across contacts, accounts, deals, and tickets - enriching each relevant object with properties from the conversation.

As an admin, you have control over:

* Which object properties get updated
* If the object planner can propose/update objects
* Object change approvals

Let's walk through the configuration for each.

### CRM Property Update Settings

<figure><img src="/files/Gxc8gjWrdMyF2R5lktNX" alt=""><figcaption></figcaption></figure>

CustomerIQ can update any property across contacts, accounts, and deals in your CRM.&#x20;

When you connect your CRM with CustomerIQ, we default to use all CRM properties configured within your CRM. If you don't connect a CRM, you an create and track properties directly within your workspace.

#### Connect your CRM

1. Go to [Apps & Integrations](https://app.getcustomeriq.com/settings/integrations) from your Settings page
2. Click configure next to your CRM
   1. If you don't see your CRM integration available, you can [request it here](https://www.getcustomeriq.com/contact/support).

#### How to configure properties

<figure><img src="/files/UPbAR6ZAhYXgzDRtmFWv" alt=""><figcaption></figcaption></figure>

From your connected CRM > Configure > Scroll down to property configuration

**First setup account properties:**

1. Select any property you want updated by CustomerIQ
2. From the property dropdown you can:
   1. Update the description: this steers the AI to find the right data, so be clear and concise
   2. Toggle if new values should overwrite existing values

The description is what guides the AI to find the right data, so make this as specific as possible.

**Next, repeat this step for contact properties and deal/opportunity properties**

{% hint style="info" %}
**Note**: When mapping a property to a CRM field that is a dropdown, multi-select, single-select, etc. CustomerIQ will automatically adjust the AI to only return values according to available values in your CRM. To setup these properties, add it to the contact or account field and move to the next step.
{% endhint %}

### Object Planner Approval Settings

<figure><img src="/files/lziI6C2FYQoRCZvY23To" alt=""><figcaption></figcaption></figure>

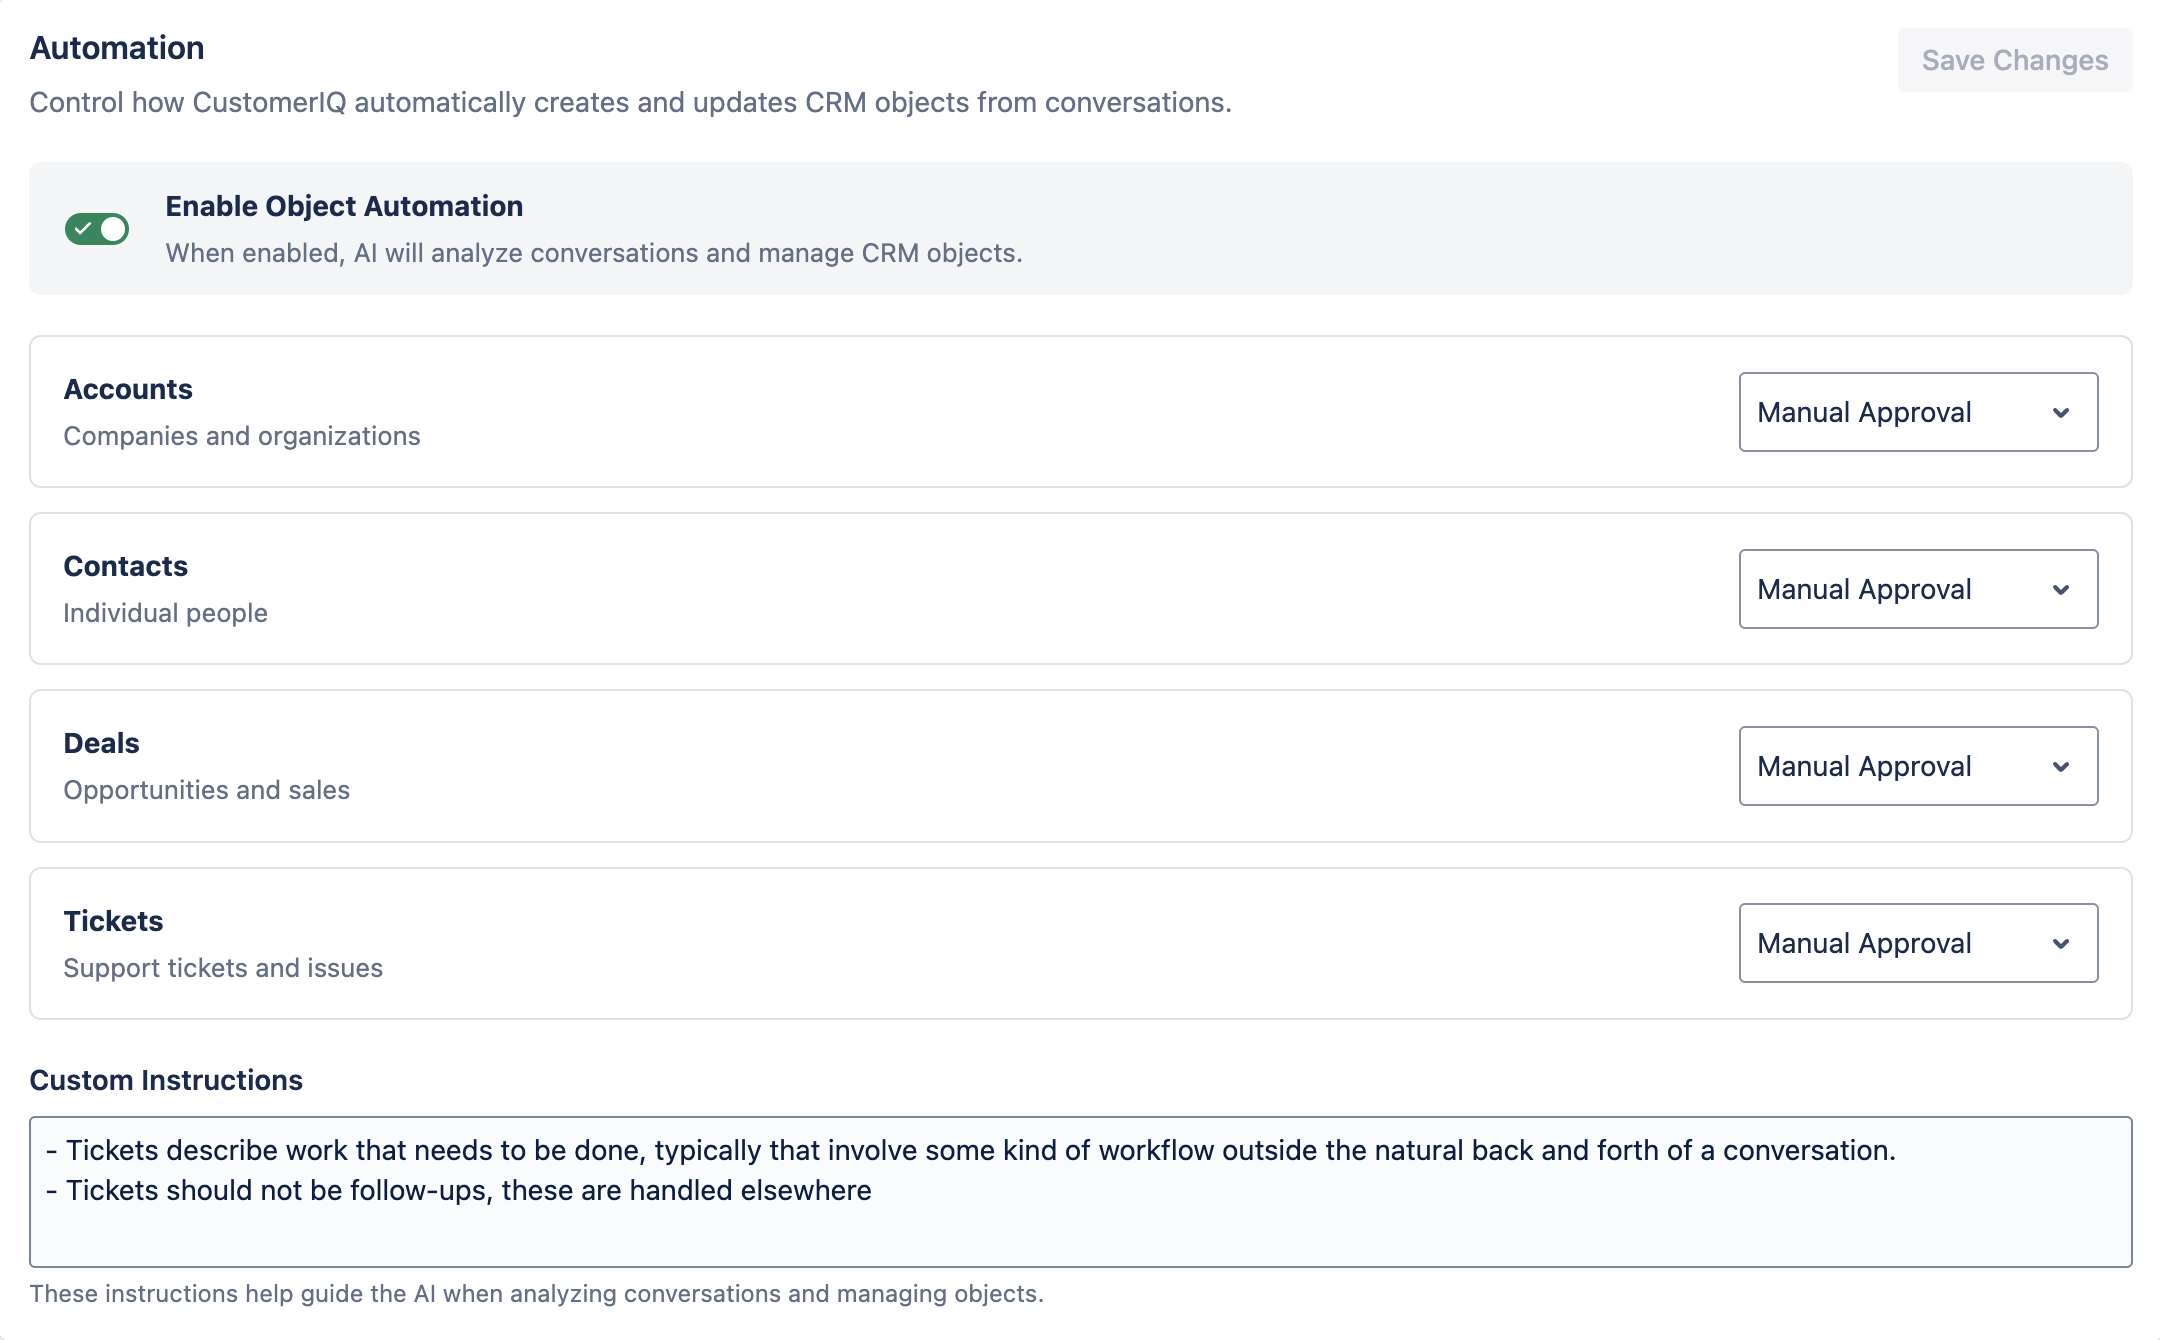
With the Object Planner enabled, you can set which objects require user-approval before changes are made.

Definitions:

* **Automatic**: Any change proposed by the object planner will be automatically accepted. This setting makes your CRM full-self-driving
* **Manual Approval**: The object planner will propose updates to the user who created the conversation. Admins can also review and approve these changes from the conversations tab
* **Off**: The object planner will ignore this particular object and not suggest any changes

If you choose to have users manually approve changes, make sure they are familiar with their [notification settings](/start-guide/user-setup-guide/notification-settings) and ready to approve changes as they're proposed.

#### Custom instructions

Custom instructions help admins guide the object planner to follow your internal procedures more closely. For example, you can add notes on what constitutes creating a deal or ticket, or how specific you want object associations to be.

Instructions should be concise and leave room for edge cases. An example of a good instruction would be: "Create deals only if the sales rep mentions sending over a quote" or "Create a ticket only if there is work to be tracked outside the scope of this conversation"


# Email Assistant

You can customize the default categories for your team's email assistant

### Overview

{% embed url="<https://www.loom.com/share/37b1c43901114f90bfa05a70784ffe45?sid=51d34258-270e-4af8-a1a4-b38d43d97610>" %}

Custom categories help your AI email assistant automatically organize and process incoming emails based on your organization's specific needs. As a workspace admin, you can create up to 15 custom categories that will automatically classify emails and trigger appropriate actions.

### Accessing Category Settings

1. Navigate to **Settings >** [**Inbox Categories**](https://app.getcustomeriq.com/settings/inbox-categories)
2. This section is only accessible to workspace administrators

### Category Types

You have three options for setting up categories:

* **Custom Categories**: Create categories tailored to your specific business needs
* **Default Categories**: Use pre-built general categories
* **Vertical-Specific Packs**: Choose from industry-specific category sets

### Creating Custom Categories

<div align="left"><figure><img src="/files/xNL5kdEwB4jOgbVHyY7A" alt="" width="375"><figcaption></figcaption></figure></div>

#### Adding a New Category

1. Click **"New Category"** in the Inbox Categories section
2. Enter a **Category Name** (this cannot be changed later)
3. Write a detailed **Category Description** that explains what types of emails should be classified here
4. Save the category

#### Writing Effective Category Descriptions

The AI uses your category description to determine which emails belong in each category. Make your descriptions:

* **Specific and detailed** - Include what should be included in this category, making sure it doesn't conflict with other existing categories.
* **Clear about intent** - Explain the purpose or nature of emails in this category.

**Example:**

* Category Name: "Quotes"
* Description: "Emails where a client, prospect, or referral is requesting a new quote or coverage. Always prioritize over Referrals or General Info."

### Managing Categories

#### Editing Categories

* **Category descriptions can be updated** at any time to improve AI accuracy
* **Category names cannot be changed** once created
* To change a category name, you must delete the old category and create a new one

#### Deleting Categories

* Deleted categories will no longer be used by the AI for new emails
* Previously categorized emails will retain their category labels in the inbox
* Consider the impact on reporting and CRM data before deleting

#### Category Limits

* Maximum of **15 categories** per workspace
* Plan your category structure carefully given this limit

### Category Settings & Actions

#### Workspace-Level Settings (Admin)

For each category, you can configure:

**CustomerIQ Logging**

* Choose whether emails in this category should be logged as submissions for AI analysis
* Logged submissions are visible to all workspace members
* Enable this for categories that provide valuable customer insights

**CRM Integration**

* If you have a CRM connected via Apps & Integrations, logged categories will sync according to your CRM settings
* Configure CRM field mappings in the Apps & Integrations section

#### User-Level Settings

Individual users can configure:

**Auto-Reply Drafting**

* Users can enable/disable AI reply drafting for each category
* This allows team members to customize which types of emails get automated response suggestions
* Access this in individual user settings

### Best Practices

#### Category Strategy

1. **Start broad, then refine** - Begin with general categories and narrow descriptions based on AI performance
2. **Avoid overlap** - Make categories mutually exclusive to prevent confusion
3. **Test and iterate** - Monitor how well the AI categorizes emails and adjust descriptions accordingly

#### Description Optimization

1. **Use specific keywords** your customers actually use
2. **Include context clues** like sender types, urgency indicators, or specific phrases
3. **Update regularly** based on misclassified emails

#### Workflow Integration

1. **Plan your logging strategy** - Only log categories that provide business value
2. **Coordinate with CRM setup** - Ensure category data flows properly to your CRM
3. **Train your team** - Make sure users understand how to configure their reply preferences

### Troubleshooting

**AI isn't categorizing emails correctly:**

* Review and refine category descriptions
* Check for overlapping category definitions
* Consider if you need additional categories for edge cases

**Categories not syncing to CRM:**

* Verify CRM connection in Apps & Integrations
* Ensure category logging is enabled for those categories
* Check CRM field mapping settings

**Need to change a category name:**

* Create the new category first
* Delete the old category
* Note: Historical data will retain the old category name

### Technical Notes

* Categories are applied as emails arrive in real-time
* Each email receives only one category classification
* Category changes take effect immediately for new incoming emails
* Previously categorized emails are not automatically re-categorized when descriptions change


# Call/Meeting Assistant

Adjust the behavior of your team's AI call and meeting assistant

From your meeting assistant settings, you can adjust how the AI meeting assistant appears in meetings.

### Display image

Disable the meeting display image to have the meeting bot appear without a cover image. If you'd like to add your own cover image, we are happy to load one in for you, just [contact support here with your request](https://www.getcustomeriq.com/contact/support).

### Assistant name

You can also adjust the assistant name for all users in your workspace. By default, the assistant displays as "\[Name of user]'s Notetaker"

**Note**: Changing the name of the assistant changes the name for ALL assistants in your workspace, so make sure the name applies to all users. For example, "Acme Co Notetaker" is a good name, wheras "John's Notetaker" is not.


# Call Coaching

Guide to configuring your AI call coaches across different call types

CustomerIQ's AI call coach will score every meeting and call based on your custom criteria. This coaching also informs your Call Performance reports in your reports tab.

### Step 1: Define Your Call Types

Call types determine how conversations get classified and reported. Common examples:

**For insurance agencies:**

* New Quote Call
* Policy Review
* Claims Discussion
* Renewal Conversation
* Objection Handling
* Follow-up Check-in

**For sales and customer success teams:**

* Discovery Call
* Demo/Presentation
* Pricing Discussion
* Customer onboarding/implementation

**To add a call type:**

1. Click "Add Call Type"
2. Name it clearly (this appears in reports and to your reps)
3. Write a brief description of when a call should be classified this way
4. Save

**Pro tip:** Start with 3-4 core types. You can expand later, but too many types dilutes your coaching insights.

***

### Step 2: Enable Coaching Per Call Type

Not every call type needs coaching. Some conversations are purely informational or administrative.

For each call type, toggle **"Enable Coaching"** on or off.

**Should have coaching enabled:**

* Revenue-generating calls (discovery, demo, closing)
* Customer retention calls (renewals, check-ins)
* Critical support interactions (claims, complaints)
* Any call where performance directly impacts outcomes

**Can skip coaching:**

* Internal team calls
* Quick administrative check-ins
* Calls where the goal is just information gathering

***

### Step 3: Write Your Coaching Prompts

This is where the magic happens. For each call type with coaching enabled, you'll write a prompt that tells the AI what "good" looks like.

#### What Makes a Great Coaching Prompt

**Be specific about your methodology:**

* "Coach reps to use the SPIN questioning framework"
* "Evaluate whether the rep identified the prospect's pain points in the first 5 minutes"
* "Flag when reps don't mention our 24-hour claims turnaround guarantee"

**Define your scoring criteria:**

* "Great calls have a 40/60 talk-to-listen ratio, with the prospect talking more"
* "Every call should cover x, y, and z criteria"
* "Reps should ask at least 3 discovery questions before presenting solutions"
* "Always verify coverage amounts and deductibles during policy reviews"

**Include your competitive differentiators:**

* "Emphasize our same-day quote turnaround vs. industry standard 48 hours"
* "Reference our 98% claims satisfaction rate when handling objections"
* "Position our bundling discounts early in pricing conversations"

**Address common pitfalls:**

* "Flag when reps jump to pricing before understanding needs"
* "Catch when reps miss obvious upsell opportunities"
* "Identify calls where next steps weren't clearly defined"

#### Use AI to generate a prompt starting point

When creating a new call type you can always select "Generate prompt" to have AI make a first-pass at the call coaching prompt. This AI will consider what you have entered in the call type and description along with context of your company to generate a call coaching prompt.

***

### Step 4: Test with Example Calls (Highly Recommended)

You can test and iterate on your prompts by testing with previously recorded calls

**To test:**

1. Select the play button on any call type
2. Select a call to test
3. Review the coaching notes as it returns

***

### Best Practices

#### Start with Your Top 2-3 Call Types

Don't try to configure coaching for every scenario on day one. Focus on your highest-impact conversations first.

#### Be Prescriptive in Prompts

"Coach reps on discovery" is too vague. "Coach reps to ask about current provider, coverage gaps, claims history, and budget in the first 10 minutes" is specific and actionable.

#### Use Your Own Language

If you say "gap selling" instead of "needs analysis," use that term. If you call it "overcoming concerns" instead of "objection handling," write that. The AI will mirror your coaching style.

#### Include Both Positive and Negative Guidance

Tell the AI what to look for that's good ("celebrate when...") and what to flag as areas for improvement ("catch when...").

#### Review Coaching Output in Week One

Check how the AI is coaching your reps on actual calls. Refine your prompts based on whether the feedback is helpful and accurate.

***

### Common Mistakes to Avoid

**Generic prompts that could apply to any business**\
"Make sure the rep builds rapport" isn't useful. "Flag when reps don't ask about family members who might need coverage" is specific and valuable.

**Forgetting your differentiators**\
Your prompts should reinforce what makes your agency unique. If your 24-hour response time is a competitive advantage, the AI should coach reps to mention it.

**Over-focusing on metrics vs. outcomes**\
Talk-to-listen ratios matter, but closing deals matters more. Balance quantitative criteria with qualitative assessment of deal progression.

**Not iterating based on feedback**\
The first prompts you write won't be perfect. Watch how reps respond to coaching and adjust your prompts to be more helpful.

**Creating call types that overlap**\
If a call could be classified as both "Discovery" and "New Quote," make the distinction clearer or combine them into one type.

***

### What Happens Next

**For your reps:** After every call, they'll receive personalized coaching feedback based on the prompts you've written. They'll see what they did well and specific areas to improve.

**For you:** Your Performance Reports dashboard will show coaching trends across the team—common strengths, recurring gaps, and opportunities for training.

**Learning curve:** The AI gets better at understanding your standards over the first 10-20 calls of each type. Early coaching might feel slightly generic, but it becomes more nuanced quickly.

***

### Iteration is Normal

Expect to refine your coaching prompts over the first 1-2 weeks:

* Adjusting what gets flagged vs. celebrated
* Adding criteria you initially overlooked
* Removing scoring dimensions that aren't meaningful
* Rewriting prompts to match how you'd actually coach in person

**This is how you build a virtual coach, not just a call analyzer.** Every refinement makes the coaching more valuable to your team.


# Tickets

Guide to setting up tickets and pipelines in CustomerIQ

Tickets are the core work-item in CustomerIQ. After any conversation, CustomerIQ's object planner can create or update tickets.

Admins can create different ticket pipelines, with different stages, and the object planner agent will create tickets, sort into the correct pipeline, and update the correct stages.

### Create a pipeline

<figure><img src="/files/rzFk8SfIwAUFTr2wXu95" alt=""><figcaption></figcaption></figure>

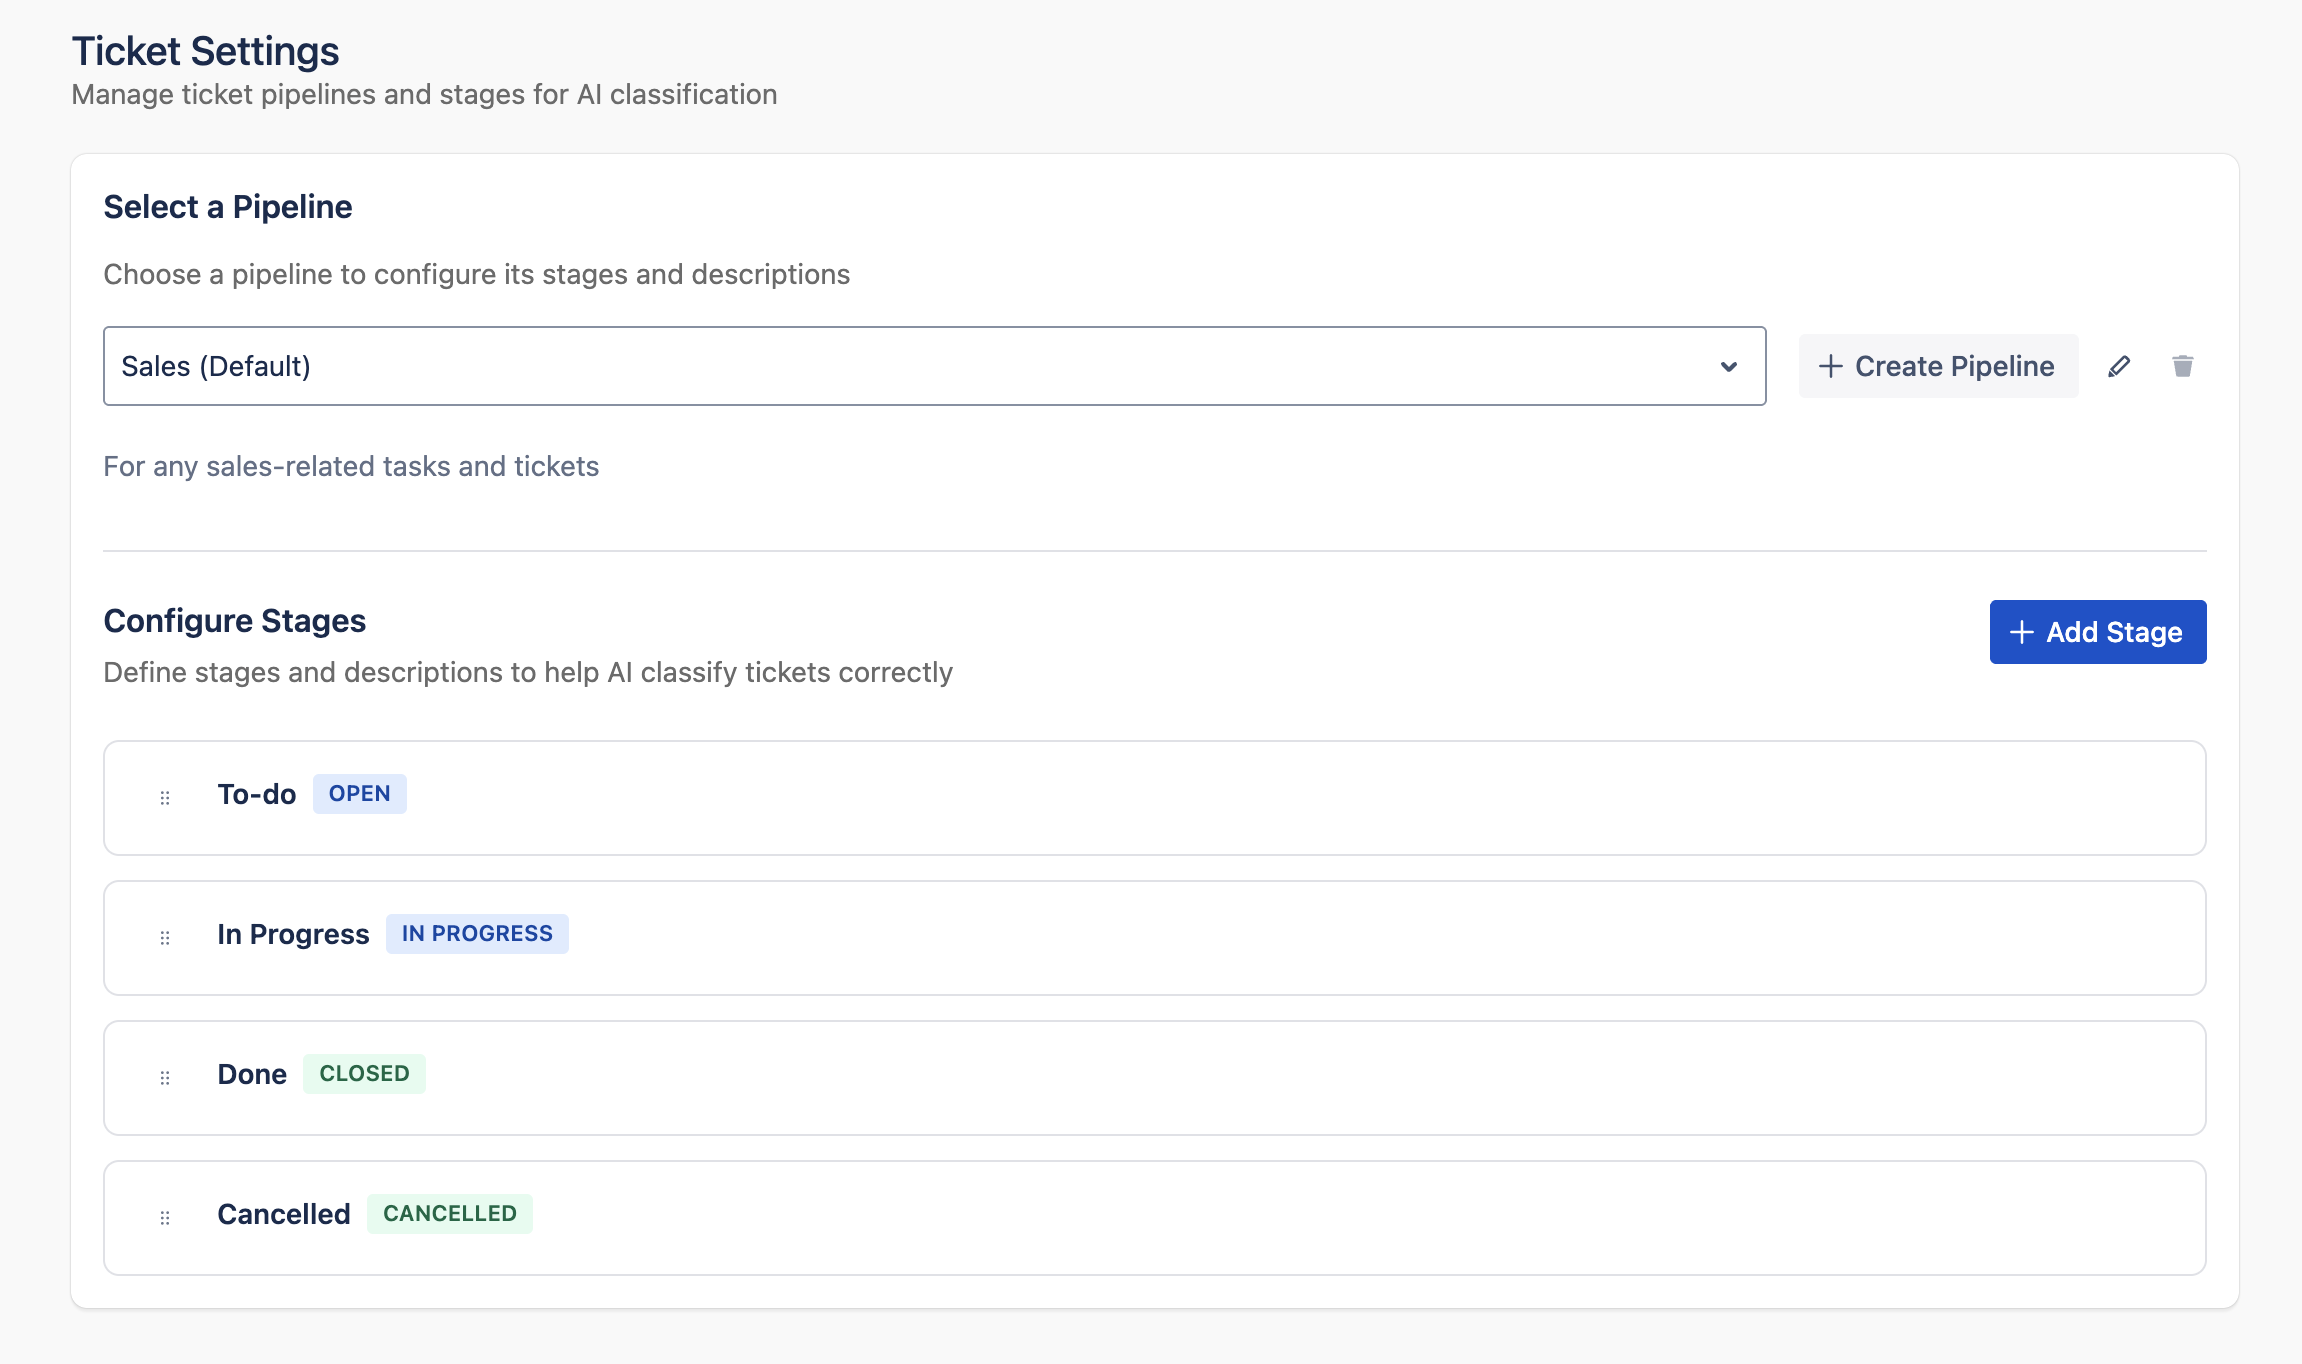
Pipeline are used to manage different workstreams. For example you can have a pipeline for sales and a pipeline for service. Larger teams may split pipelines by specific service categories. The choice is yours.

**To create a pipeline**

1. Go to Settings > Tickets and Click "Create Pipeline"
2. Give the pipeline a name and description

**Description note**: The description field is primarily what the object planner will use to determine which pipeline a ticket belongs to. Make sure your pipeline description contains the appropriate context for the AI to make the right decision.

### **Pipeline stages**

Pipelines can have many stages. Stages can have any name and description but must be either: Open, in-progress, or closed. We use these system stage types for downstream reporting and integrations.

**To create stages:**

1. Select your pipeline
2. Click "Add stage"
3. Give the stage a name, description, and stage type

**Stage description notes**: Just like pipeline descriptions, the stage descriptions are used by the AI to inform when and where to update a ticket. Make sure the stage description makes sense relative to other stages so that the AI can make the best determination.

### Ticket Routing

The object planner can also assign tickets to specific workspace members based on the contet of the ticket.

To make the best determination for who should be assigned the ticket, the object planner uses every workspace member's "Responsibilities" description.

These are managed from the members page, let's take a look!


# Managing Members

Invite your teammates to collaborate workspace

Manage all your workspace members from the Settings > Members tab. From the members tab you can:

1. Add and remove workspace members
2. Adjust member settings such as:
   1. **Email logging**: whether or not this user's emails should be logged to the workspace/CRM
   2. **Ticket routing**: whether or not this user should be assigned tickets
   3. **Responsibilities**: describes which [tickets](/start-guide/workspace-setup-guide/tickets) should be assigned to this user
   4. **Workspace role**: admin, member, or no access

### Invite new workspace members

1. Go to Settings > [Members](https://app.getcustomeriq.com/settings/members)
2. Invite new members by selecting "Invite people" and follow the invite process

{% hint style="info" %}
**Note**: On the free plan, all users are admins and subsequently have full access to the workspace. If you want admin-controls and to invite view-only users, you can do so with [any of our paid plans](https://app.getcustomeriq.com/settings/plans).
{% endhint %}

### Managing workspace members

To edit the settings for any particular member, click the actions button in the members table.

<figure><img src="/files/Yc0YxBJvDItYhYrTxBER" alt=""><figcaption></figcaption></figure>

#### **Editing a user configuration**

As as admin you can edit:

1. **Email logging**: whether or not this user's emails should be logged to the workspace/CRM
2. **Ticket routing**: whether or not this user should be assigned tickets
3. **Responsibilities**: describes which [tickets](/start-guide/workspace-setup-guide/tickets) should be assigned to this user
4. **Workspace role**: admin, member, or no access

{% hint style="info" %}
**Note on Responsibilities**: This field gives the object planner context into which tickets should be assigned to which users. Make sure to describe here the responsibilites of this particular user with the proper context for the AI to determine the best-fit tickets. For example: "Route any technical requests related to workspace settings to Brian, he manages all customer requests"
{% endhint %}

#### **Masquerade as users**

Admins can also masquerade as any user in order to help users configure their settings and make for smoother user-management across the organization.

When masquerading as a user, you are effectively acting as that user - so be diligent in what actions are taken and make sure to stop masquerading as user when your work is finished.


# Knowledge Base

Guide to training your team's assistant using the knowledge base

The Knowledge Base is the central repository of knowledge that informs nearly everything about how CustomerIQ performs. Everything you add to the knowledge base is used by CustomerIQ's AI to:

1. Draft emails
2. Answer questions
3. Create tickets

***

### What to Add to Your Knowledge Base

Think about how you onboard a new employee. Anything you would share about how the comapny works, domain knowledge needed to perform the job, or just general guidelines, are perfect additions to the knowledge base.

#### Product & Service Knowledge

* Insurance policy types, coverage details, carrier guidelines
* Plan comparisons and pricing structures
* Coverage limits, deductibles, and exclusions
* Product specifications and features
* Service offerings and deliverables

#### Email Templates and Writing Patterns

* Add email templates for the AI to reference in certain situations
* Common scenarios ie. "When someone asks Z, write X in Y way"

#### Common Customer Questions

* FAQ responses (pre-approved language)
* Policy explanation scripts
* Claims process walkthroughs
* Coverage scenario examples
* Eligibility requirements

#### Sales & Objection Handling

* Competitive differentiators
* Objection handling frameworks
* Pricing justification talking points
* Value propositions for different customer types
* Case studies and success stories

#### Company Processes

* Onboarding procedures
* Claims submission steps
* Policy change workflows
* Escalation protocols
* Service level agreements

#### Compliance & Regulatory

* Required disclosures
* Approved terminology
* Legal language for contracts
* State-specific requirements
* Do-not-say guidelines

#### Internal Resources

* Product sheets and one-pagers
* Rate cards and pricing guides
* Referral programs
* Partner information
* Contact information for specialists

***

### Getting Started

Navigate to: **Knowledge Base**

You'll see your (likely empty) knowledge base ready for training data.

***

### Adding Knowledge Snippets

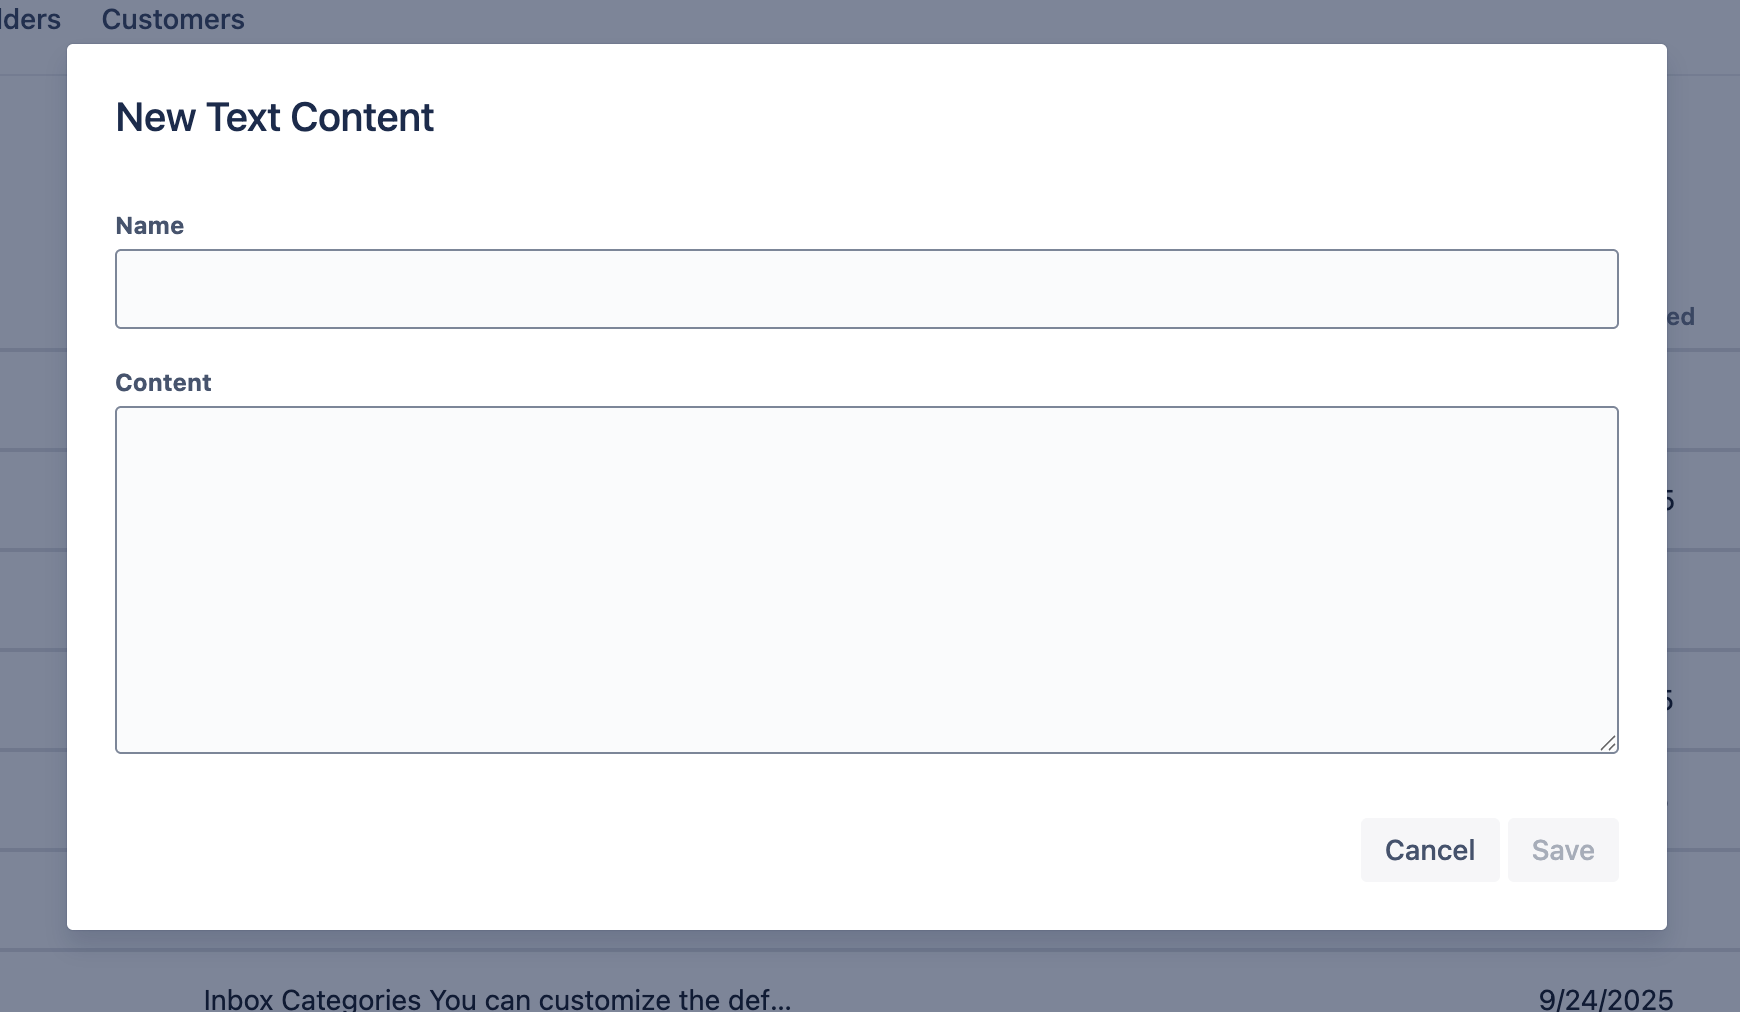
<figure><img src="/files/evtu7RT2NYRbMAOkwAlR" alt=""><figcaption></figcaption></figure>

**To add a snippet:**

1. Click "Add Content"
2. Choose Text Content
3. Give it a clear, descriptive name
4. Paste or write the information in the content field
5. Save

#### Writing Effective Titles

Your AI searches by title first, so clarity matters.

**Good titles:**

* "Homeowners Policy - Water Damage Coverage Explanation"
* "Objection Handling - Price Too High Response"
* "Auto Insurance - Multi-Car Discount Details"
* "Claims Process - First Notice of Loss Steps"

**Weak titles:**

* "Policy Info"
* "FAQ #7"
* "Insurance Stuff"
* "Important Document"

**Pro tip:** Include the topic category in the title so the AI knows when to reference it.

***

### Content Best Practices

#### Be Specific and Complete

Don't summarize—give the full information. Your assistant will pull exact language from snippets.

**Instead of:** "We have good hurricane coverage"\
**Write:** "Our homeowners policies include comprehensive hurricane coverage with up to $500K in dwelling protection, additional living expenses if your home becomes uninhabitable, and debris removal up to policy limits. Unlike some carriers, we don't have a separate hurricane deductible—your standard deductible applies."

#### Use Approved Language

If there's specific wording required for compliance or consistency, capture it exactly in your knowledge base.

#### Include Context

Help the AI know when to use this information.

**Example:**

```
Title: "Objection Handling - Competitor Offers Lower Rate"

When to use: Customer says a competitor quoted them less

Response framework:
"I appreciate you doing your research. Price is definitely important, but let's make sure we're comparing apples to apples. A few questions: 
- What coverage limits did they quote? 
- What's their deductible?
- Did they mention their claims satisfaction rating?

Our rates reflect our A+ AM Best rating and 98% claims satisfaction. We've also got a price-match guarantee—if you find truly comparable coverage for less, we'll match it. Can I review their quote with you to see what we're working with?"

Key points to emphasize:
- Our financial strength rating
- Claims satisfaction
- Price-match guarantee
```

#### Structure for Readability

Use bullet points, headings, and clear formatting so your AI (and humans reviewing snippets) can quickly scan.

***

### Finding What to Add

Not sure where to start? Use CustomerIQ to tell you what's needed.

#### Use CustomerIQ's Highlight Views

Navigate to **Highlights** and filter for:

* Questions customers ask frequently
* Topics where reps hesitate or give inconsistent answers
* Objections that come up repeatedly
* Product areas generating the most inquiries

**These are your highest-impact training opportunities.**

#### Ask Your Team

Your experienced reps know what questions they get asked daily. Have them spend 30 minutes brain-dumping common scenarios into snippets.

#### Review Recent Conversations

Look at emails and calls from the past week. What information did reps have to look up or wasn't readily available? Add it.

#### Mine Existing Resources

Do you have product sheets, training decks, or FAQ documents already? Don't recreate—copy the relevant sections into snippets.

***

### The Evolution from Assistant to Expert Employee

**Week 1: Basic Assistant (10-20 snippets)**

* Core product information
* Top 5-10 FAQs
* Basic objection responses Your assistants can handle routine questions with pre-approved language.

**Week 2-3: Knowledgeable Assistant (30-50 snippets)**

* Expanded FAQs
* Process walkthroughs
* More objection scenarios
* Product comparisons Your assistants rarely need to defer to humans for standard inquiries.

**Month 1+: Expert Employee (100+ snippets)**

* Comprehensive product knowledge
* Edge case scenarios
* State-specific information
* Competitive intelligence
* Deep objection handling Your assistants can handle complex, nuanced conversations with confidence.

**This is the transformation that makes CustomerIQ the most flexible revenue platform available.** You're not just configuring software—you're training virtual employees who know your business as well as your best reps.

***

### Best Practices

#### Start with High-Impact Information

Focus on the questions your team gets asked most often. These snippets will be referenced immediately and deliver instant value.

#### Add Continuously, Not All at Once

Don't try to document everything in one sitting. Add 5-10 snippets per day as you notice gaps.

#### Review and Update Regularly

Products change, policies update, competitors shift. Set a monthly reminder to refresh outdated snippets.

#### Get Team Input

Your reps are in the conversations daily. They know what information would be helpful. Make adding snippets a team effort.

#### Test Your Snippets

After adding knowledge, monitor how assistants use it. Are they pulling the right information at the right times? Refine as needed.

***

### Common Mistakes to Avoid

**Vague or incomplete information**\
"We offer competitive rates" doesn't help your assistant. "Our homeowners rates average 15% below market in Tennessee, with discounts up to 25% for bundling" does.

**Forgetting about discoverability**\
Even great information is useless if the AI can't find it. Use clear titles and comprehensive tags.

**Writing for humans only**\
Your snippets need to work for both AI search and human reading. Include key terms the AI might search for.

**Copying jargon-heavy documents verbatim**\
Translate internal documentation into language your assistants can use in customer conversations.

**Not leveraging existing conversations**\
You have a goldmine of data in your CustomerIQ Views. Use it to identify what knowledge is actually needed.

**Adding everything at once, then never updating**\
The knowledge base should be living and growing. Schedule regular additions and updates.

***

### What Happens Next

**Immediate impact:** As soon as you add a snippet, all your team's assistants can reference it when drafting emails or answering questions.

**You'll notice:**

* More consistent messaging across your team
* Faster response times (less searching for information)
* Better handling of complex customer questions
* Fewer escalations for routine inquiries

**Continuous improvement:** The first 1-2 weeks will involve the most additions as you build your foundation. After that, you'll add snippets as gaps emerge.

***

### Measuring Success

**Good indicators your knowledge base is working:**

* Assistants draft complete responses without needing human input
* Reps report feeling confident in AI-suggested answers
* Customer satisfaction improves (faster, more accurate responses)
* Team messaging becomes more consistent

**Signs you need more training data:**

* Assistants frequently say "I don't have enough information"
* Reps heavily edit AI drafts for accuracy
* Same questions get asked repeatedly but assistants can't answer them
* Inconsistent responses across team members


# User Setup Guide

The setup guide for configuring your personal AI settings

CustomerIQ exists to automate the tedious administrative work you experience after any call, meeting, or email. Every user has control over the day-to-day behavior of CustomerIQ

**What to expect after connecting CustomerIQ:**

* **Inbox:** Your emails are automatically categorized according to your workspace email categories
* **Draft replies:** You can opt to have CustomerIQ's agent, Quinn, draft replies to important emails in your tone and style
* **Draft follow-ups:** You can opt to have Quinn draft follow-ups to conversations that need a nudge
* **Meeting follow-ups**: Quinn will draft meeting follow-up emails after every meeting
* **CRM object planning approvals:** After conversations CustomerIQ will recommend which records to create, update, and assign. You will be notified to approve any actions that require approval.

***

#### The Setup Sequence

You'll want to get familiar with these two areas to make CustomerIQ fit your day-to-day workflow:

{% stepper %}
{% step %}
**My Assistant Settings**
{% endstep %}

{% step %}
**Notification Settings**
{% endstep %}

{% step %}
**Managing notifications with the inbox**

{% endstep %}
{% endstepper %}

Let's get started!


# My Assistant

CustomerIQ's AI assistant integrates with your calendar and email to capture meeting context, take notes, draft emails, and automate administrative tasks.

This guide will walk you through:

1. **Connecting Your Calendar and Email**
2. **Adjusting Settings** for email, meeting recordings, auto-join, and meeting recaps

***

### 1. Connect to Google or Outlook

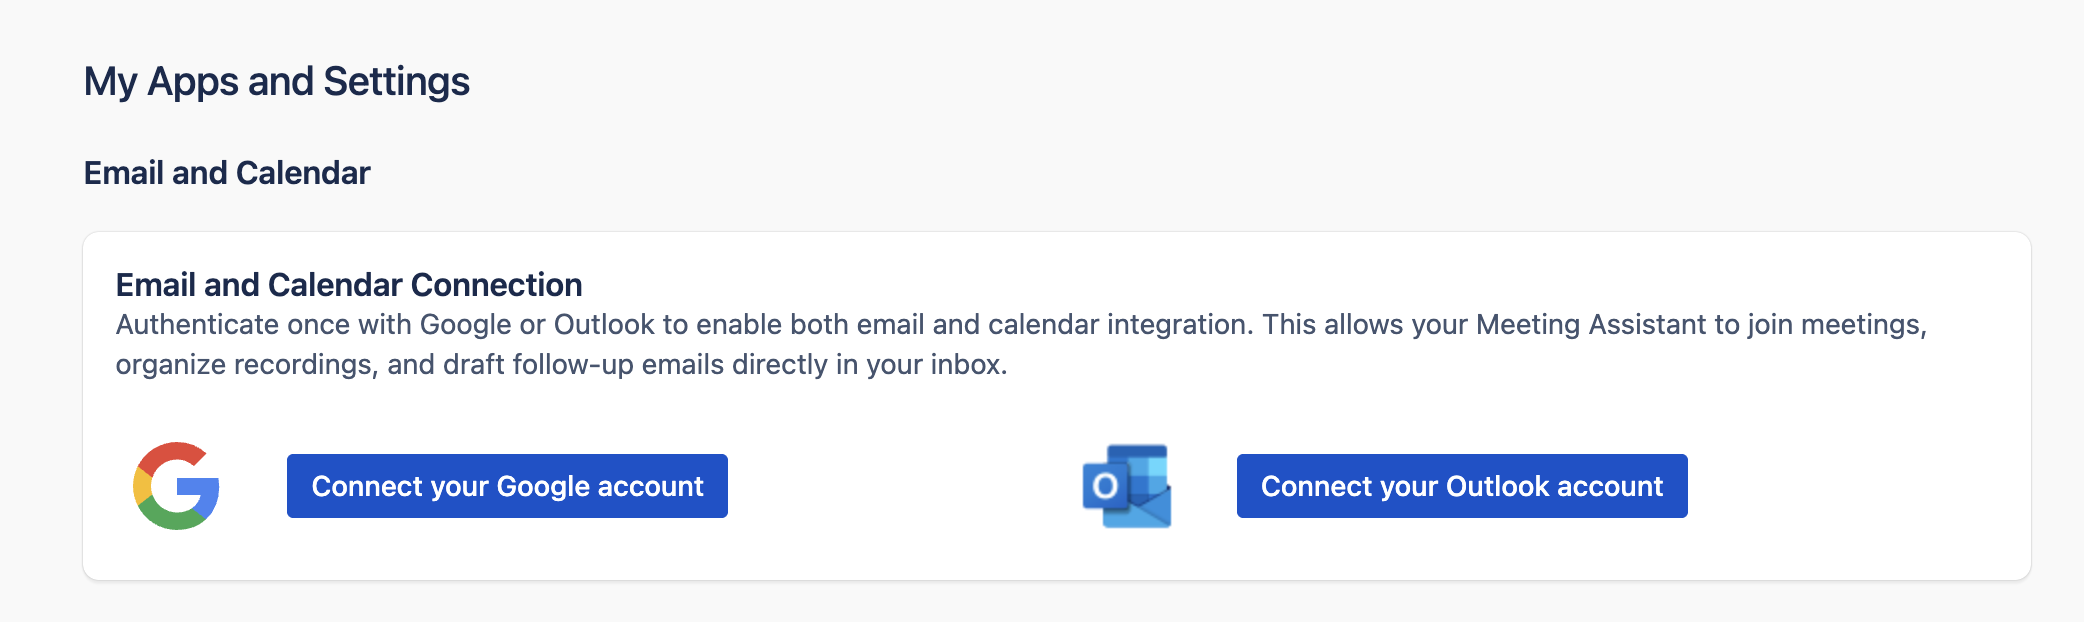
<figure><img src="/files/TImHtEHBsrGR6K5O1ZJe" alt=""><figcaption></figcaption></figure>

1. **Connect your calendar and email suite**
   1. From [Settings > My Apps](https://app.getcustomeriq.com/settings/my-apps) connect either your Google or Outlook account
2. **From your inbox, enable Conversation View** \
   Enabling Conversation View organizes your emails by threading messages and drafts CustomerIQ adds together, making it easier to follow discussions and quickly send drafts.

{% hint style="info" %}
**Important: Enable Conversation View**

For the email assistant to work properly, please set your inbox to **Conversation View**.

<details>

<summary>How to enable in Gmail</summary>

1. **On a Computer:**

   1. Open Gmail
   2. At the top right, click the **Settings** gear icon and then select **See all settings**.
   3. In the **General** tab, scroll down to the **Conversation View** section.​
   4. Select **Conversation view on.**
   5. Scroll to the bottom and click **Save Changes**.​

   **On an Android Device:**

   1. Open the Gmail app.​
   2. Tap the **Menu** icon (three horizontal lines) in the top left corner, then select **Settings**.​
   3. Tap **General settings.**
   4. Check the box for **Conversation view** to enable it.​

   **On an iOS Device:**

   1. Open the Gmail app.
   2. Tap the **Menu** icon (three horizontal lines) in the top left corner, then select **Settings**.​
   3. Tap your account.​
   4. Toggle **Conversation view** on.​

</details>

<details>

<summary>How to enable in Outlook</summary>

**For Classic Outlook:**

1. Open Outlook and go to the **View** tab on the ribbon.​
2. Check the box labeled **Show as Conversations**.​
3. Choose either **All mailboxes** or **This folder** to apply the setting accordingly.

**For New Outlook:**

1. Click on the **Settings** icon (gear-shaped) at the top of the page.​
2. Select **Mail** and then choose **Layout**.
3. Under **Message organization**, select **Show email grouped by conversation**.

**For Outlook on the Web or Outlook.com:**

1. Click on the **Settings** icon at the top of the page.​
2. Select **Mail**, then choose **Layout**
3. Under **Message organization**, choose **Show email grouped by conversation**

</details>
{% endhint %}

***

### **2. Configure your meeting settings**

Determine how the assistant should help during meetings

1. From [**Settings > My Apps**](https://app.getcustomeriq.com/settings/my-apps#), scroll down to the Meeting section
2. **Set your auto join settings:** We recommend all users start with "All meetings with web conference link" to start so you capture as much context for the assistant as possible
3. **Set your default folders:** This determines where meeting transcrips and voice notes should go by default for analysis.  We recommend sending meeting transcripts to a folder associated with your team. \ <mark style="background-color:blue;">**Reminder**</mark><mark style="background-color:blue;">: any meeting the AI determines to be "private" will be automatically routed to your private folder, even if your default folder is set to a workspace folder.</mark> [<mark style="background-color:blue;">Learn more about private meeting routing</mark>](/product-guides/folders/private-meeting-routing)
4. **Enable email behavior**: the assistant has the capabilities to categorize emails, draft replies, and draft meeting-follow ups - all directly in your inbox. You can toggle these settings on and off here.

***

### 3. Configure your email settings

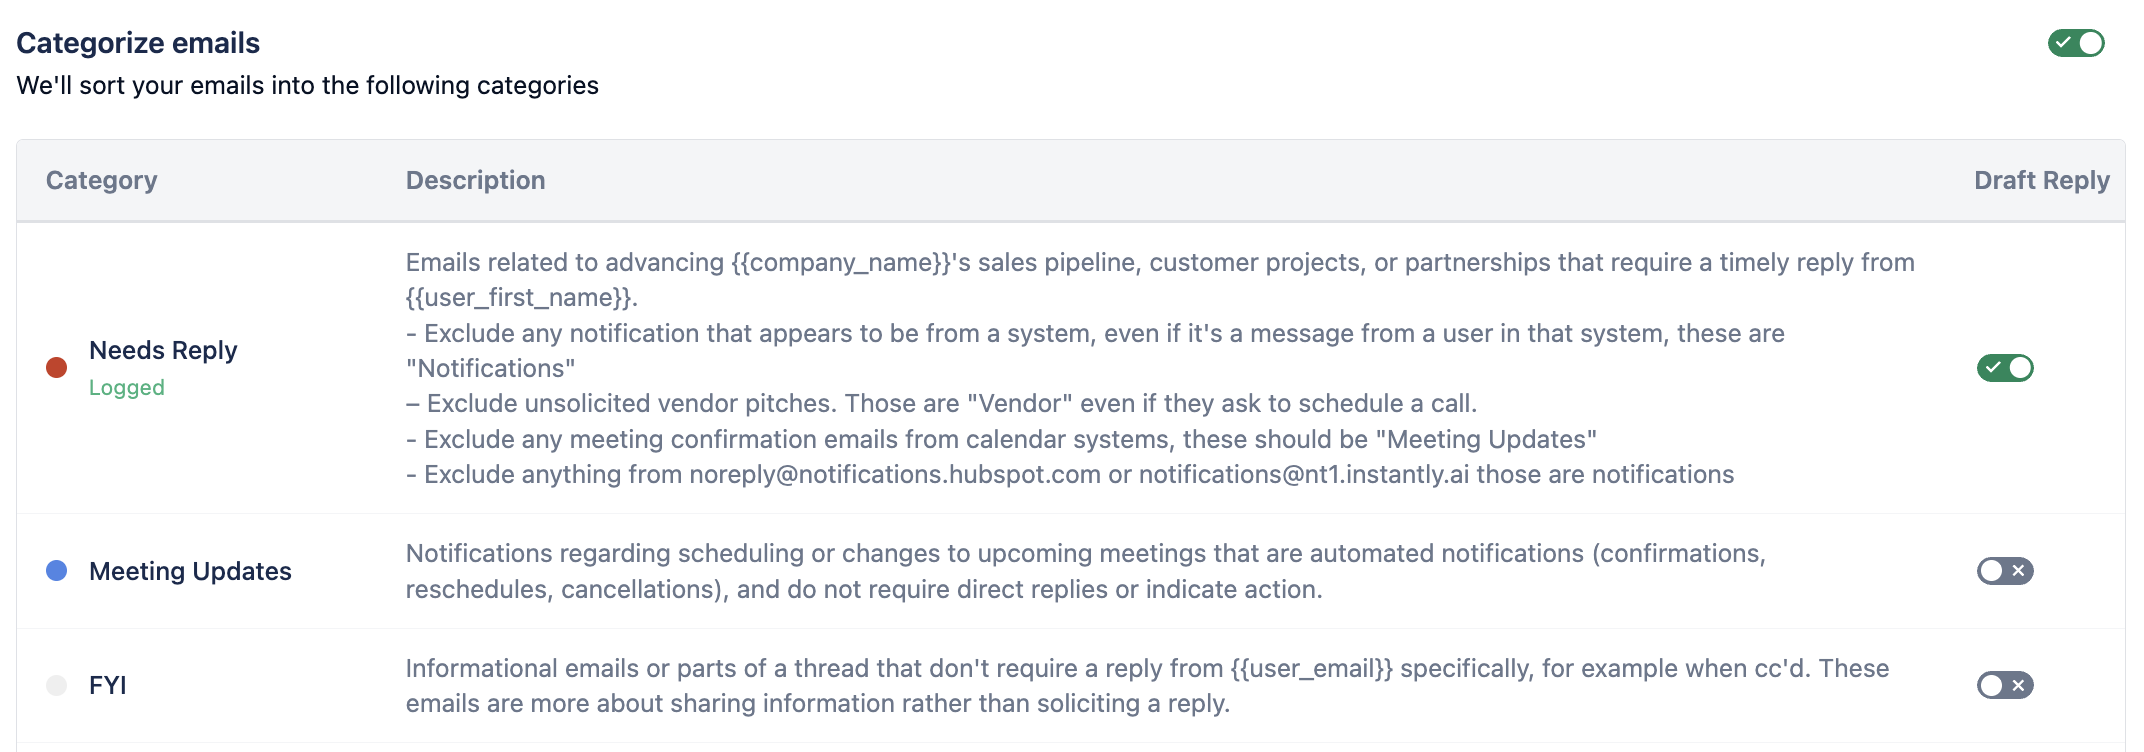
<figure><img src="/files/B2bJCm7lix4O9T1Qd2xk" alt=""><figcaption></figcaption></figure>

Control which types of emails get AI-drafted replies based on the categories your admin has set up:

**For each category, you can choose:**

* **Draft Reply ON**: AI will automatically create response suggestions
* **No Drafting**: AI will categorize the email but won't draft responses

**How to configure:**

1. Toggle drafting on/off for each category
2. Changes apply to new incoming emails immediately

***

### 4. What to expect

<figure><img src="/files/SryaN9Q6vFbTgVwiK21L" alt=""><figcaption></figcaption></figure>

#### First Few Days

* The AI learns your writing style, so early drafts may need more editing
* Category accuracy improves as it processes your emails
* You might need to adjust which categories should draft replies

#### Daily Use

* Emails categorized within 1-2 minutes
* Draft replies ready in 2-5 minutes (when enabled)
* Simple emails need minimal editing; complex ones need more review

#### Performance Over Time

* Categorization accuracy: 85-95% for well-defined categories
* AI gets better at matching your tone with use
* High-volume categories work more consistently than rare ones

#### Getting Better Results

**If emails are frequently miscategorized:** Ask your admin to improve category descriptions with more specific instructions and examples in Settings > Inbox Categories.

**If drafts don't match your style:** Keep editing them - the AI learns from your changes.

#### Best Practice

Start with auto-drafting enabled for only your most routine email types, then expand as the system learns your preferences.

***

### 5. Test your assistant

1. **Check your workspace** [**Home Page**](https://app.getcustomeriq.com/home)**:**
   * Your upcoming meetings and the Meeting Assistant status should now be visible on your CustomerIQ home page.
   * This confirms that your assistant is live and ready to join meetings.
2. **Send yourself a test email**
   1. From a different email address (not the one connected to CustomerIQ) send yourself an email similar to one you'd get from a prospect or customer where you would expect to reply. For example\
      **Subject:**\
      Quick question about CustomerIQ\
      **Body:**\
      Hi \[Your Name],\
      I’m testing the AI assistant and wanted to see how it handles this email. Can you confirm if everything is working as expected on your end? Also, do you have time next week for a quick sync?\
      Let me know.\
      Thanks,\
      \[Your Name]
3. **Test meeting follow up emails**
   * Start a meeting with your chosen provider (Zoom, Google Meet, MS Teams)
   * Copy the link to invite a participant to the meeting
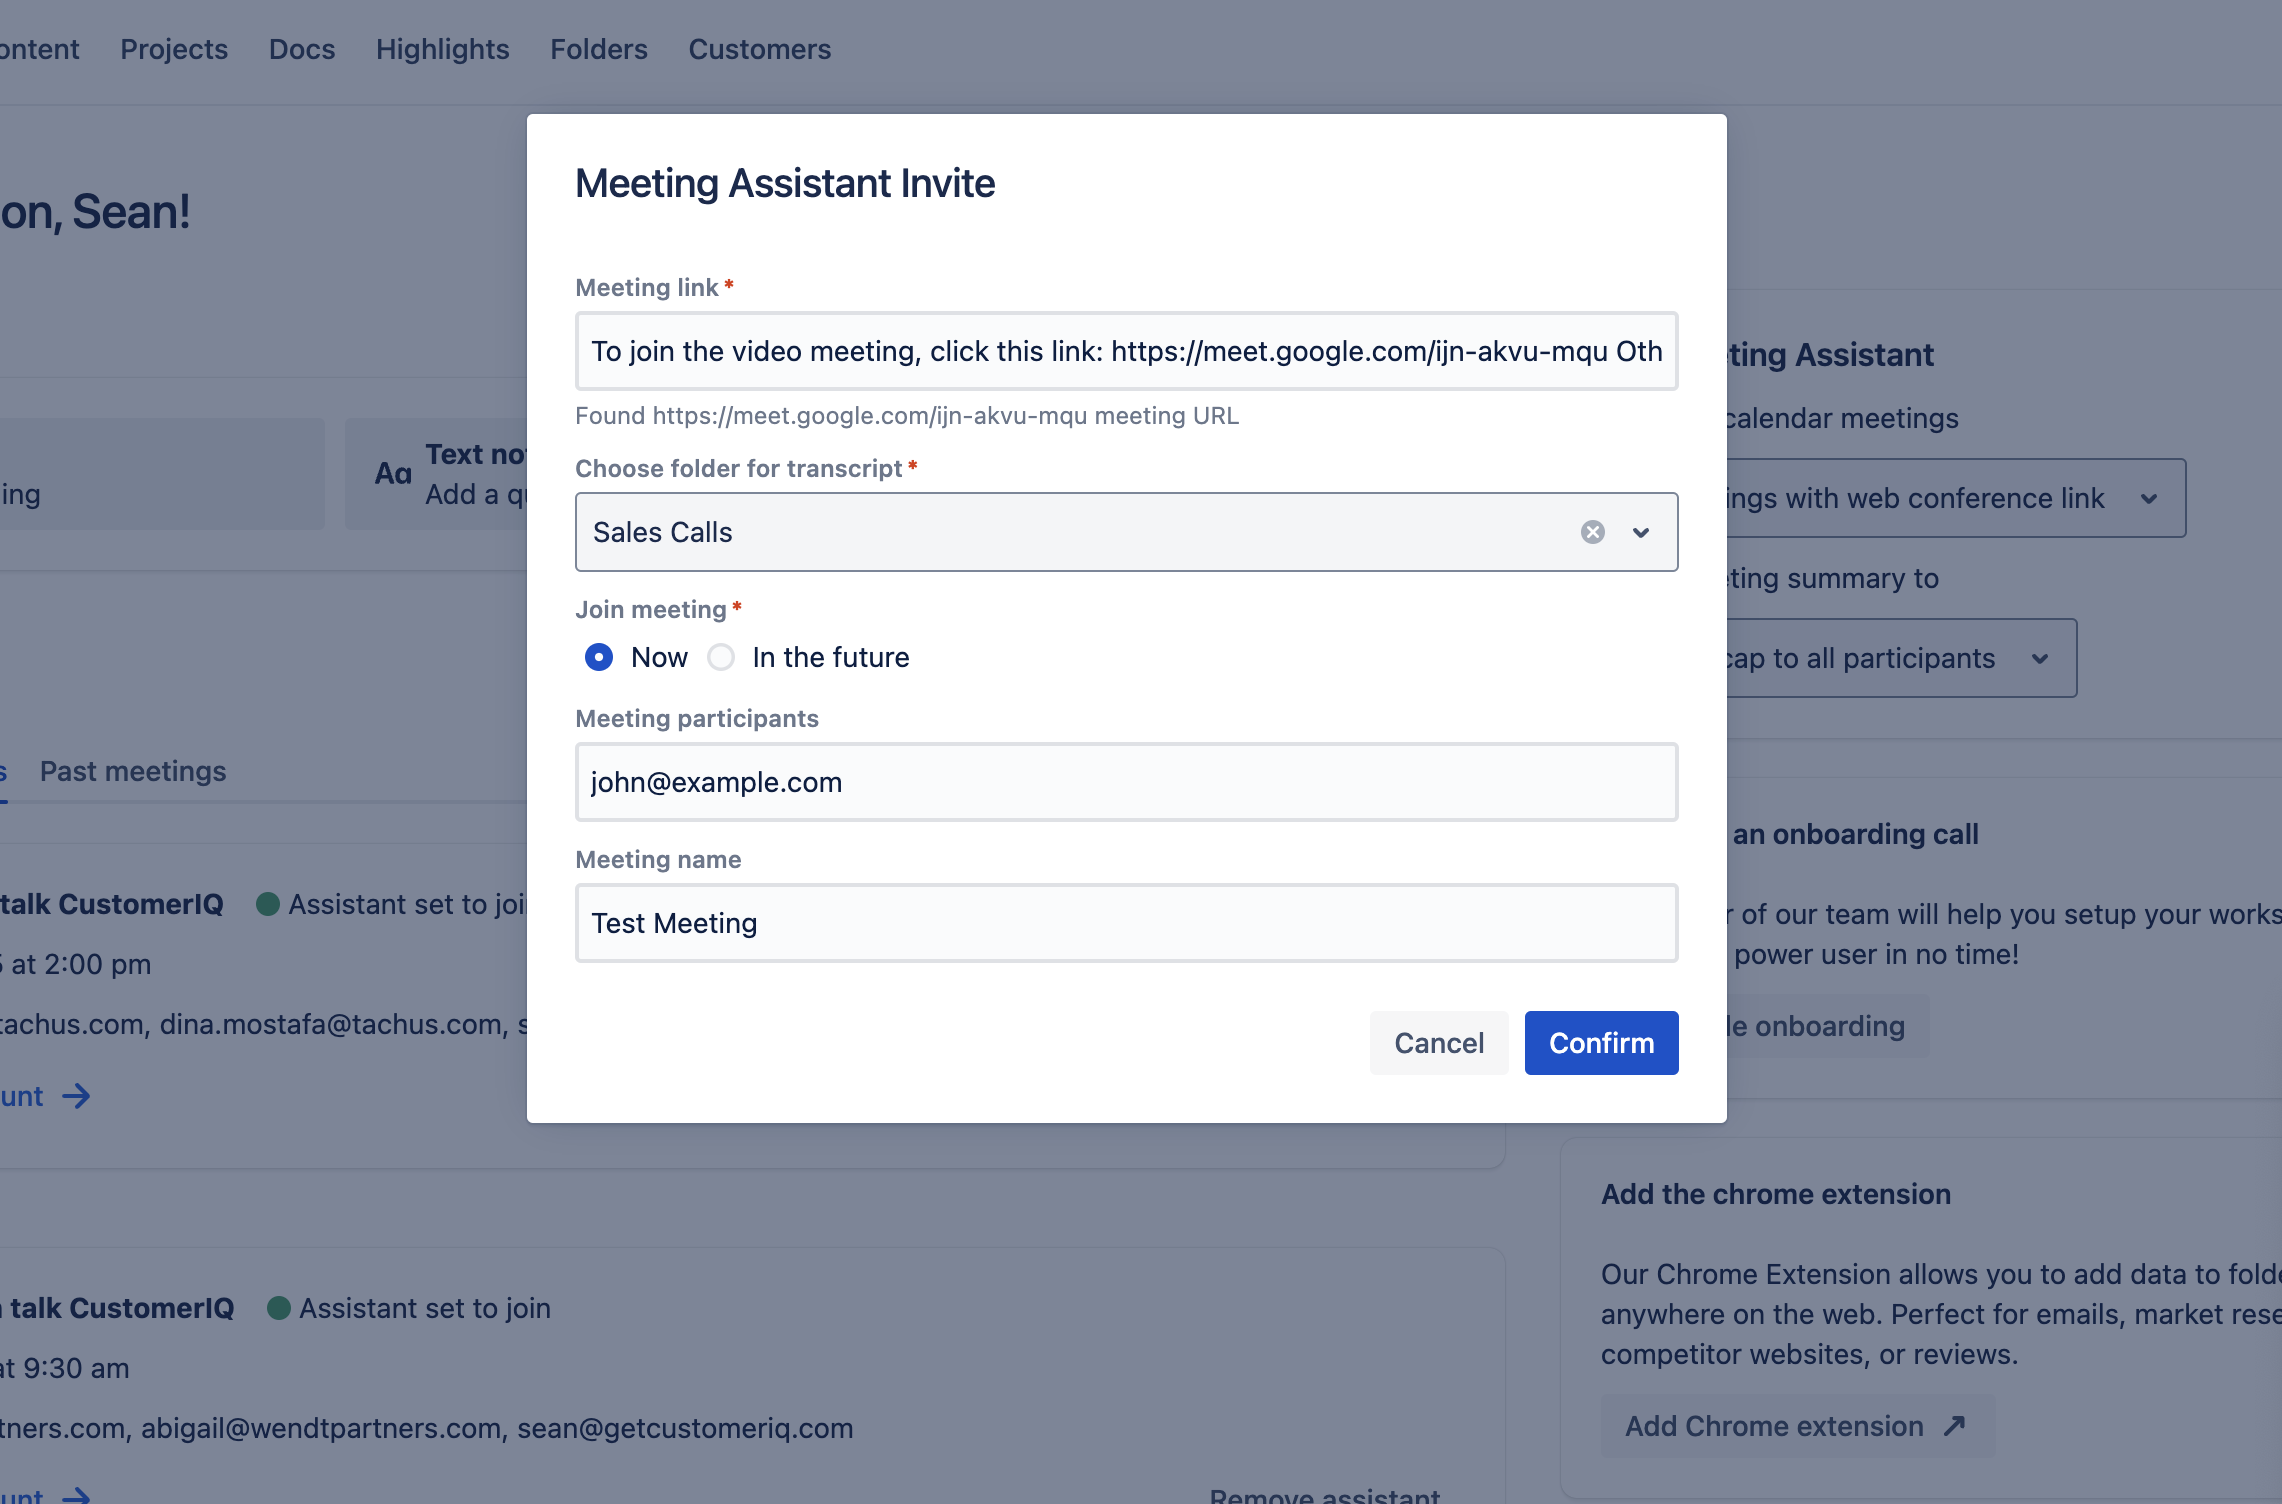
   * From your CustomerIQ home page, select "Join my meeting"
   * Paste in the link to the meeting
   * Add a participant (this can be any email - this is the email for which the agent will draft a follow up)
   * Speak a few words in the meeting, then end the meeting.
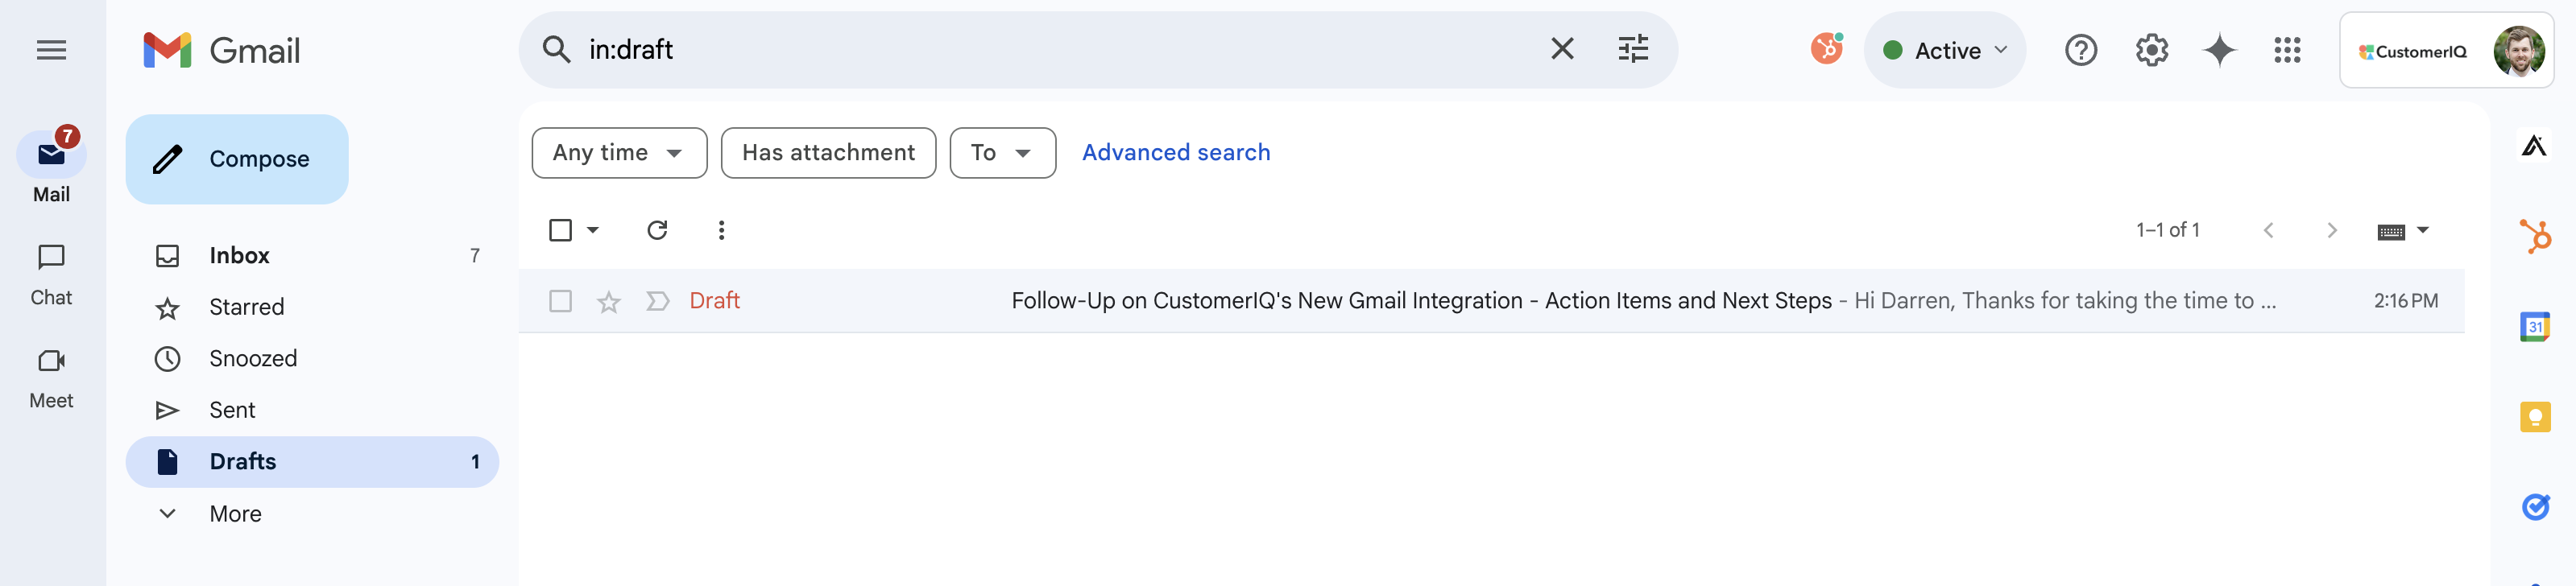
   * Check your inbox for a follow up email and summary!

<figure><img src="/files/KsVL4ZEnb3O07Fd0bdvz" alt=""><figcaption></figcaption></figure>


# Notification Settings

Manage how CustomerIQ sends you notifications

CustomerIQ primarily notifies you when:

1. There is an action that needs approval
2. You have subscribed to a report or object that has changed

Our primary notification channels are email and Slack

### Configure your notification settings

1. Go to Settings > Notifications
2. Select which channels you want notifications for
3. Select if you'd like immediate, batched, or daily notifications

Notification frequency definitions

* **Immediate**: get notified of proposed CRM updates as they are created by the object planne
* **Batched**: we will batch all proposed updates and deliver them to you at 9am, 1pm, and 4pm
* **Daily**: we will batch all proposed updates and deliver them you daily at 9am

### Configure notifications in Slack

With Slack configured, you can adjust your notifications to arrive via Slack (recommended)

1. Go to [Settings > Notifications](https://app.getcustomeriq.com/settings/notifications)
2. Select configure
3. Authenticate with Slack

Next time CustomerIQ goes to notify you, you'll see it in a personal DM from the CustomerIQ Slack bot.&#x20;

{% hint style="info" %}
**Note**: Only a Slack workspace admin can set up the initial connection between CustomerIQ and Slack. If you are not an admin, Slack will prompt you to share our application with the admin. After this is complete, you can configure Slack for your notifications.
{% endhint %}


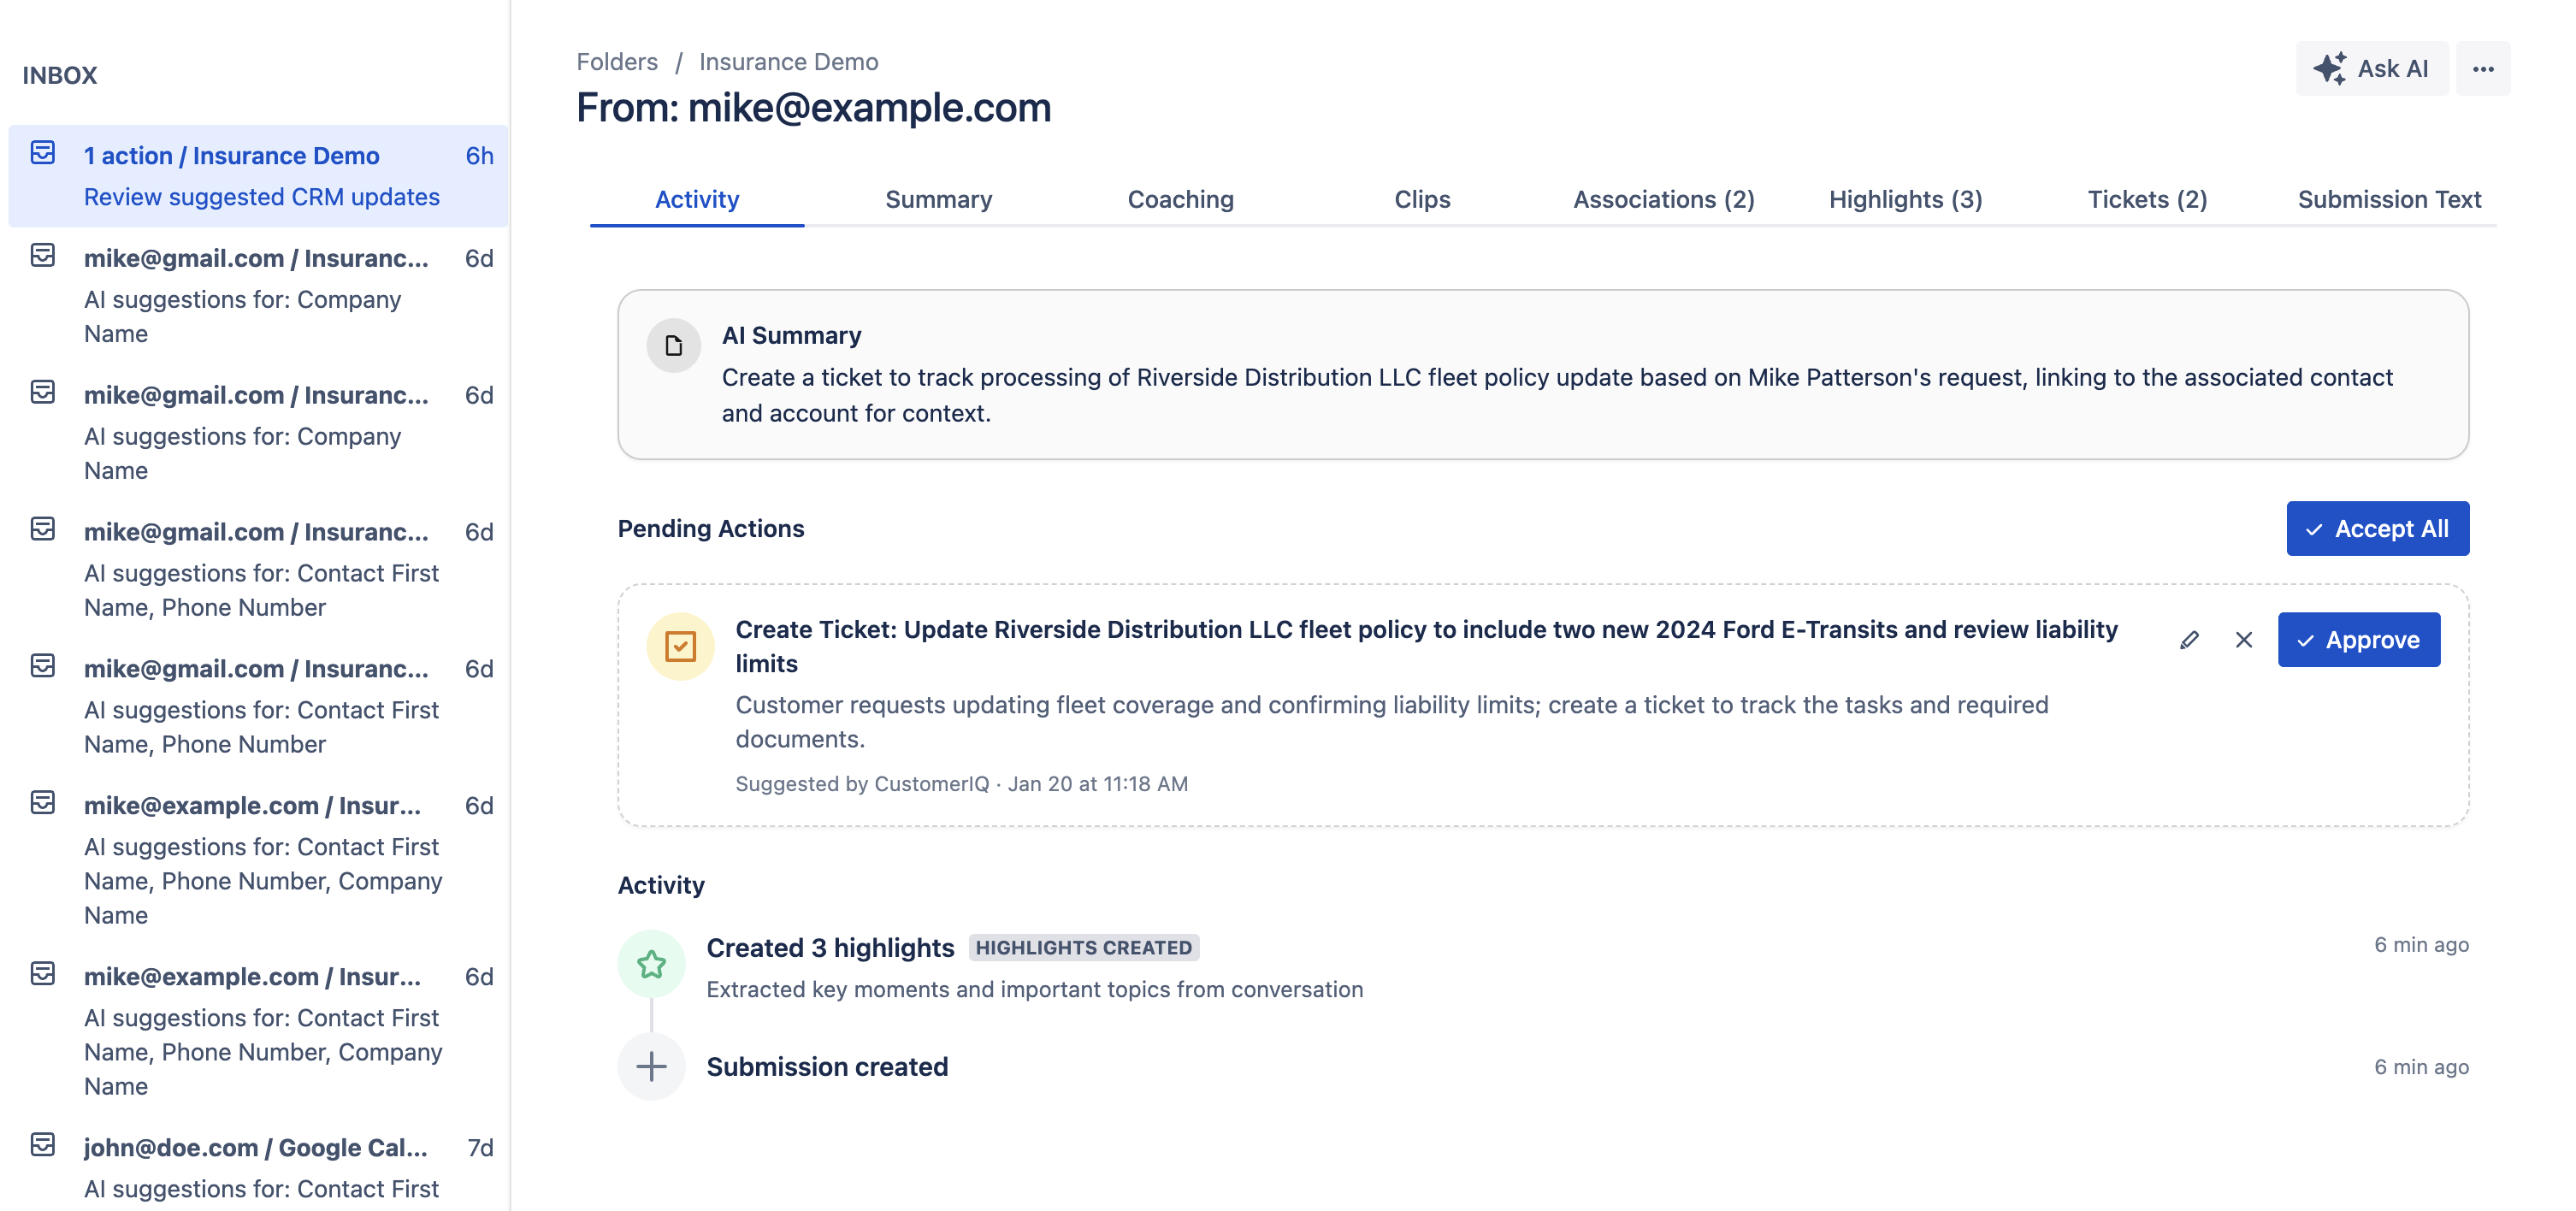
# Manage Notifications with the Inbox

The inbox is where you can quickly review all proposed actions by the CustomerIQ object planner

<figure><img src="/files/PrDyncB15em4KMtPoZFp" alt=""><figcaption></figcaption></figure>

Whenever CustomerIQ needs you to approve changes to records in CustomerIQ and your CRM, you get a notification.

Notifications and approvals can be quickly managed in the notification inbox.

Whether you get [notifications](/start-guide/user-setup-guide/notification-settings) immediately, batched, or daily, you can tab through and accept, edit, or reject changes periodically and they will be reflected in your system of record.


# Meeting Recording

How to set up and troubleshoot meeting recording

CustomerIQ's Agent supports most of the top meeting platforms, but each of the platforms has their own nuances to be aware of.

Certain platforms (like Zoom) require some setup to start configuring your user's bots.

### Platform Overview

| Platform        | Setup Required? | Setup Guide                                                                            |
| --------------- | --------------- | -------------------------------------------------------------------------------------- |
| Zoom            | Yes             | [Getting Started: Zoom Bots](/product-guides/meeting-recording/zoom-oauth-integration) |
| Google Meet     | No              |                                                                                        |
| Microsoft Teams | No              |                                                                                        |


# Zoom Admin Settings to Avoid Common Zoom Recording Errors

Common situations in Zoom that prevent a bot from recording.

## Host was not present

Sometimes a bot joins a meeting but is unable to record because it never asked for permission. In this case, this means the host was not present and thus was unable to grant recording permissions to the bot.

You'll be able to identify this scenario because the bot will be in the meeting as a participant but not have the recording symbol next to its name.

In order for a bot to get recording permissions when the host is not present in the meeting, the creator of the meeting must be authenticated via the [Zoom OAuth Integration](/product-guides/meeting-recording/zoom-oauth-integration).

> ### 📘But I am the host and am present, why are we still not getting the confirmation message?
>
> If the end user that created the meeting is not showing up as the host, one of two things is going on:
>
> * You are not signed into the Zoom account where the meeting was created from
> * You are not signed into your Zoom client at all

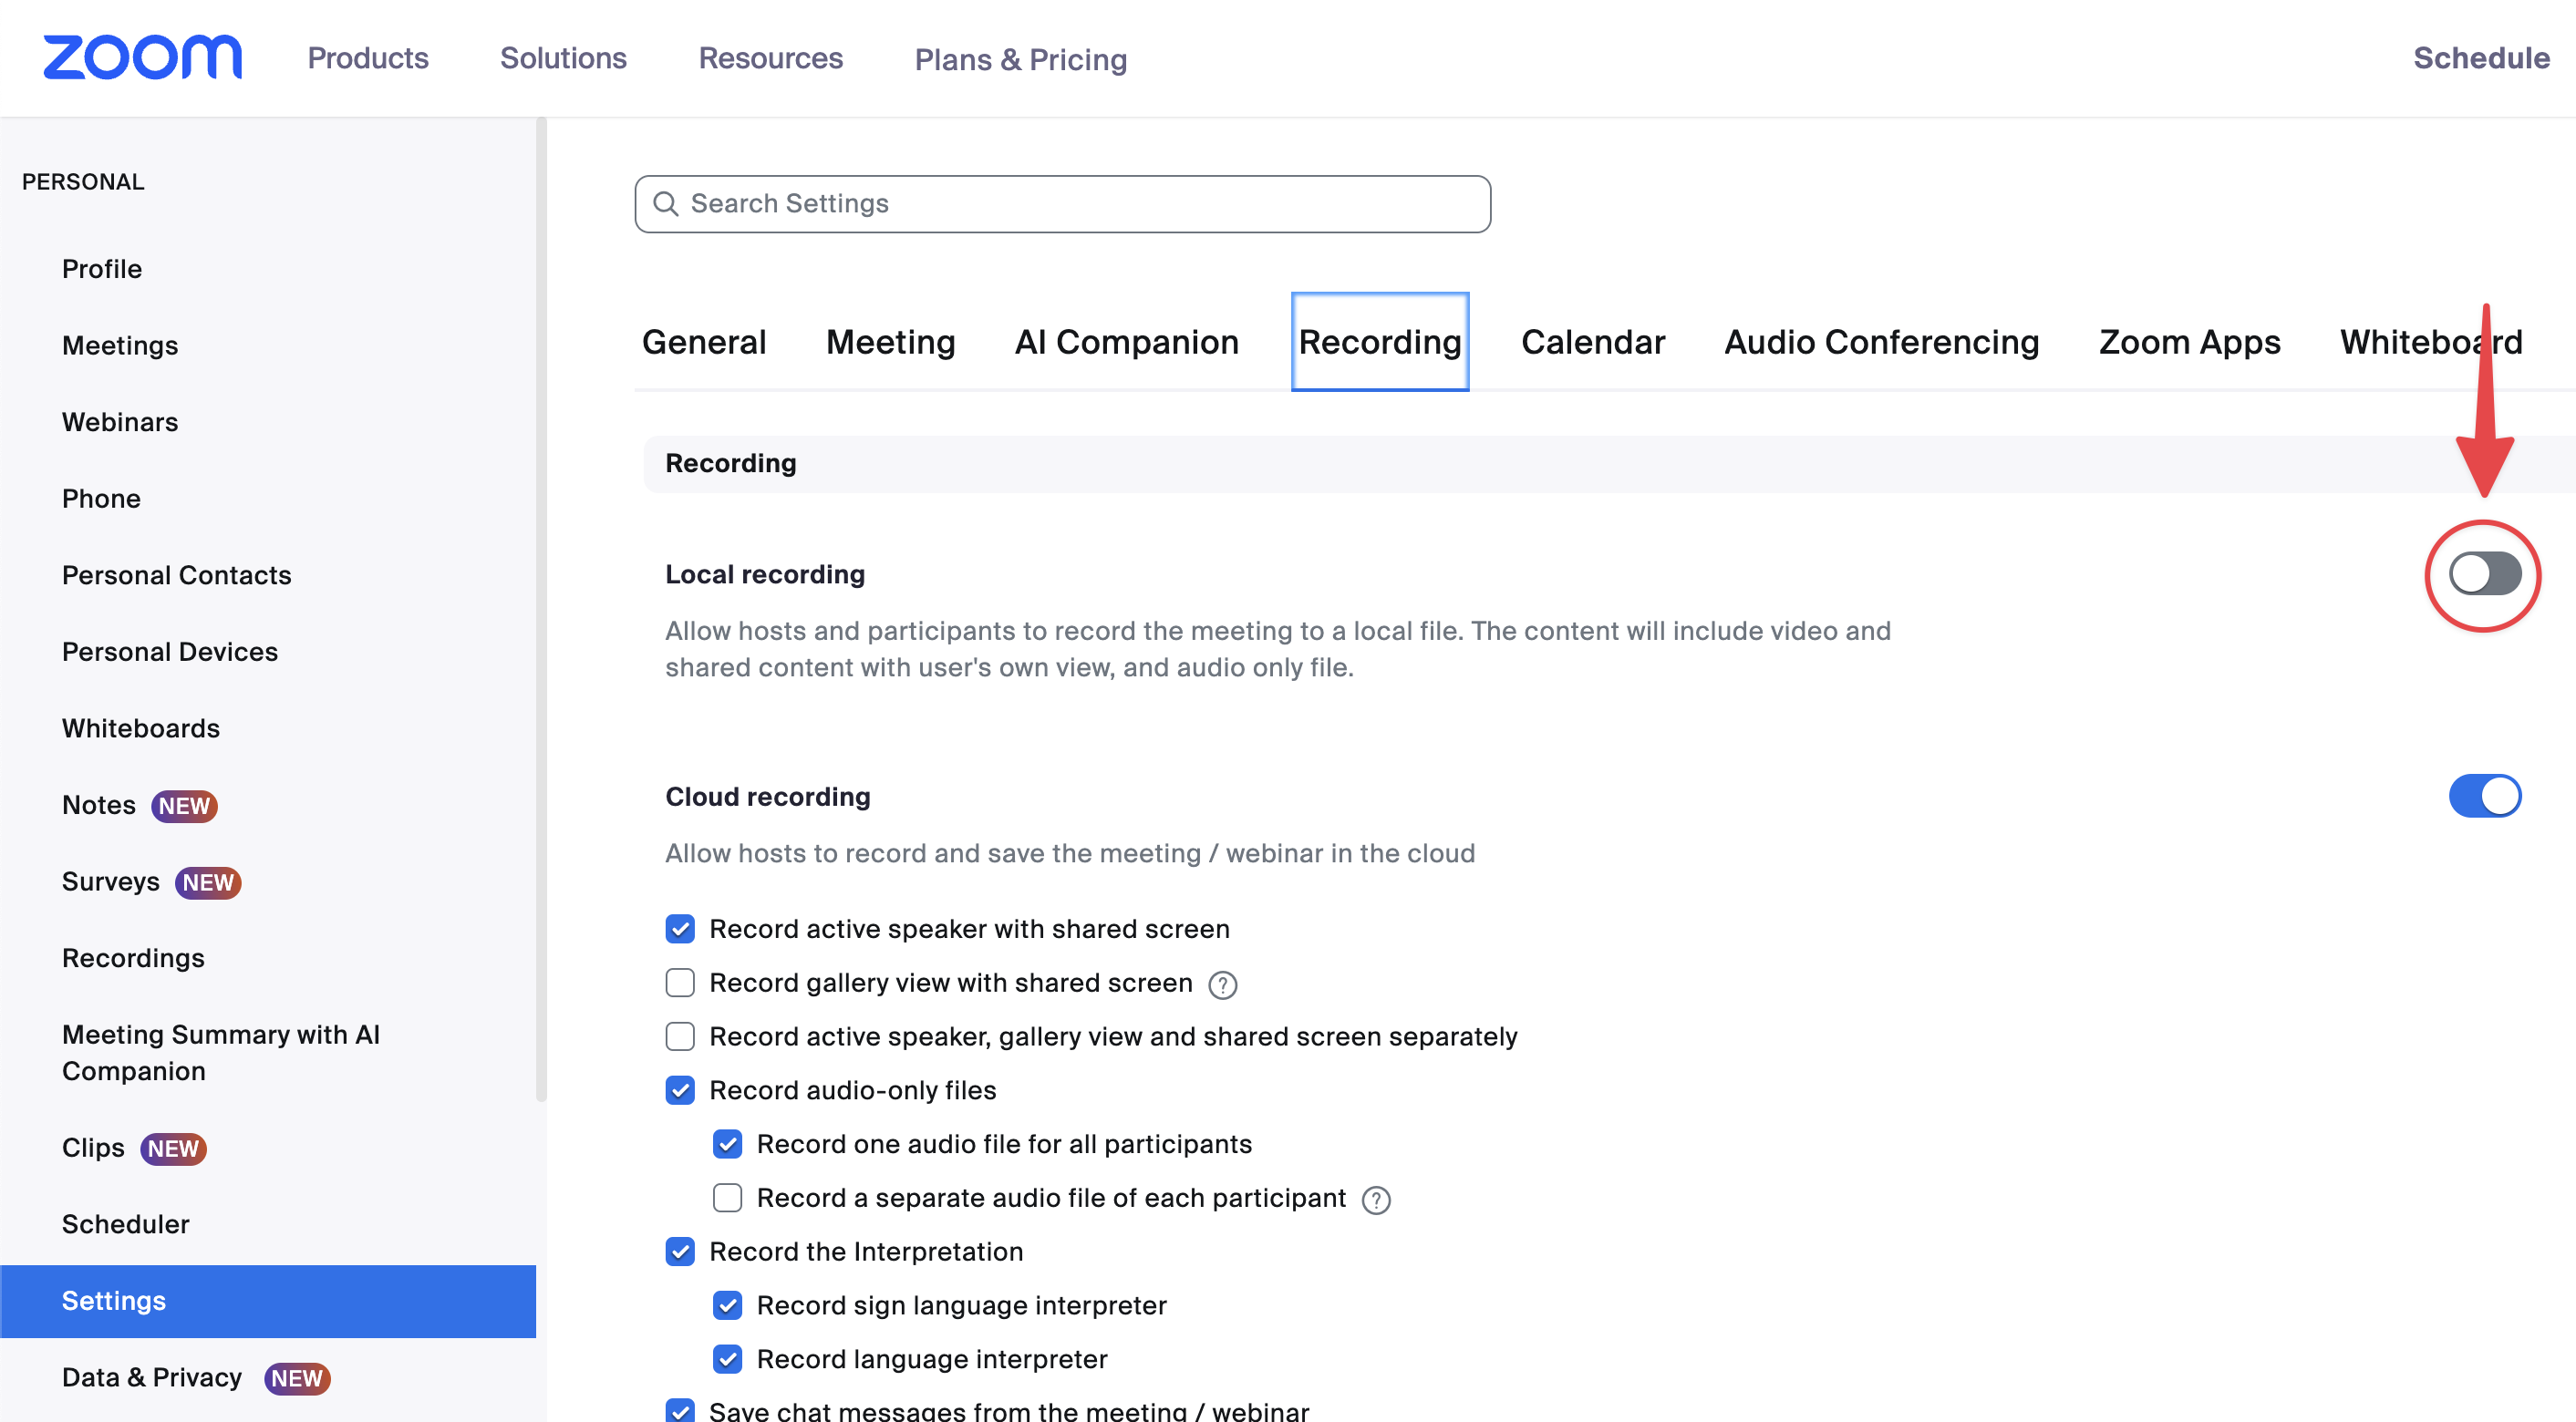
## The host's local recording setting is disabled

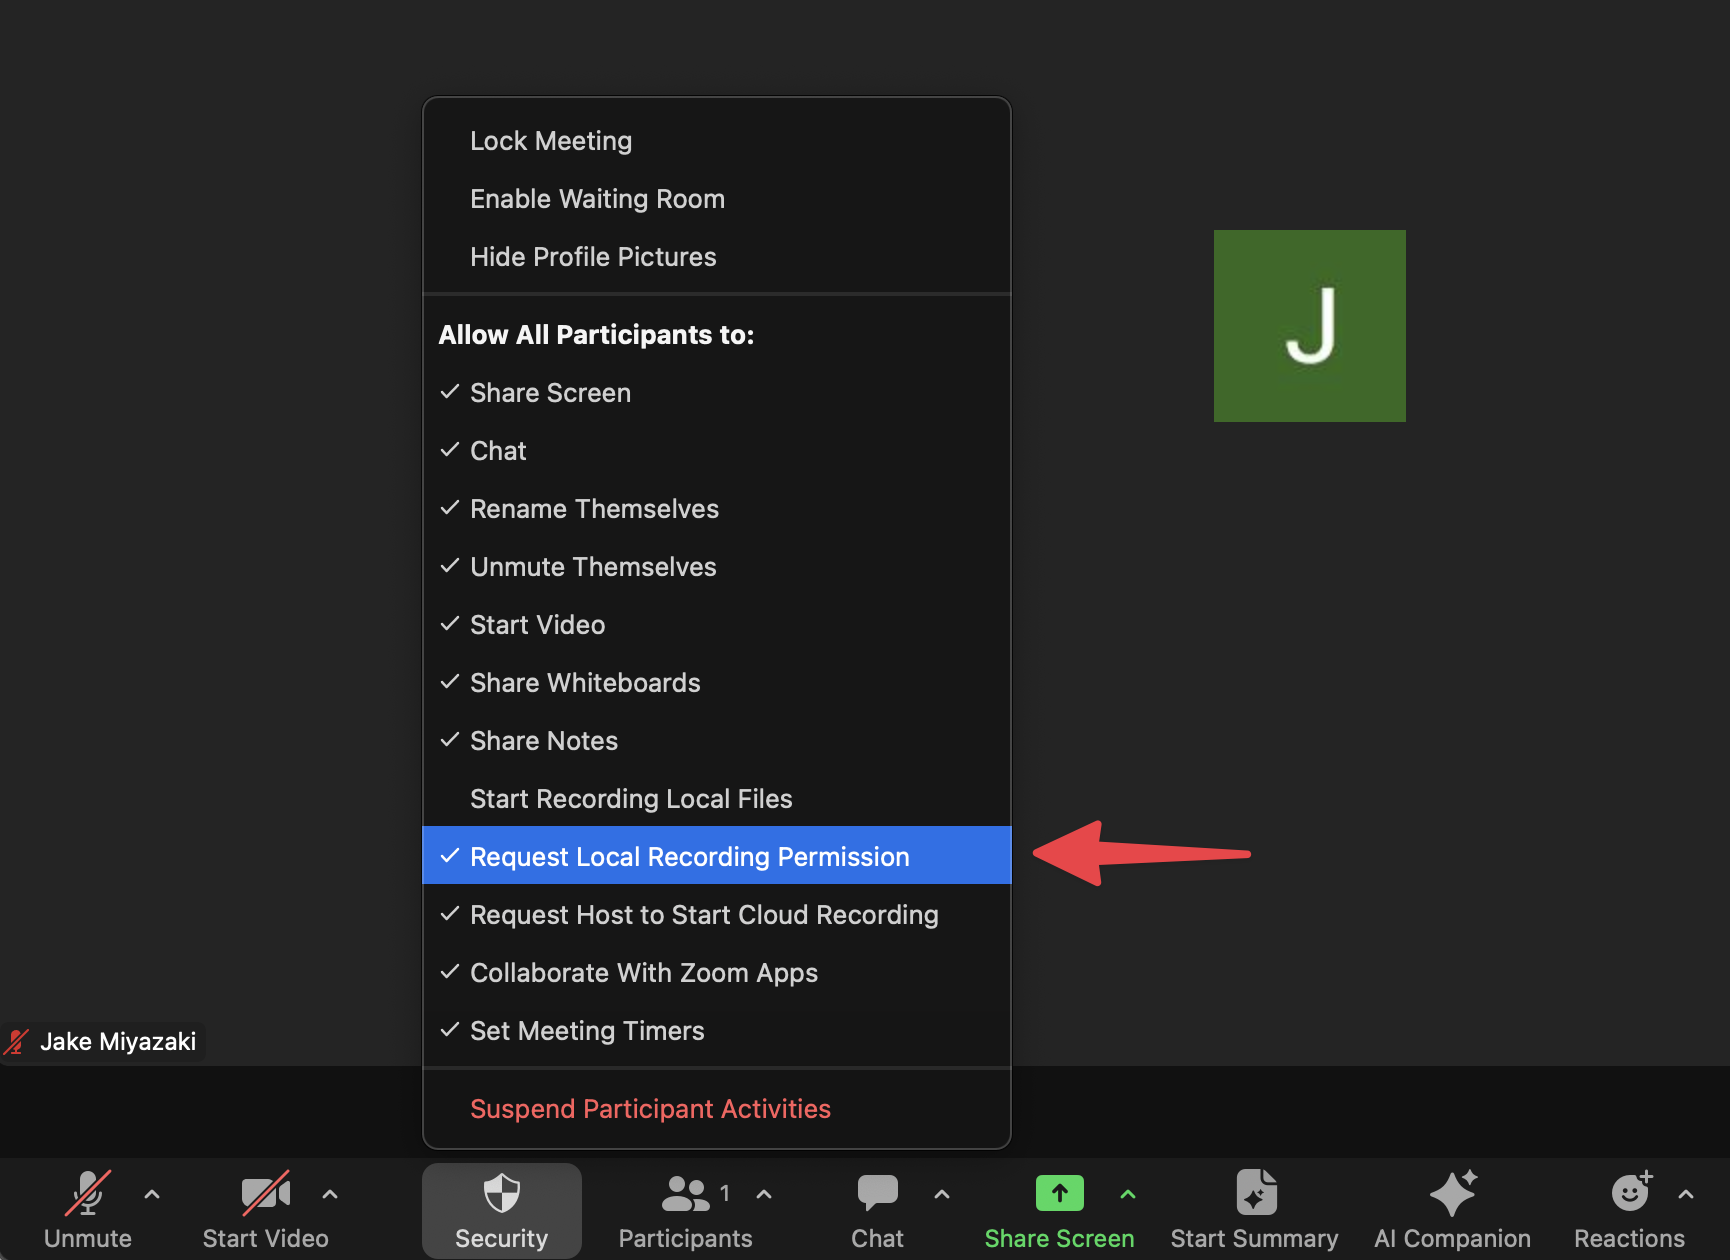
If the host's global local recording setting is disabled, the bot will fail to record.

In this case, the bot will have a Recording Permission Denied event with a `zoom_local_recording_disabled.`

**How to fix:** Host should enable their global user-level local recording setting in their Zoom user settings:

<figure><img src="https://files.readme.io/6544b07-zoom_local_recording_disabled.png" alt=""><figcaption></figcaption></figure>

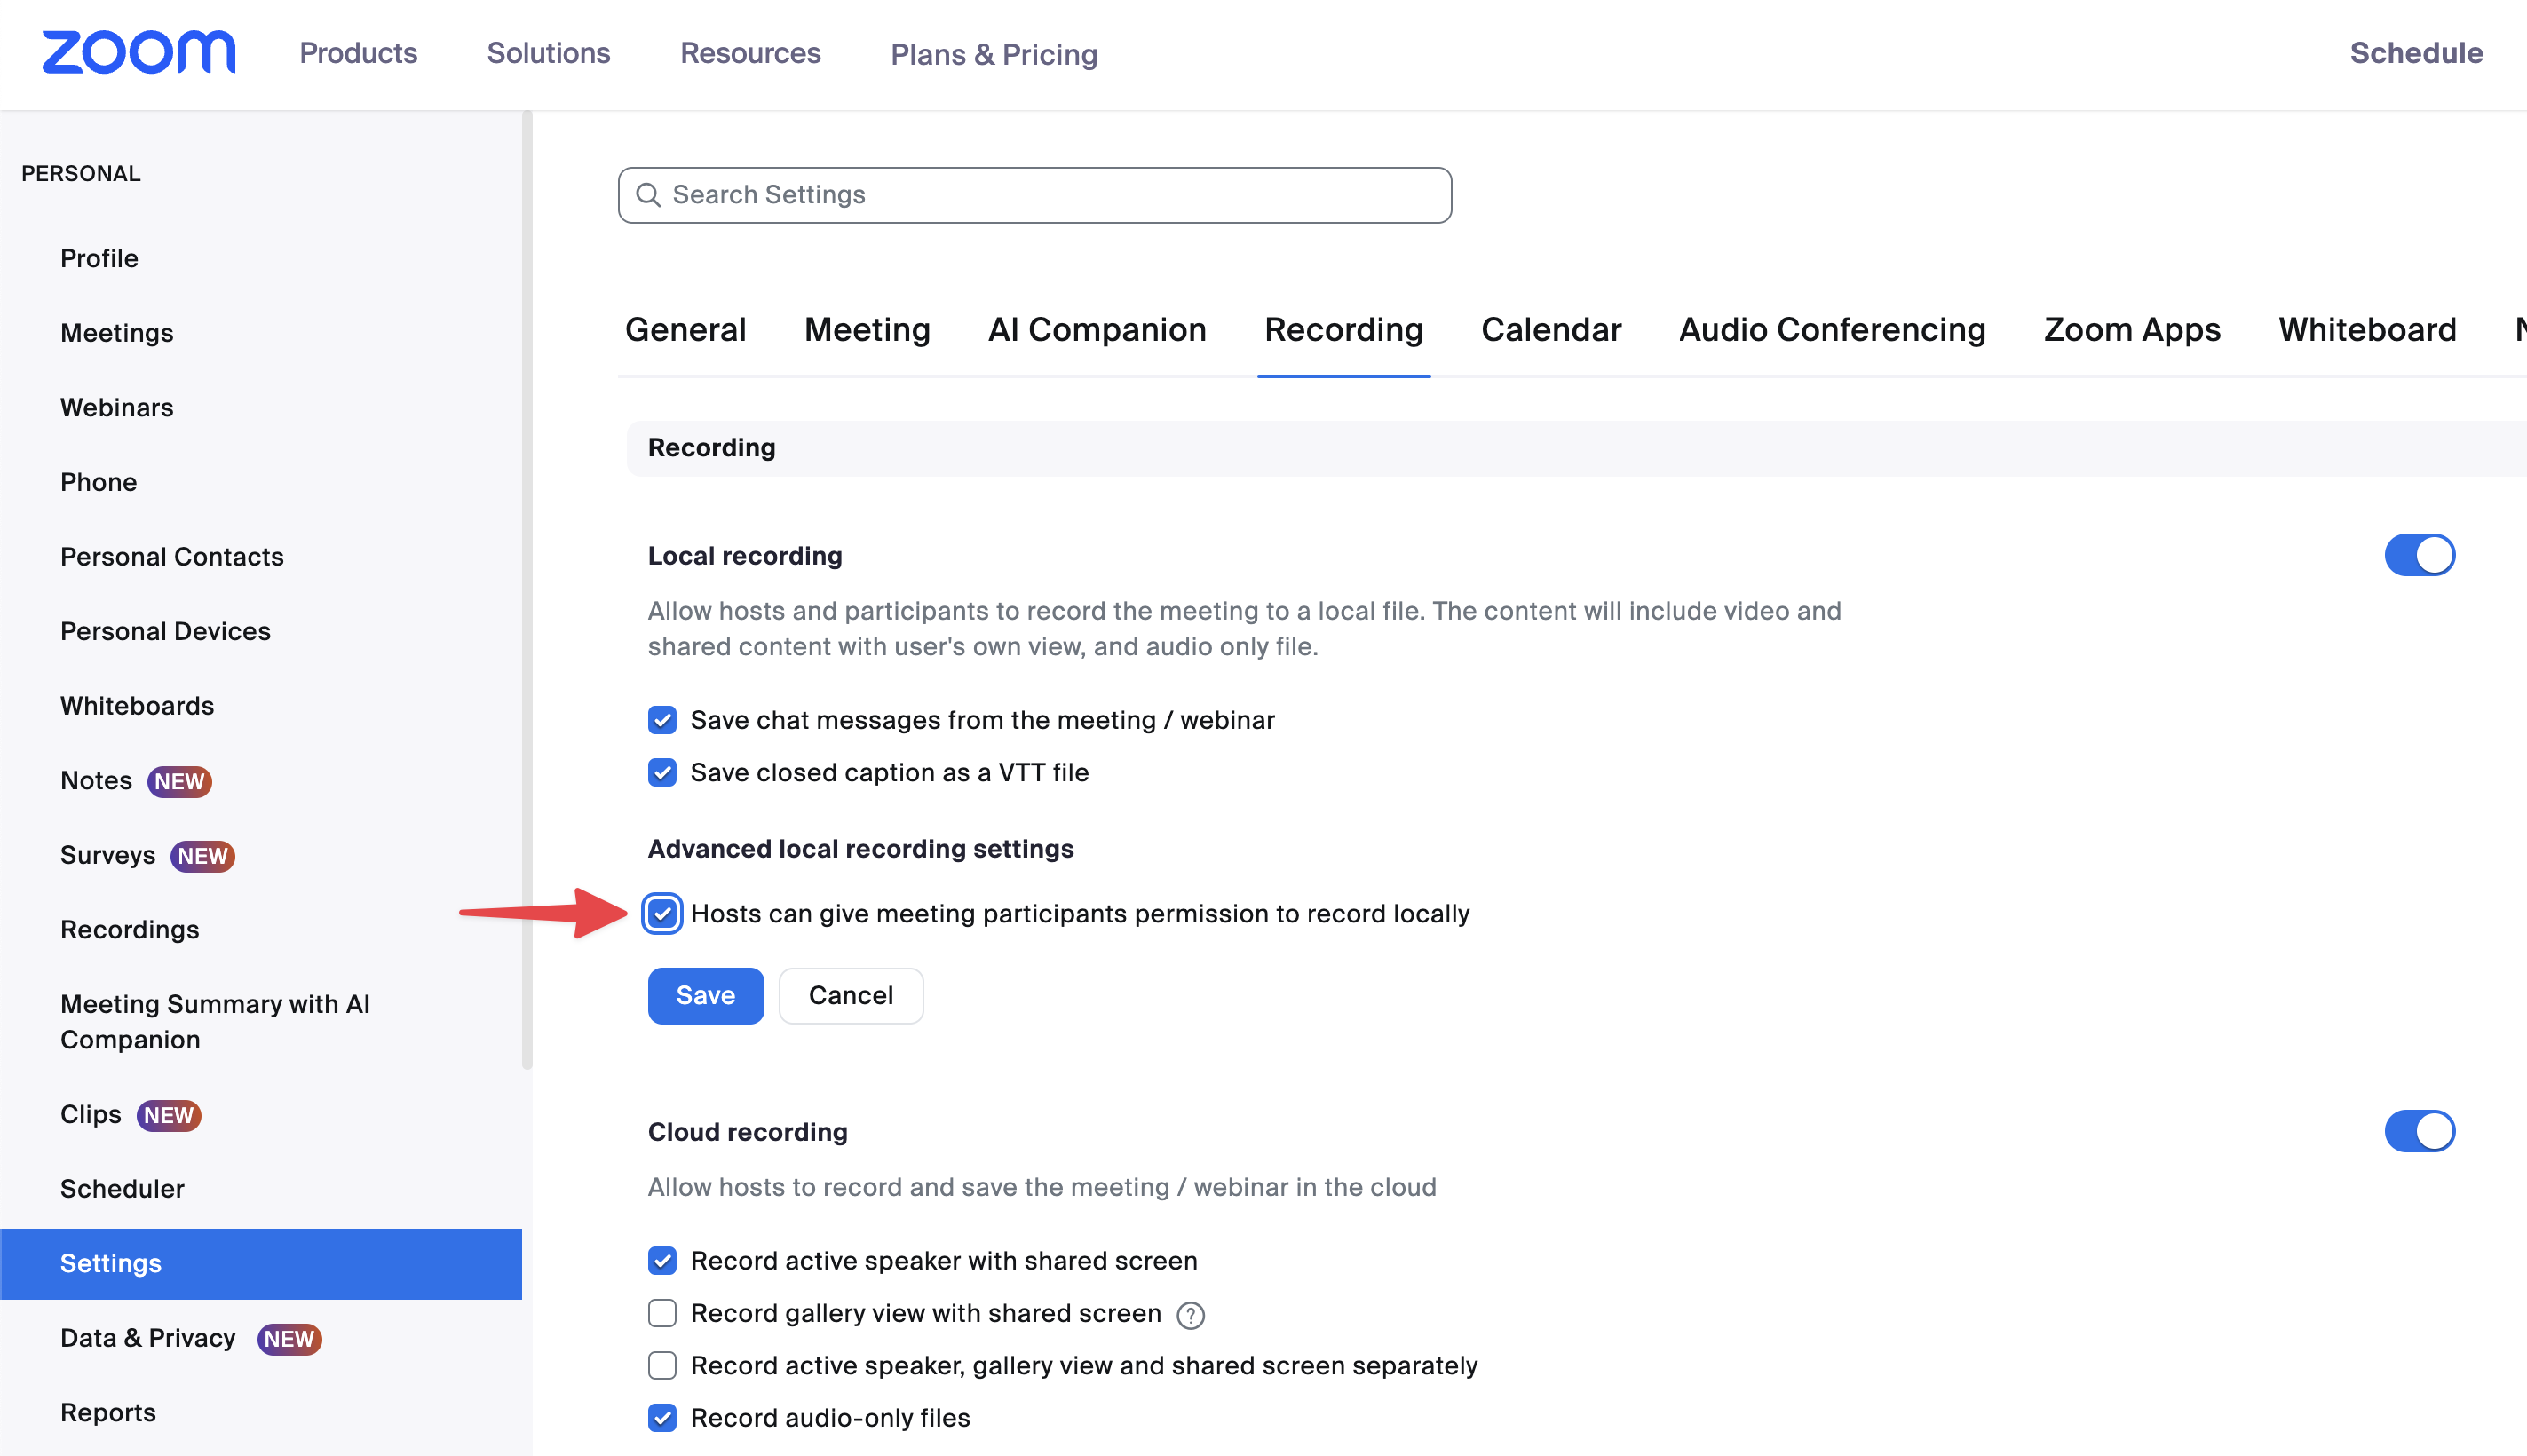
## The host has disabled permitting participants to record locally

In this case, the host has their **global** local recording setting enabled, but they can't grant participants permission to record locally, which is needed for a bot to record.

**How to fix:** Host should enable this setting by checking the box labelled:

*Advanced local recording settings > Hosts can give meeting participants permission to record locally* \*\*<br>

<figure><img src="https://files.readme.io/c187d56-zoom_local_recording_request_disabled.png" alt=""><figcaption></figcaption></figure>

## The host's ADMIN has disabled permitting participants to record locally

Similar to the above case, there is a setting across the entire Zoom workspace account that can prevent Zoom users in your workspace from permitting participants to record locally.

**How to fix:** Your Zoom admin should enable this setting by checking the box labelled:

*Account management > Account Settings > Recording & Transcript > Hosts can give meeting participants permission to record to their computer \*\**

<figure><img src="/files/0KslbnDeQsAAubQRCjzN" alt=""><figcaption></figcaption></figure>

{% hint style="info" %}
**Note**: Make sure you DO NOT also check the box labelled "Only users in your account can request to record to their computer" as this will prevent the bot from being able to request to record.
{% endhint %}

## The host has disabled requesting recording permission within the current call

If the host has the proper user-level recording settings set up properly on the Zoom website, but has disabled the option to allow participants to request local recording *within the call*, the bot will not be able to record.

**How to fix:** Host should enable this setting within the call:

<figure><img src="https://files.readme.io/b4a00d5-zoom_local_recording_request_disabled_by_host.png" alt=""><figcaption></figcaption></figure>

## Zoom internal error

On rare occasions, your bot may fail to enter a call with a `zoom_internal_error`sub code.&#x20;

Unfortunately this means something went wrong on Zoom's end, and we have limited visibility into the underlying error. We do our best to handle these errors internally through retries but on rare occasions this error can cause a bot to fail.

If you're seeing this error recur for a certain situation or user, please let us know and we can raise the issue with Zoom.

## Host never received the recording consent popup

In certain cases, a user may report that the bot never recorded and they never received a recording consent popup to grant recording permissions.

This is the same situation as the host not being present, but in this case, the end user that created the meeting was actually in the call.

If the host claimed they were present, but no participant is shown as the host, it's likely that the user joined the Zoom call while signed into a different Zoom user than the one that the meeting was created from.

Many users have multiple Zoom accounts and they'll need to ensure they're joining the meetings from the same account as the one they're creating meetings from. If the end user needs to support granting recording permissions from various Zoom accounts, they can assign their alternative account(s) as alternative hosts.

<br>


# Zoom OAuth Integration

The Meeting Assistant's Zoom OAuth integration prevents you from needing to confirm permissions for each meeting

## Recording Behavior

Zoom has formal requirements that bots must comply with in order to record meetings. In order to be compliant with Zoom, your meeting assistant can get recording consent one of two ways:

1. (Default) **Explicit consent**
2. OAuth permission

### Explicit consent

*By default*, in order for a bot to record Zoom calls:

* The host must be present in the meeting
* The host must explicitly grant permission to record by accepting the consent dialog

Because these requirements can introduce user friction and unexpected recording errors, we recommend using the provided OAuth permissions to grant recording permissions.

<figure><img src="/files/p111EQWfDfESxrDRbY8B" alt=""><figcaption><p>Use the Zoom OAuth feature in your Meeting Assistant configuration to avoid granting permission every meeting</p></figcaption></figure>

### OAuth permission

As an alternative to manually accepting a consent dialog each meeting, you can grant CustomerIQ OAuth permissions to allow bots to record **automatically**.

This means that not only will you not have to manually grant permission each meeting, but this also enables the assistant to record meetings regardless of if you are present for your meeting.

Because of this, we **highly recommend** using this mode of consent to make this process easier to implement into your workspace.


# Creating and sharing clips

Create clips of meeting recordings to share with prospects, customers, and your team

Create a new clip from any meeting recording by heading to the Clips tab of the meeting recording page.

Then simply:&#x20;

1. Click "Add Clip"
2. Drag the slider to the section of the video you would like to clip, then click Next
3. Give the clip a name
4. Save

This will create a new clip along with an AI summary and transcript of the section.

### Sharing the clip

Copy the clip link by clicking the link button on the clip card

<figure><img src="/files/BakxyX4yt5YyrgRLSWPd" alt=""><figcaption></figcaption></figure>

Clips are viewable by anyone with the link. You will be notified whenever someone views the clip.


# Voice notes

Voice notes allow you to record and transcribe audio from in-person meetings or voice notes

From CustomerIQ's home page you can record audio to capture meeting notes on the fly, or even record entire in-person meetings. This is great for recording notes or entire in-person meetings.

**If you do not host in-person meetings or wish to record audio notes you can skip this step.**

### &#x20;**(iPhone Users) Save CustomerIQ to your mobile device' home screen**

1. Login to [app.getcustomeriq.com](https://app.getcustomeriq.com/auth/login) from your mobile device

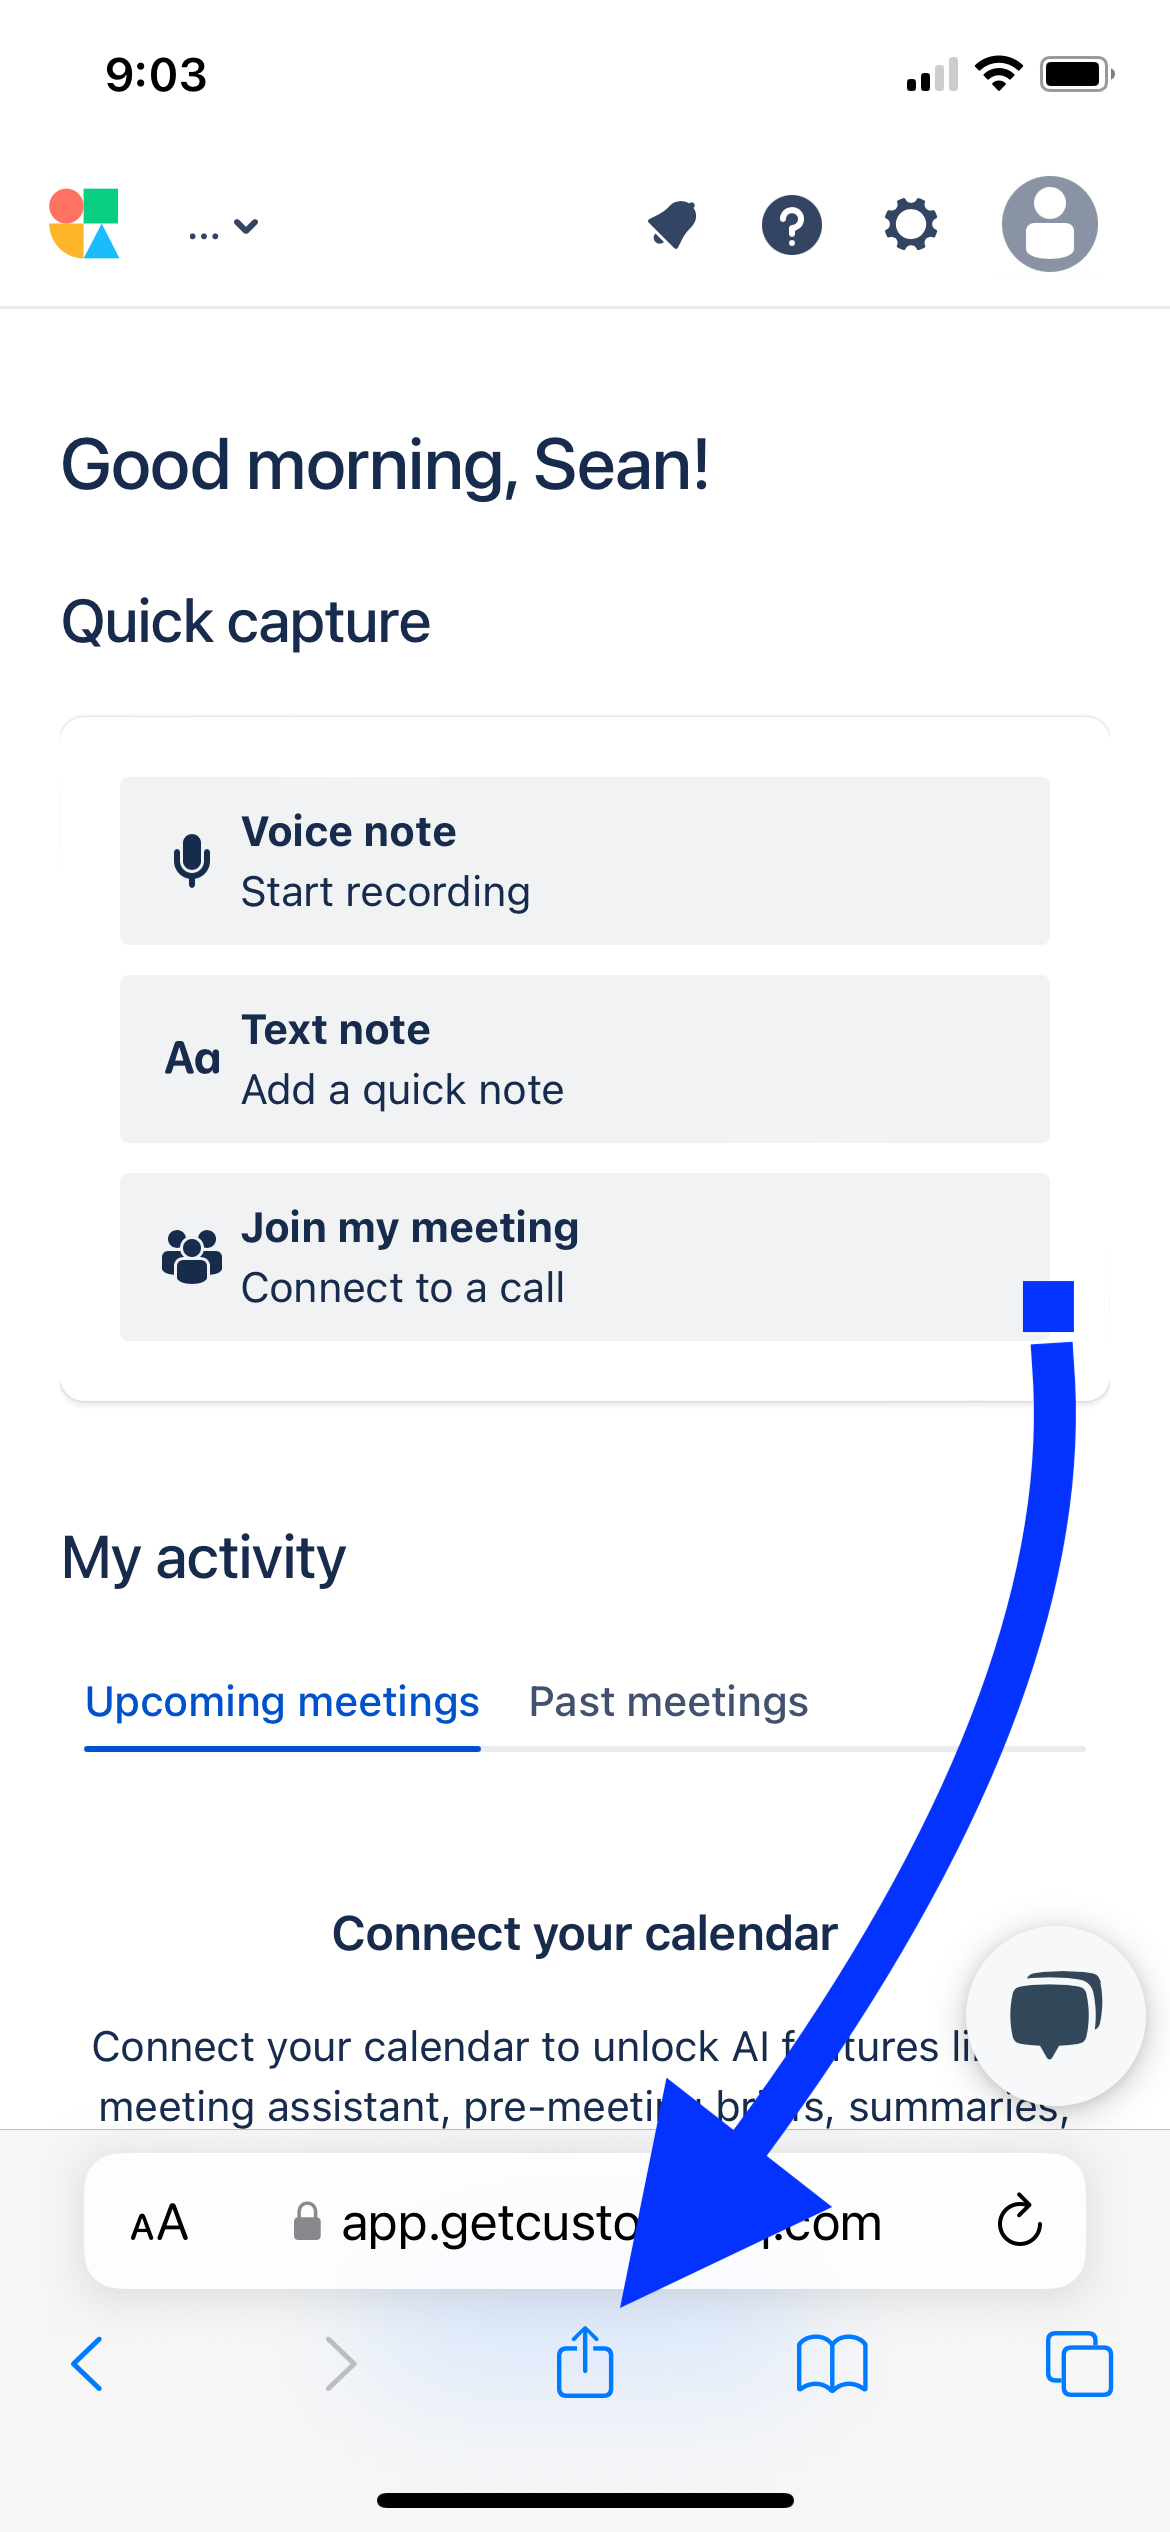
2. From CustomerIQ's home page, click the share page icon:
   1. On Chrome

      <div align="left"><figure><img src="/files/jKinjjCvAC5ZAjOPRM1M" alt="" width="188"><figcaption><p>Share page from Chrome</p></figcaption></figure></div>

   2. On Safari&#x20;

      <div align="left"><figure><img src="/files/bsSLXQZr7l5oB7fu9Bpz" alt="" width="188"><figcaption></figcaption></figure></div>

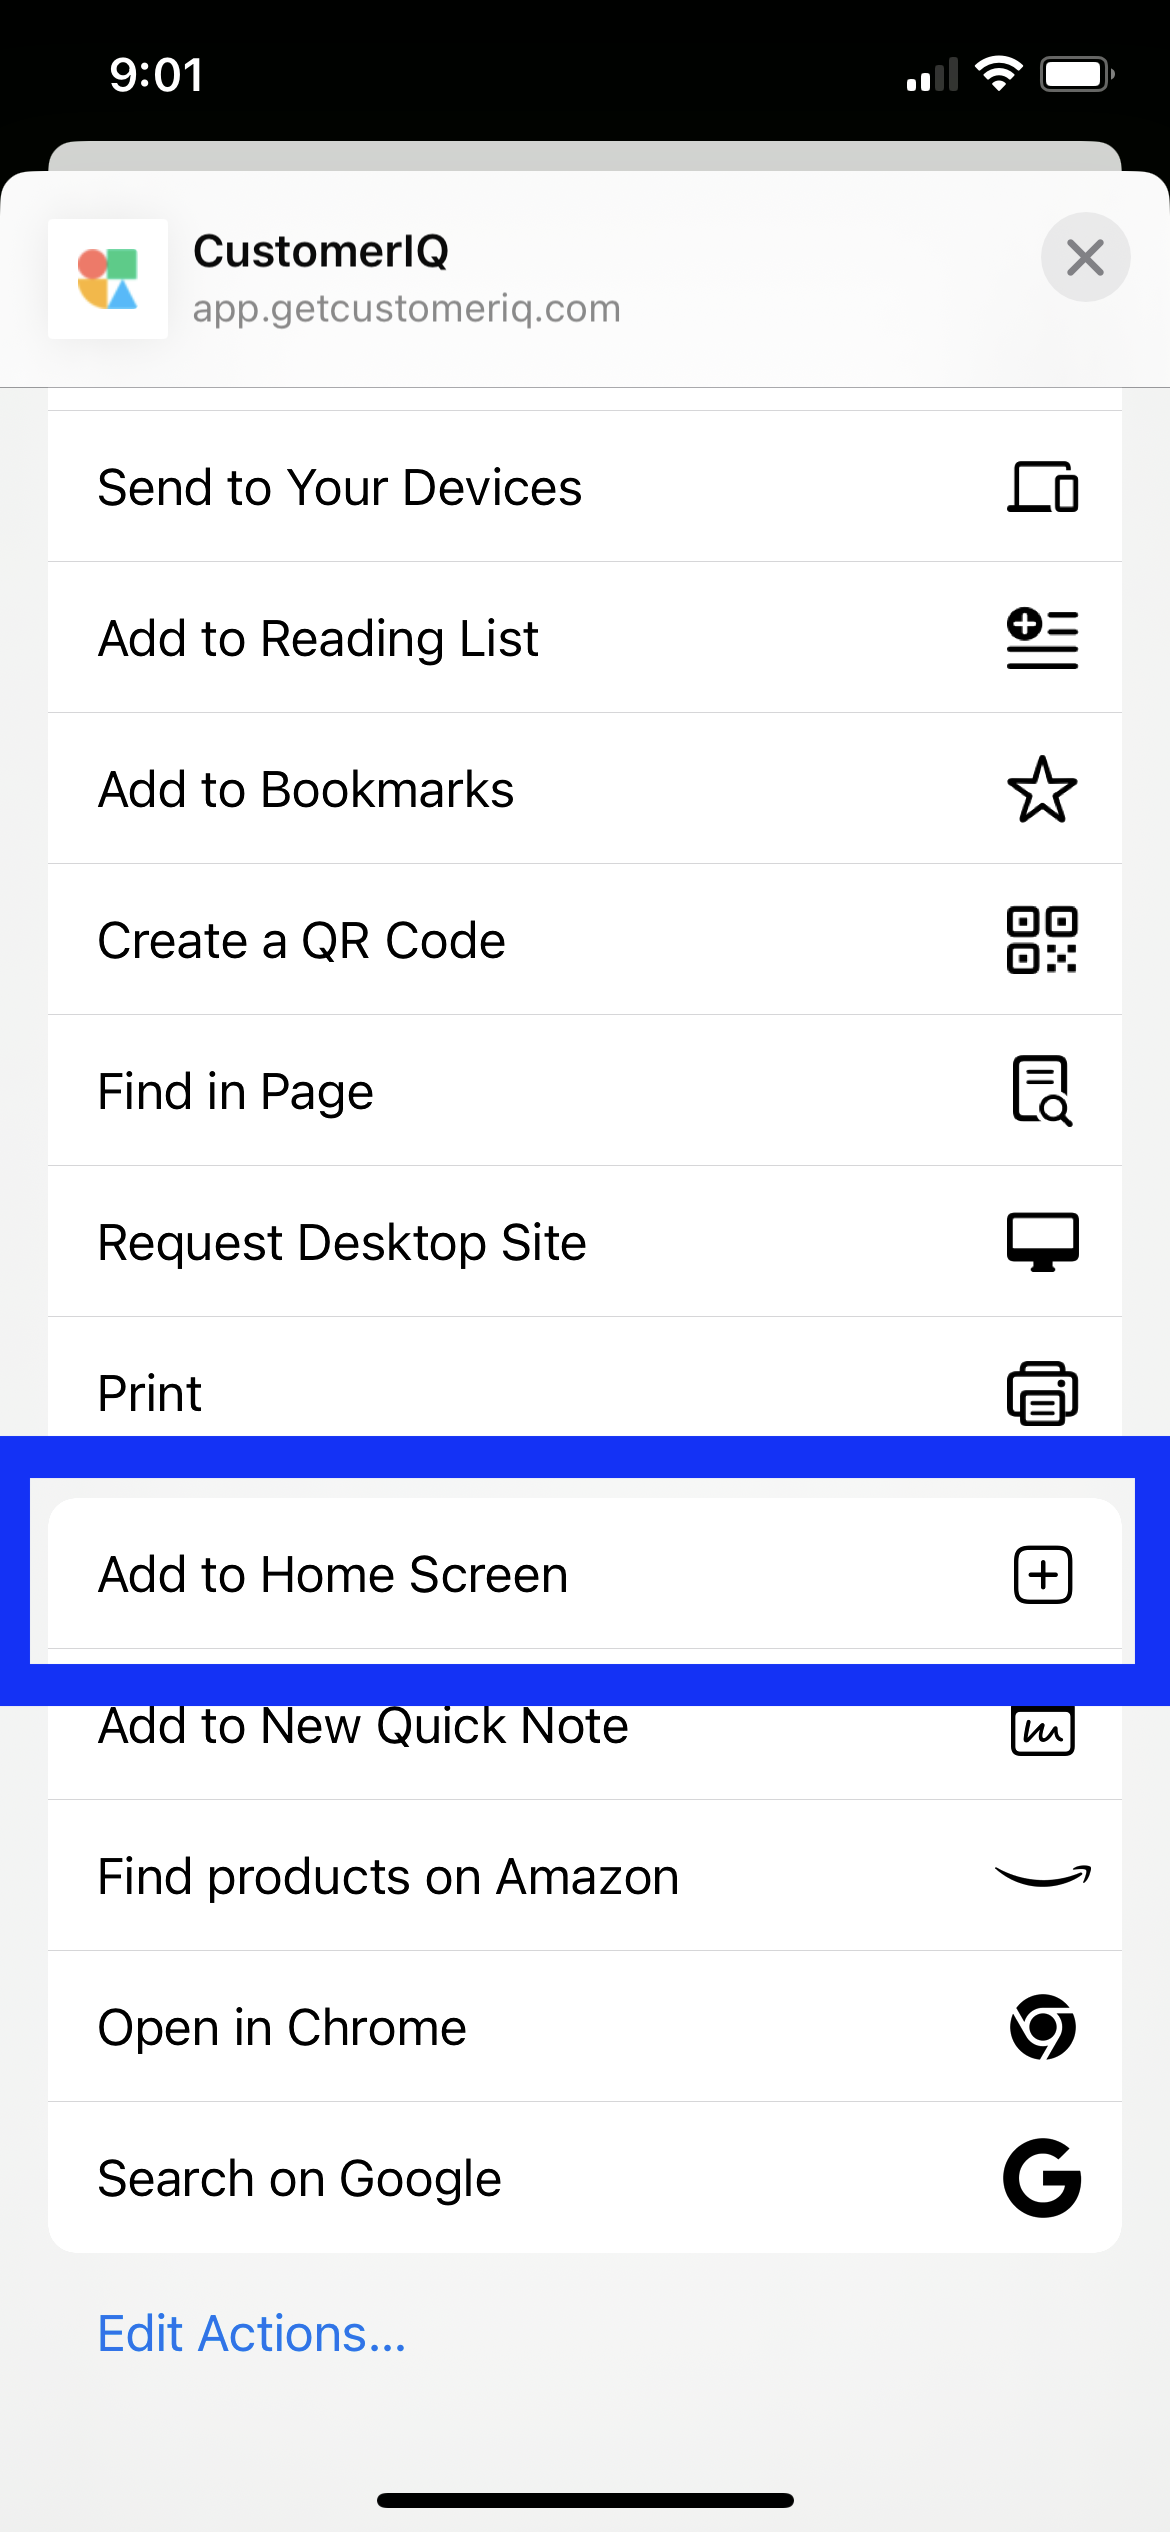
3. Click "Add to Home Screen"

   <div align="left"><figure><img src="/files/osHWv7dVHd4yoXNVBrjW" alt="" width="188"><figcaption></figcaption></figure></div>

Now you can easily access CustomerIQ from your home screen.

### &#x20;**(Android Users) Save CustomerIQ to your mobile device' home screen**

1. Login to [app.getcustomeriq.com](https://app.getcustomeriq.com/auth/login) from your mobile device

2. From CustomerIQ's home page, click the three vertical dots in the top right corner:

   1. Select add to home screen

      <div align="left"><figure><img src="/files/Lnw7Nyamr34hwIAqd6Ch" alt="" width="188"><figcaption></figcaption></figure></div>

3. Choose Install or Create shortcut (either works)

   <div align="left"><figure><img src="/files/CKCHU4W3nyGOfV4SRoOW" alt="" width="188"><figcaption></figcaption></figure></div>

Then confirm. Now you can easily access CustomerIQ from your home screen.

### Add a voice note

Now you can quickly add a voice note, or record an in-person meeting, by recording the audio and adding it as a submission

1. Choose "Add a voice note" from the application's home screen
   1\.

   ```
   <div align="left"><figure><img src="/files/iOaaUjUc6V0c6MtVvAzc" alt="" width="188"><figcaption><p>Home page mobile view</p></figcaption></figure></div>
   ```

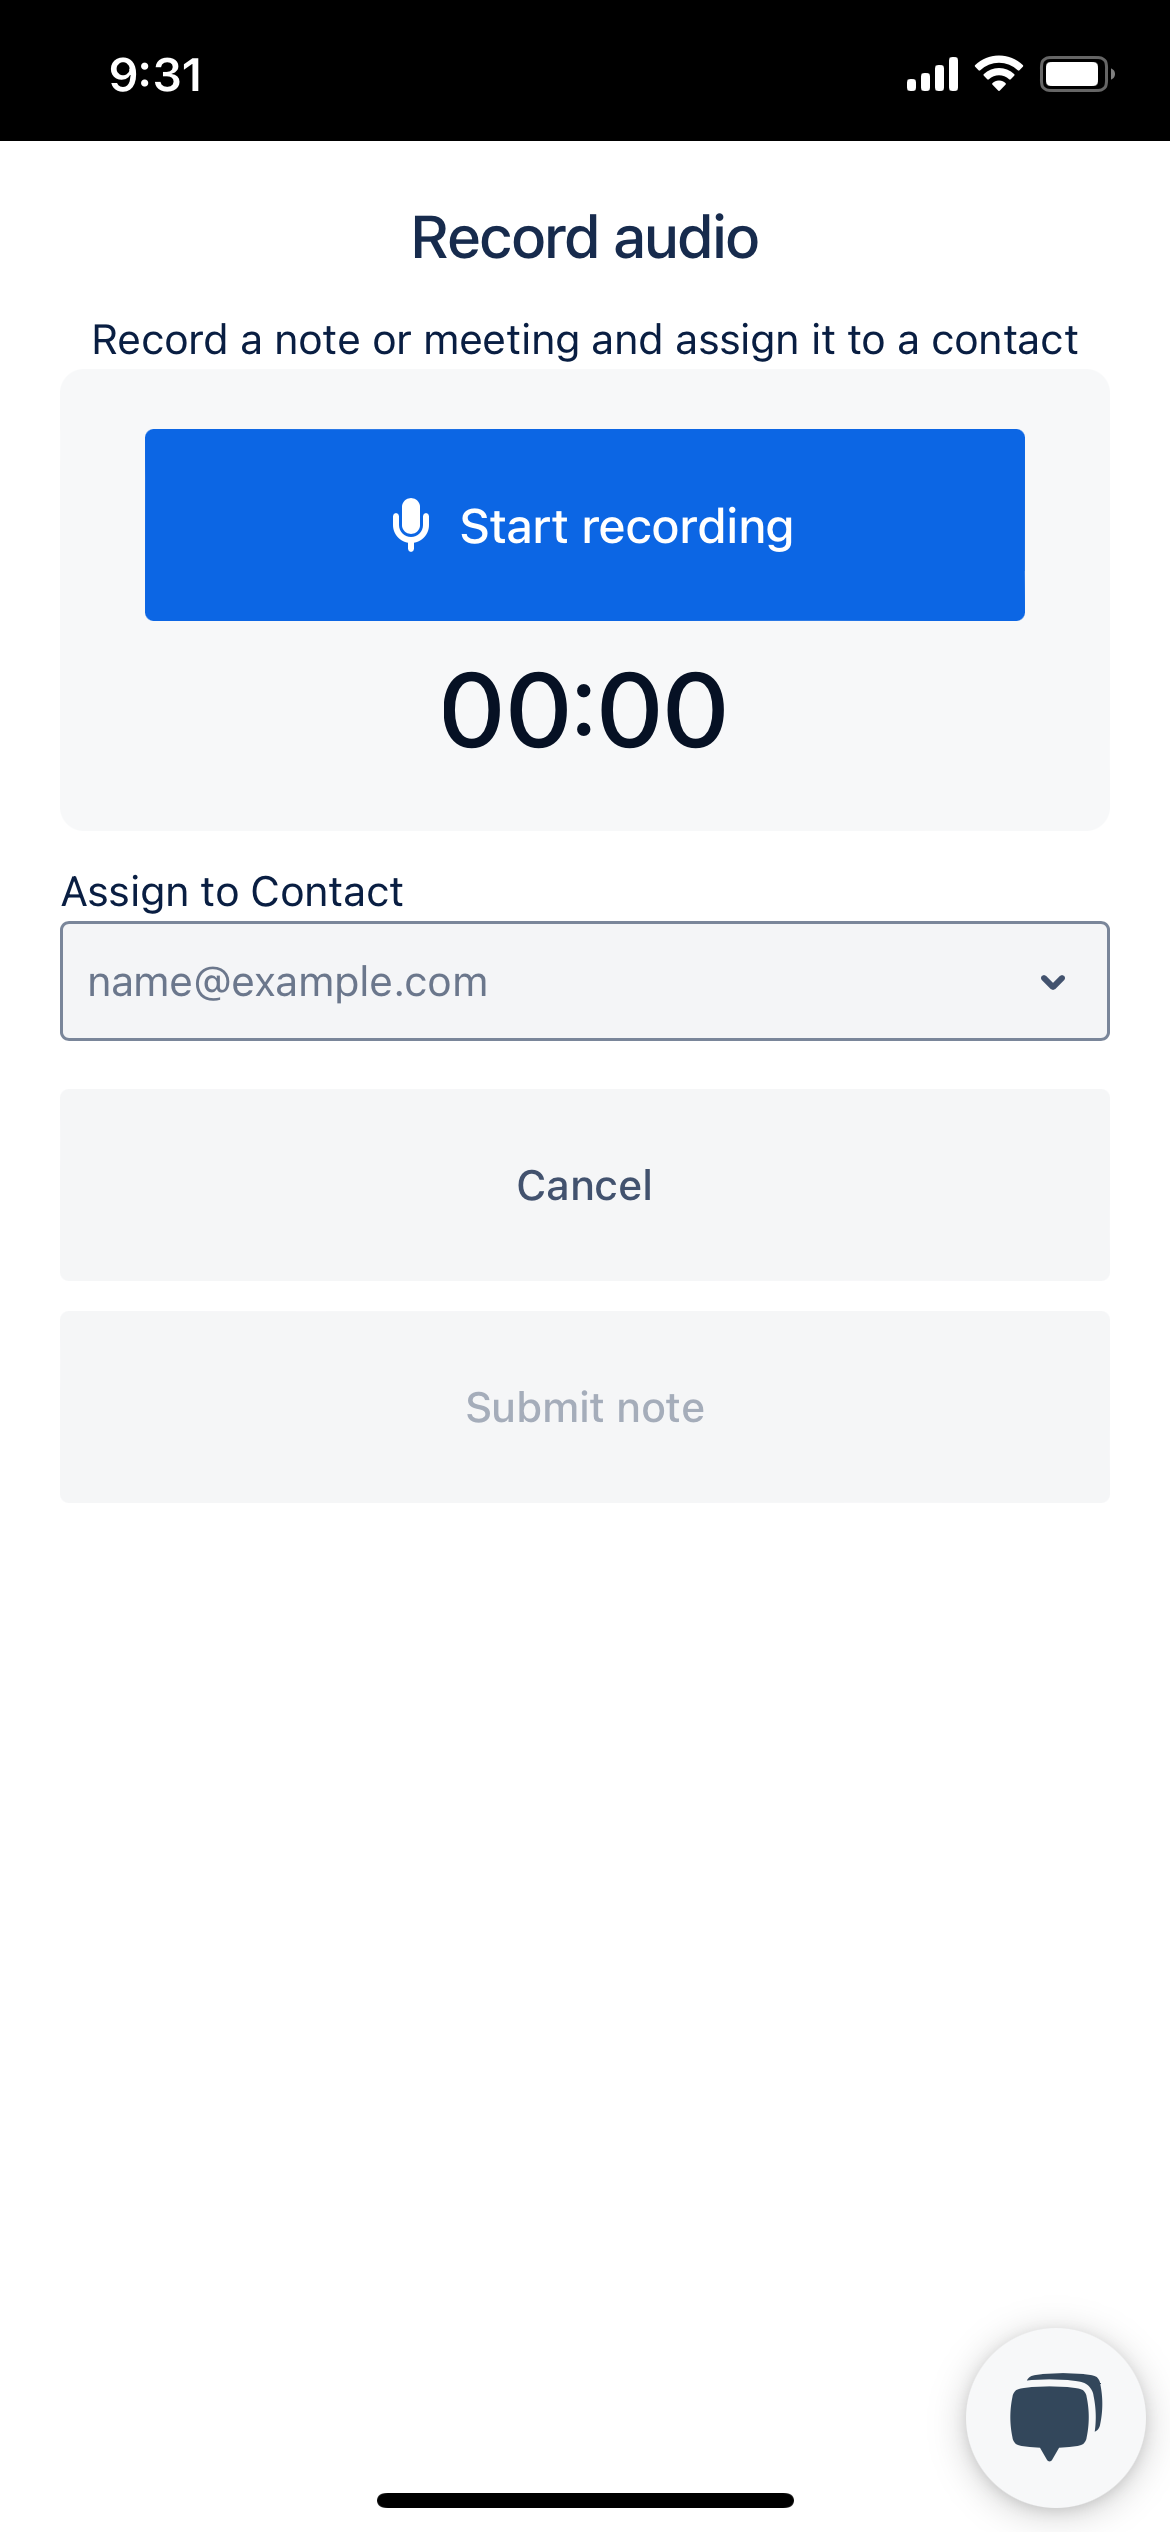
2. Press start recording and record a voice note (entire meeting). When you're finished, stop recording.

   <div align="left"><figure><img src="/files/jFkp4W4IkQrGgNiCD8tR" alt="" width="188"><figcaption></figcaption></figure></div>

3. Assign a contact to associate with the recording and submit!

   <div align="left"><figure><img src="/files/yMEgTbJBKQYUOESNgx1U" alt="" width="188"><figcaption></figcaption></figure></div>

Now, CustomerIQ will transcribe the audio and analyze it for any relevant CRM properties.


# Contacts and Accounts

How to navigate contact and account pages


# Reports

Understanding performance reports, conversation insights, and watch lists

## Overview

Highlights are organized by customizable views. The purpose of views are to help you filter and tag subsets of highlights created and aggregated from folders.&#x20;

## Editing any data in a view

The beauty of CustomerIQ is, while AI automates most processes, you can update any data the AI creates.&#x20;

**To update the title of a view:**

* Click the title to edit and update

**To update anything about a highlight:**

* Click the highlight to open the highlight modal
* Click to update the highlight
* Update sentiment
* Explore the original submission
* Explore related objects

**To bulk update highlights**

* Check the box next to any number of highlights and:
  * Add/remove tags
  * Delete highlights

Now, let's explore views capabilities.

## Filters

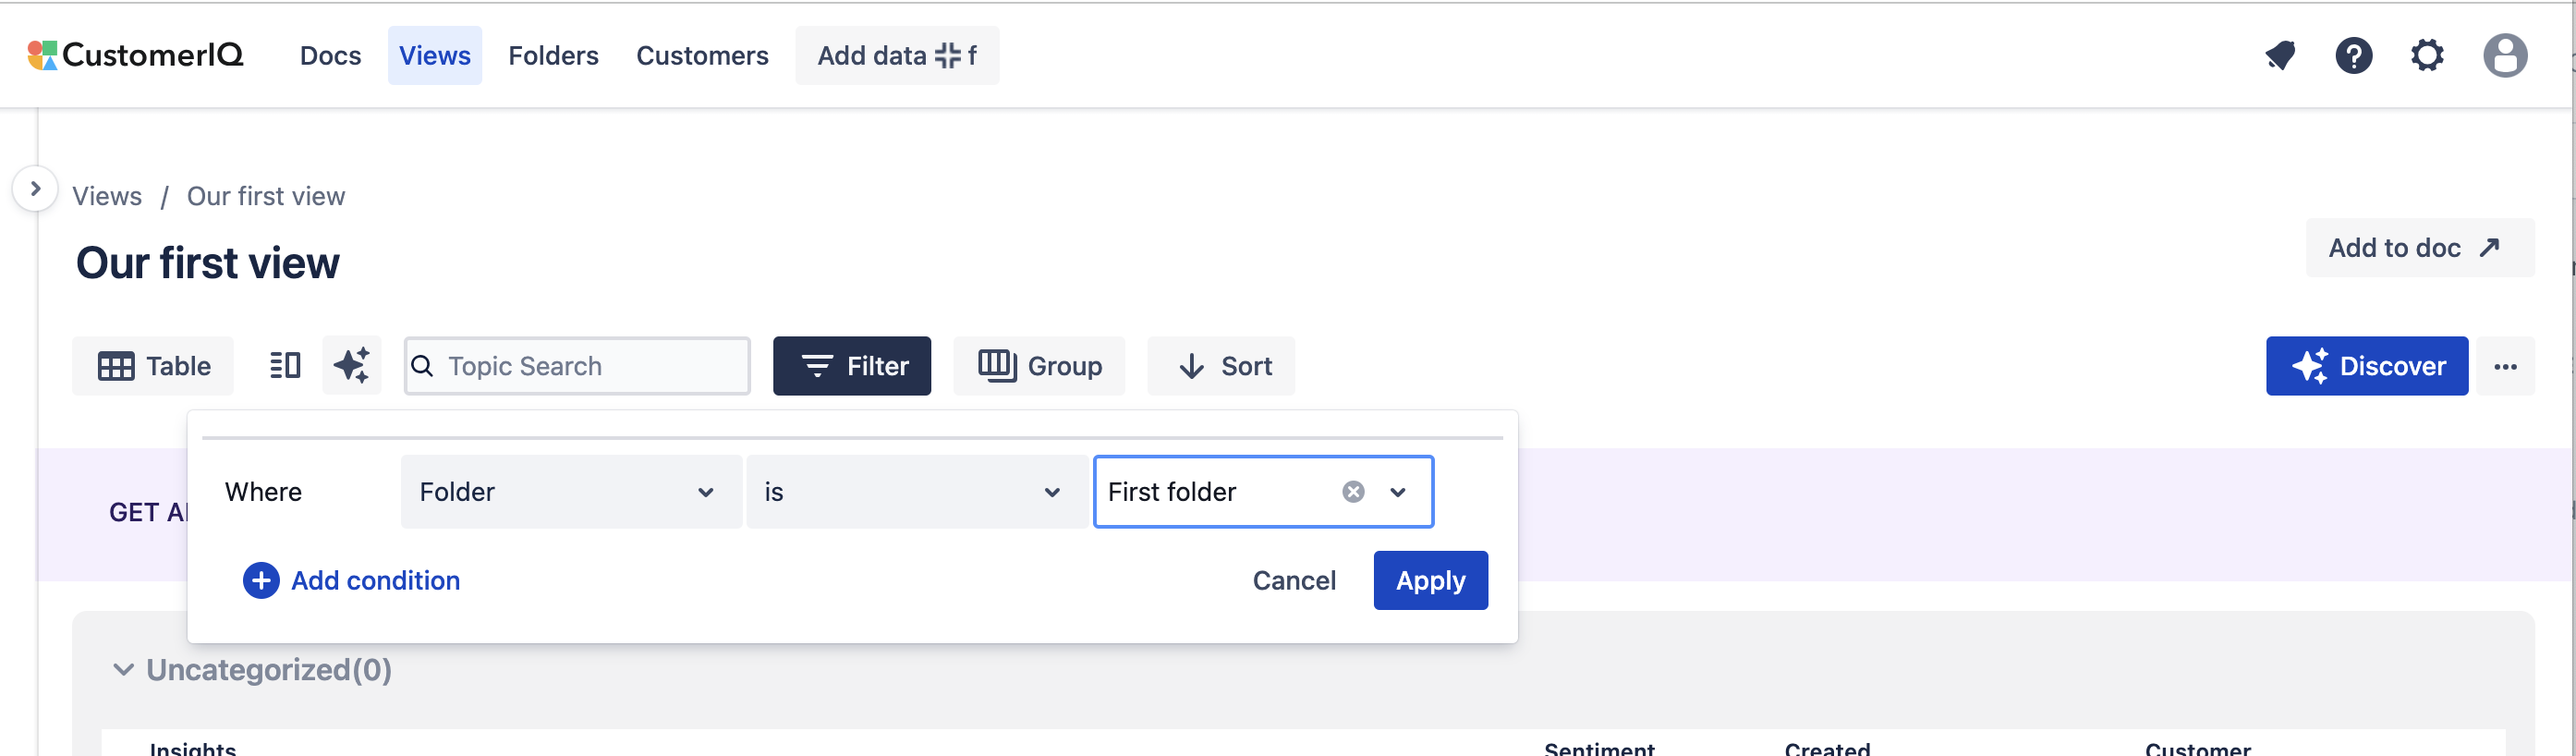
<figure><img src="/files/yArmfzbLCIXeCfAv0UD3" alt=""><figcaption></figcaption></figure>

Any view can filter by a number of highlight attributes including

* Folder
* Sentiment
* Create date
* Contact
* Account
* Contact tag
* Account tag
* View tag

Filters can be stacked to accomplish specific subsets of highlights.

## Group

Allows you to group highlights by the selected attribute. The most popular group is by View tag, where the view will display each highlight by the view tag created by you or the AI. Views can group by:

* View tag
* Sentiment
* Contact
* Account

## Sort

Changes the order in which highlights are displayed. By default highlights are set to sort by create date but there are many additional options for sorting.

## Discover

This tasks the AI with discovering themes among the highlights in view and tagging each insight with the subsequent theme.

## Classify

This tasks the AI with tagging highlights according to any existing tags on highlights in the view. Classify requires at least 2 tags are present in view to work.

## Topic Search

This filters highlights in view to highlights that are most relevant to your query. Unlike a keyword search, topic search takes into account semantic relevance. This means you are able to surface highlights that are similar to your query, but not an exact match.

## AI Summaries

As changes are made to the view the AI will summarize the view for quick and easy analysis. You can always generate a new summary by selecting "New summary" under the provided summary.

## Tags

All analysis in a view is governed by tags. While discover and classify will tag highlights automatically, you can add/update tags on highlights manually by selecting the row or opening the insight modal.

## Nested Views

When you filter a view by a tag from a different view, your view will automatically nest as a child of the parent view (where the original tag was generated). We do this to illustrate the relationship between the views. If the parent view is updated, the child views will also update.


# Tracking topics

How to use the topic search filter to include or remove topics from view

In any view, add a filter > Topic

Type your topic into the field and apply.

As new highlights enter view they will continue to filter by this term, allowing you to track mentions over time.

<figure><img src="/files/ZTgBGTgecboYnck80dio" alt=""><figcaption></figcaption></figure>

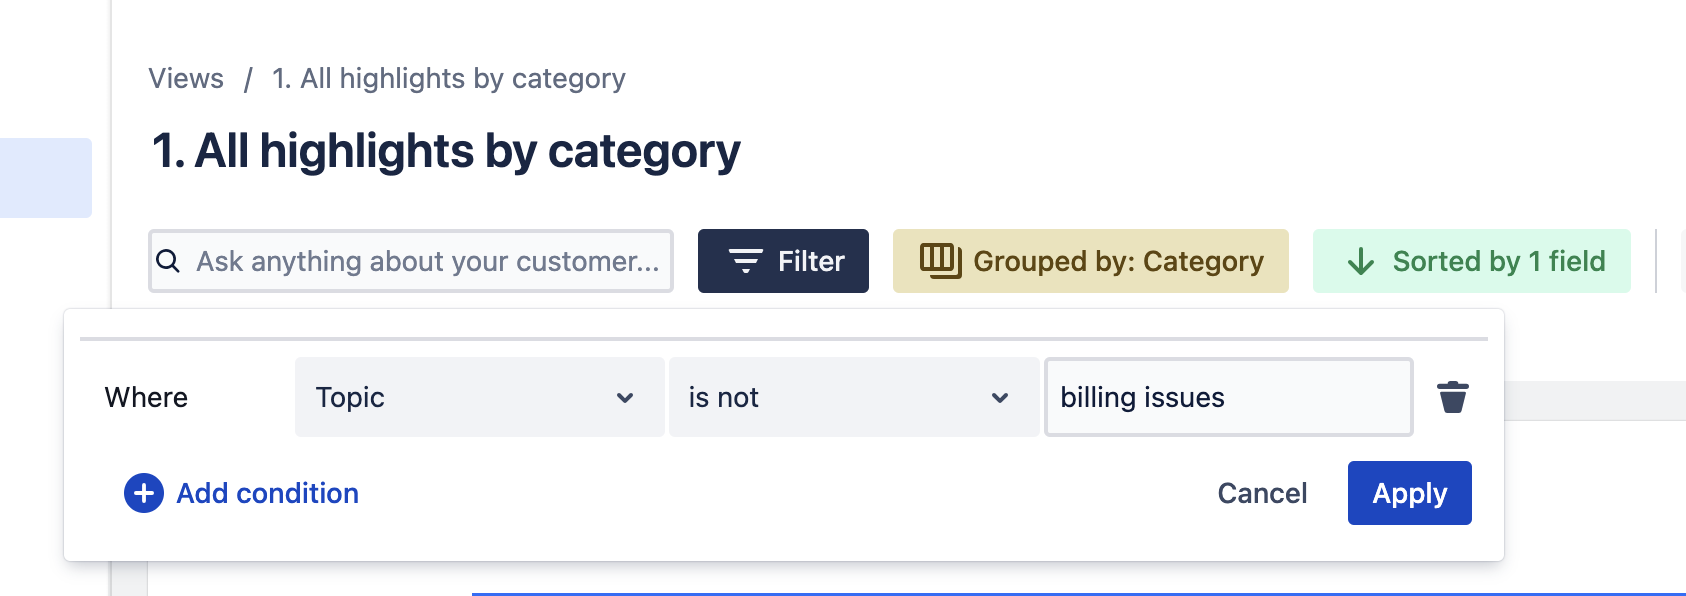
### Excluding topics

In some cases, like when tracking feature requests from sales calls, it can be helpful to *exclude* topics from views.

Do this by going to Filter > Topic > Is NOT > \[Your topic]

This has the opposite effect as a typical topic search, where it will exclude any highlight semantically similar to the topic you entered.

You can add as many combinations of positive or negative topic searches as you'd like to any view.


# Drilldown views

Drill down into any group and explore a nested view

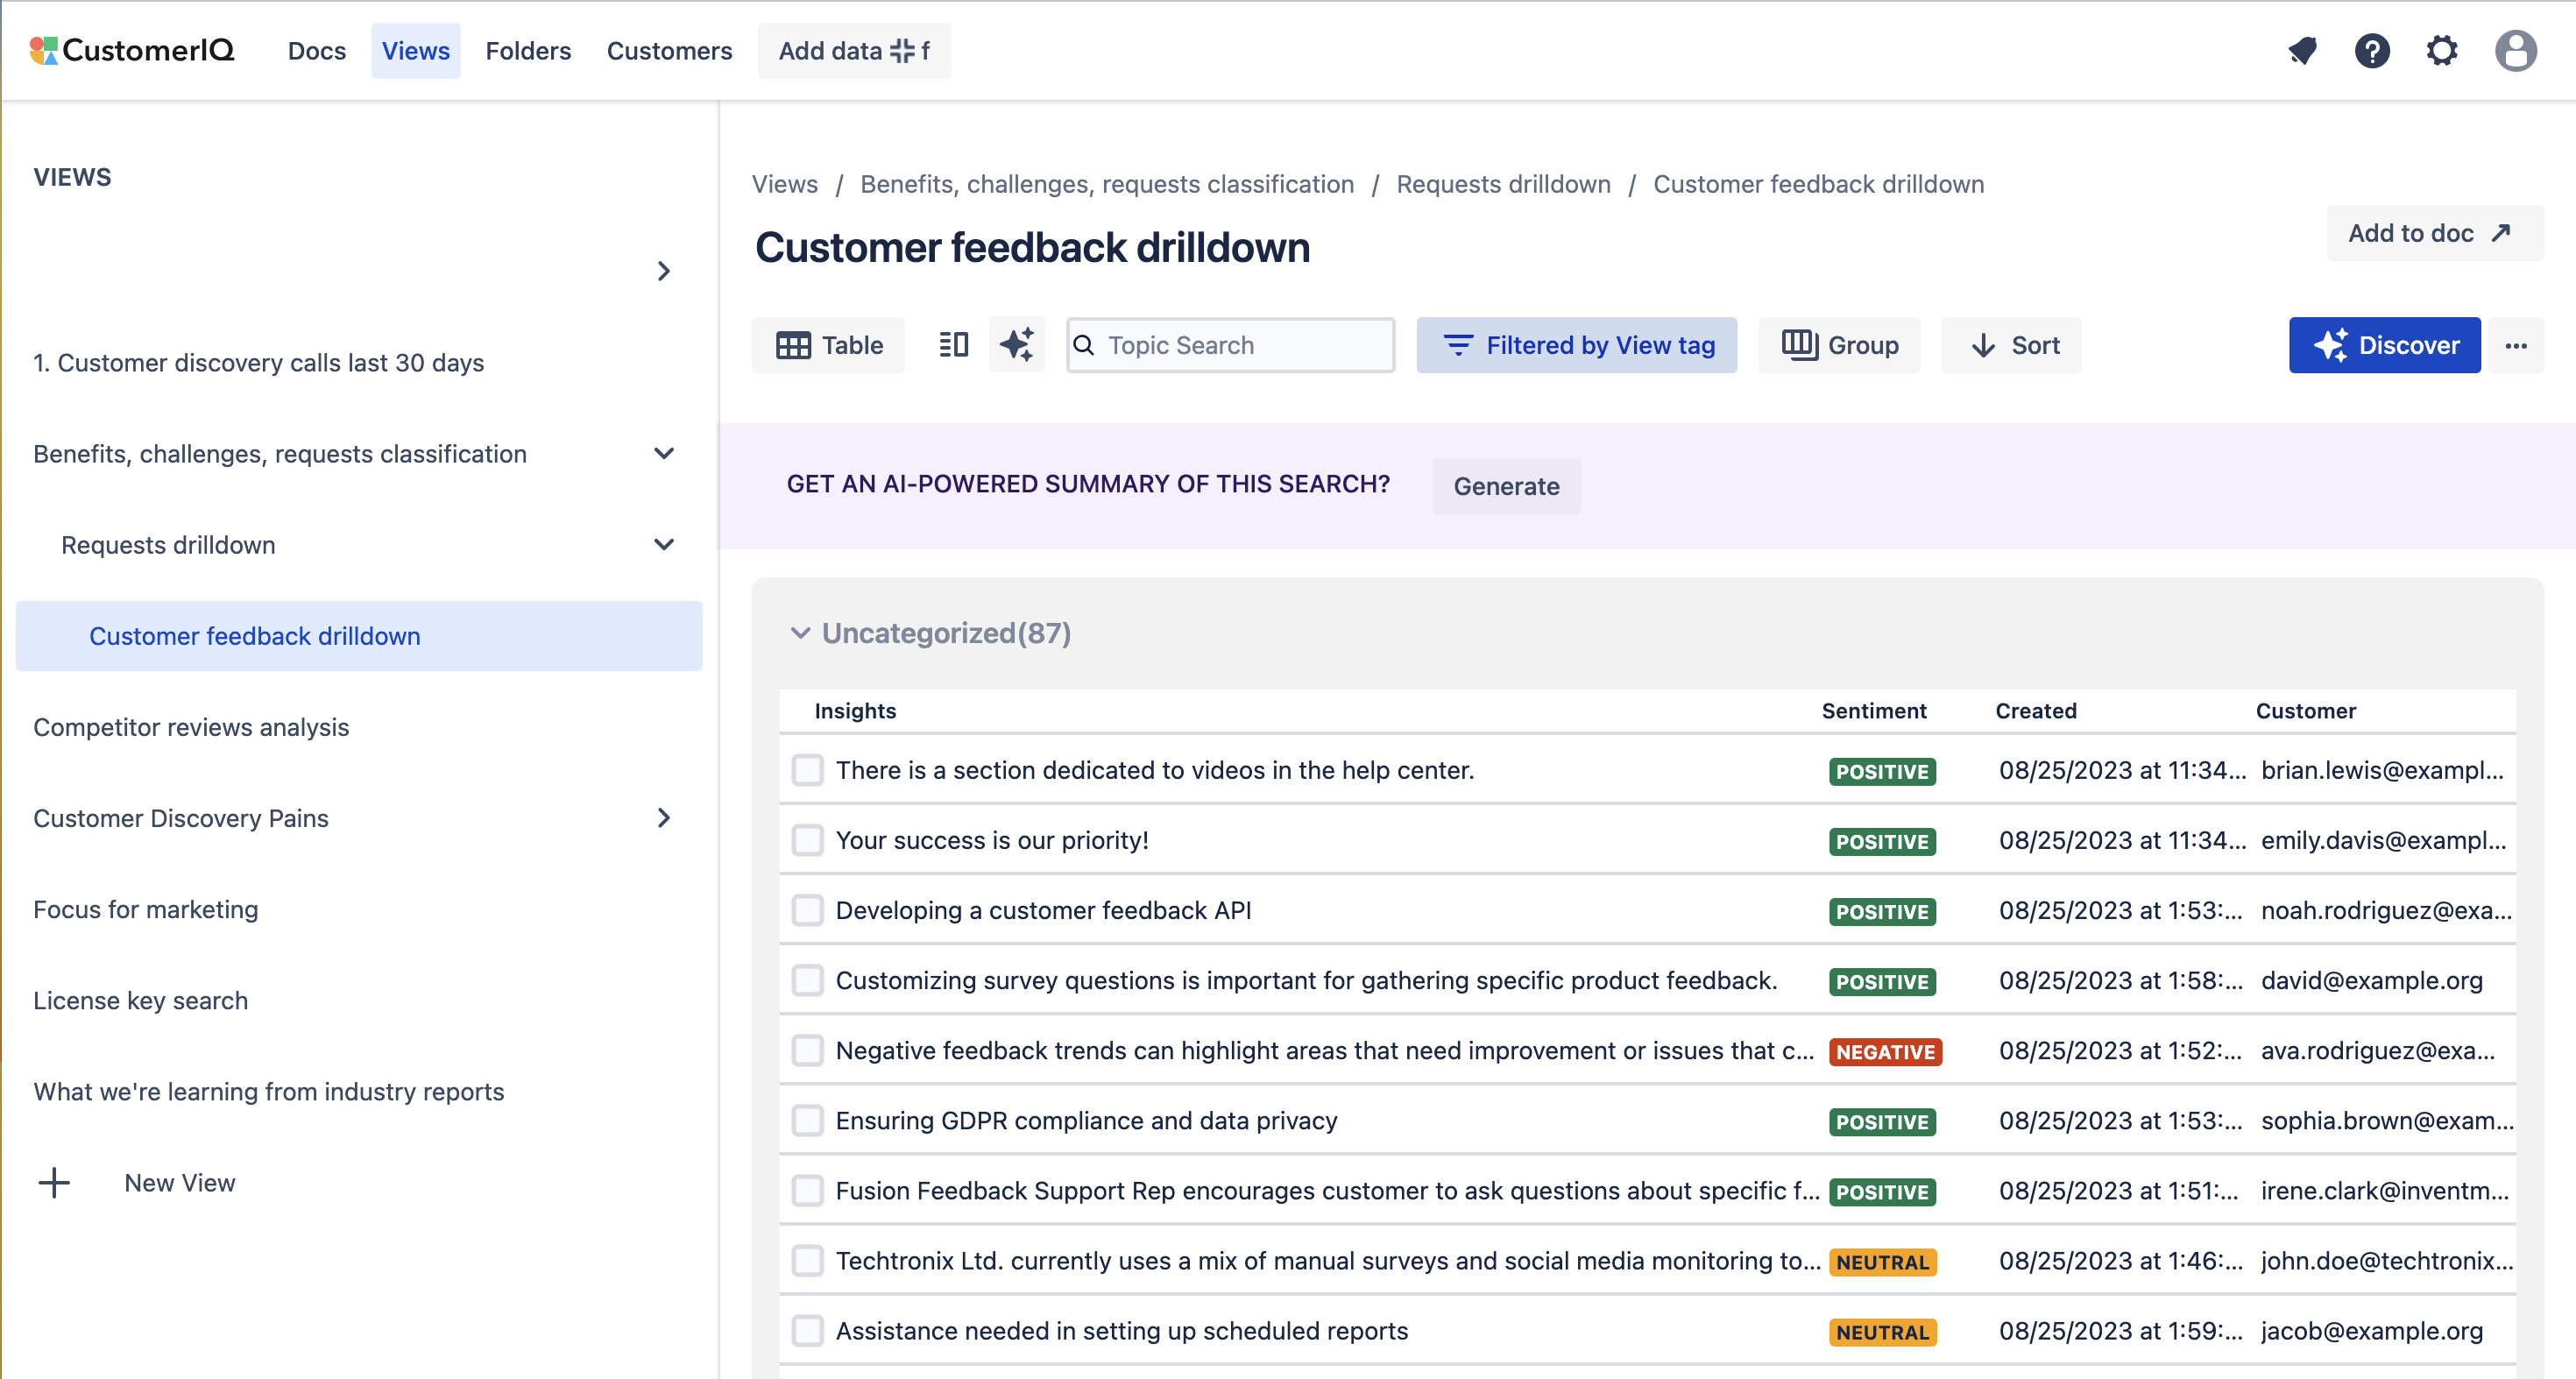
When you filter a view by a "view tag", you create a parent/child relationship between views. We display this relationship using nested views, which you can see in the side navigation menu.

<figure><img src="/files/VKaU5h4IwJbxIfZkWG3m" alt=""><figcaption></figcaption></figure>

Nested views are a simple way to build robust, specific analysis across views.

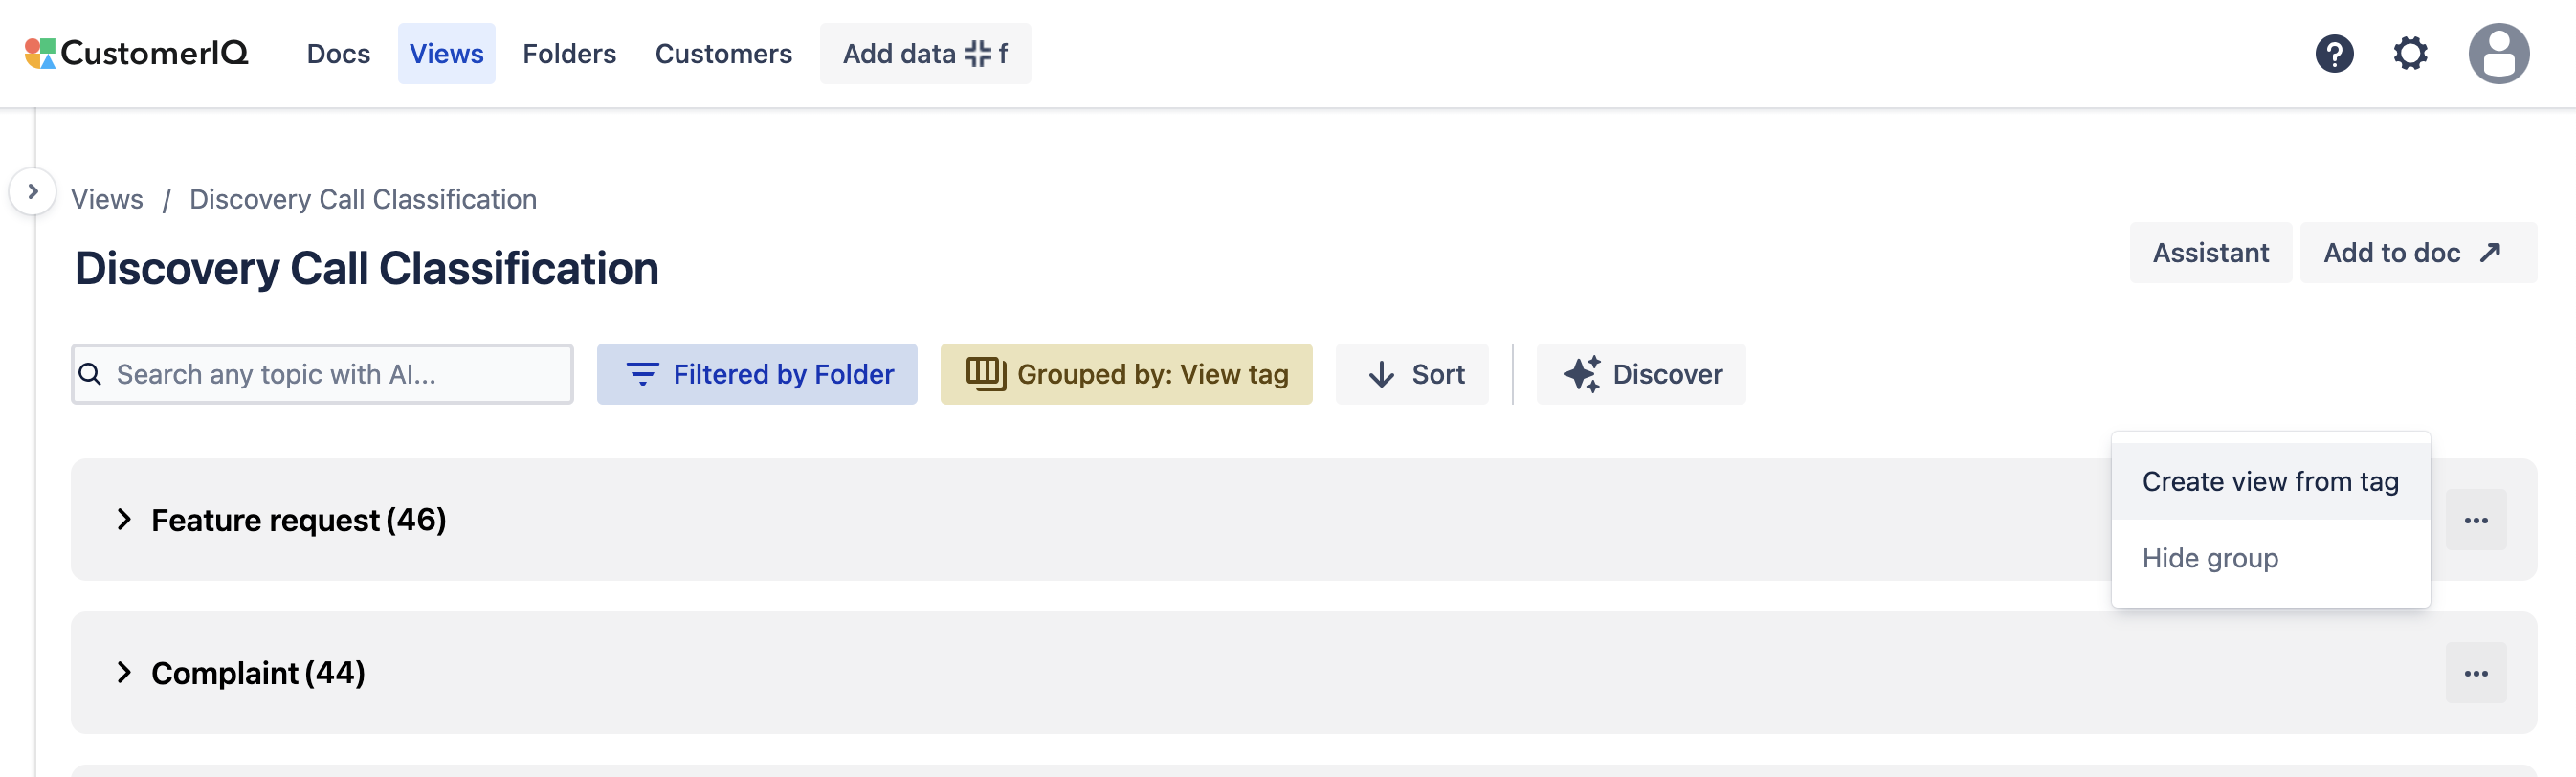
### Shortcut: Create a view from tag

When highlights are grouped by tag, you can quickly create a nested view filtered by that tag by selecting the group's action menu > Create view from tag

<figure><img src="/files/BSI35R3ABQ22UMGMRGQ9" alt=""><figcaption></figcaption></figure>

### Examples of when you might use nest views:

* **Split up large groups**: sometimes views with a lot of data can cluster into large groups. Discover more themes by drilling down into these larger groups
* **Use the assistant**: if you want the assistant to focus on a specific theme it's helpful to filter by only that theme.

Remember: As new data is added to folders, classification views can continue tagging uncategorized highlights, making nested views all the more valuable!


# Hide group

Hiding groups can filter our unhelpful highlights

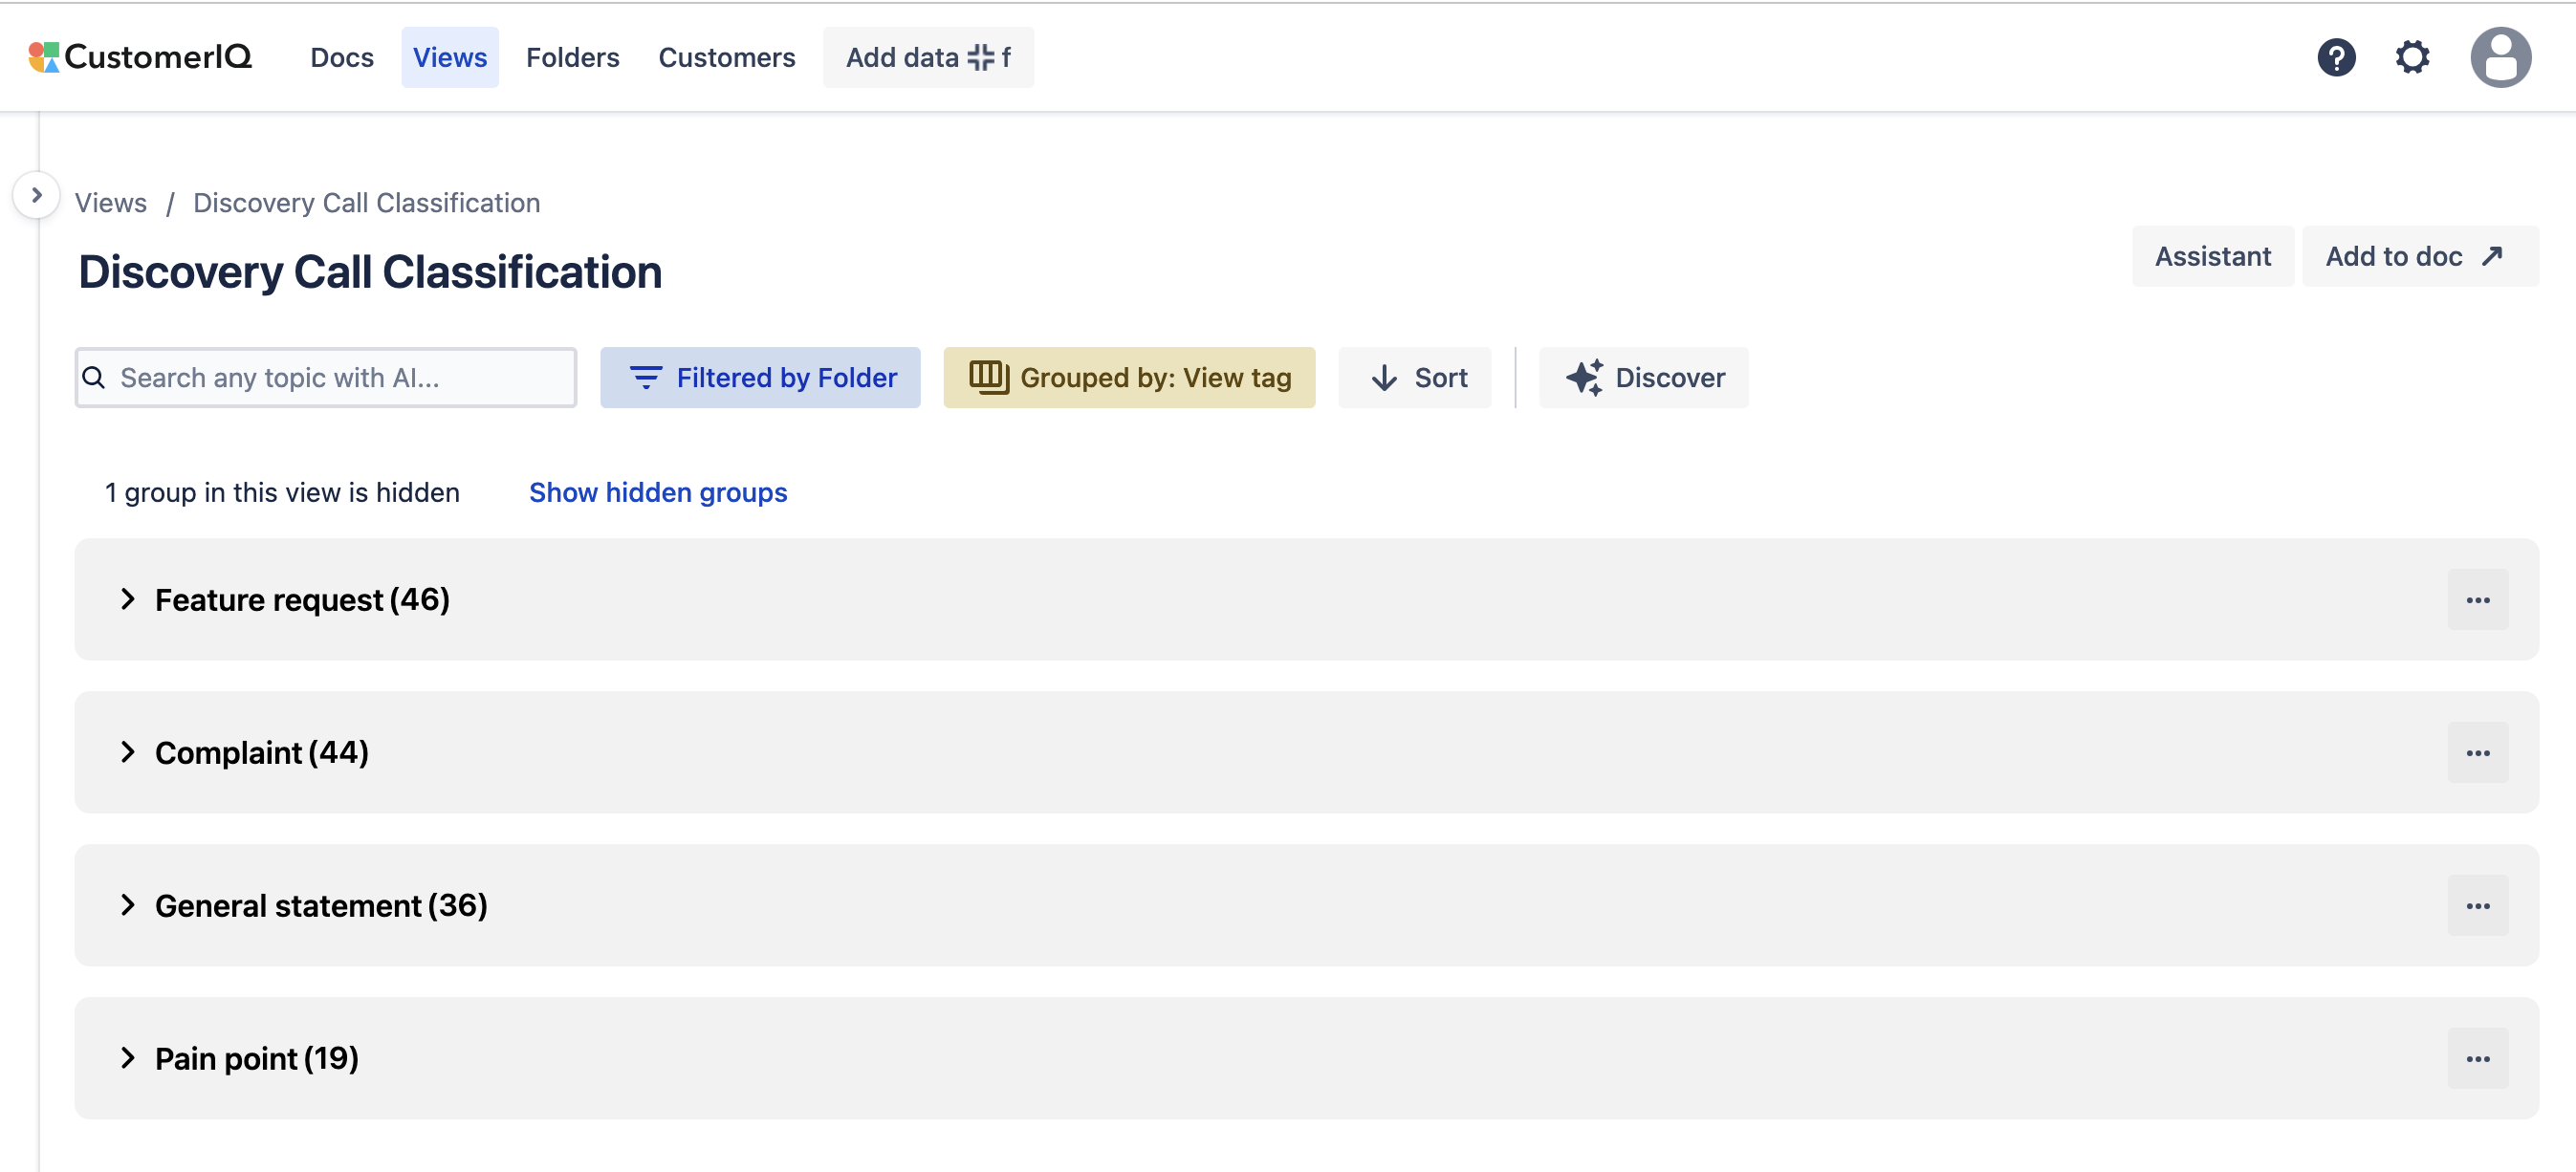
Often times when working with large data sets the AI will group generic highlights together. It can be helpful to hide these groups, which acts as a sort of "noise filter" as new highlights emerge and possibly organize into these groups.

To hide a group

1. Select the group action menu
2. Hide group

You can view and unhide groups anytime by selecting the hidden groups button at the top of the view.

<figure><img src="/files/JCdnk15k4EBJGKapIRap" alt=""><figcaption></figcaption></figure>


# Folders

Folders store and prep all the qualitative data in your workspace

## Overview

In the start guide we introduced the foundational principles of Folders. Now we'll outline popular use cases and settings for your folders.

Folders can be used to store all the qualitative data across your organization: customer feedback, call recordings, ideas, support tickets, etc.&#x20;

## Private vs Workspace folders

There are two types of folders: *Workspace* folders and *Private* folders. By default, every user has their own private folder.

**Private folders**: submissions in your private folder are only viewable by you. You can still share meetings in private folders using the share link, but no data from a submission in a private folder is viewable in workspace features like Views, accounts, contacts, and inbox. Participants still receive meeting summaries if user settings allow.

**Workspace folders**: submissions in any workspace folder are viewable by anyone in the workspace. Additionally, associated objects like highlights, accounts, and contacts are viewable by workspace users. Highlights and snippets from these submissions can also be cited by the AI assistant.

Workspace admins can create and rename as many workspace folders as they'd like. CustomerIQ will automatically route meetings it deems to be private to your private folder. [See more about routing here.](/product-guides/folders/private-meeting-routing)

## Changing the title of folders

On any folder simply click the name of the folder to change its name.

<figure><img src="/files/3lumWAIGsXyF0ZaC7S6h" alt=""><figcaption></figcaption></figure>

We provide each workspace with a set of default folders but you can rename or delete these folders any time.

## Use folders to organize submissions by team or type

Think of folders as a way to organize different calls and notes across different teams. For example, your sales teams and customer success teams are both recording meetings with CustomerIQ, you'll want to have each member default their meeting recordings to their respective folders

With Folders, you can have your sales members point their meeting recordings to the Sales Folder and CS managers point their recordings to the CS folder.

<figure><img src="/files/PDiJ5qIVxnoa6kD9lahn" alt=""><figcaption><p>Example customer success folder</p></figcaption></figure>

{% hint style="info" %}
**Pro tip:** It's tempting to use folders to organize calls and emails by things like customer names or deals but this is a lot to manage and not recommended. Instead, CustomerIQ automatically organizes highlights and submissions by associated contacts and accounts. You can always find these from the contacts or accounts pages.
{% endhint %}

### Moving submissions to a different folder

Many times users will record calls or emails that could be better suited in a different folder than their default setting, like sales calls and internal calls.

You can move any submission to any folder by selecting the submission from the index page and clicking "Move to folder"

<figure><img src="/files/lLm8j0ppo15k1VdhM2Dm" alt=""><figcaption><p>Move any submission to any folder</p></figcaption></figure>


# Private meeting routing

How to steer CustomerIQ's meeting routing specific to your workspace

Most teams use CustomerIQ to record and summarize every meeting they attend. This often includes private, internal meetings that users may not want to share with their broader organization.&#x20;

For this reason, each CustomerIQ workspace automatically routes meeting recordings between a user's default workspace folder and their private folder.

### Adjusting the routing behavior

Every workspace user has a default folder setting for either:

1. **A workspace folder**: when the default folder is a workspace folder, all recording meetings can be found there. Workspace folders are accessible to all users.
2. **Private meeting folder**: when the default folder is the user's private folder, their recorded meetings are only viewable by that person.

Default folder settings can be found in the [My Assistant settings](https://app.getcustomeriq.com/settings/my-assistant) for any user.

### Moving meetings between folders

Just like any other workspace folder, users can move meetings between their private folder and workspace folders by selecting the meeting in the index list and choosing to "Move to folder".&#x20;

[Learn more about moving submissions between folders here.](/product-guides/folders#moving-submissions-to-a-different-folder)


# Compliance Settings

This guide reviews the capabilities of key features for industries who need extra compliance and security, like centralizing transcripts and redacting PII

### PII Redaction

With PII redaction, you can automatically remove any PII (Personally Identifiable Information) from transcripts across meetings and calls with AI.&#x20;

Great for financial services, PII redaction will remove the following from any transcript and replace it with "###":

```
account_number
banking_information
blood_type
credit_card_cvv
credit_card_expiration
credit_card_number
date_of_birth
drivers_license
drug
event
gender_sexuality
healthcare_number
injury
ip_address
language
location
medical_condition
medical_process
money_amount
nationality
number_sequence
occupation
passport_number
password
person_age
political_affiliation
religion
url
us_social_security_number
username
vehicle_id
```

#### Enable PII Redaction

To enable this feature, go to Settings > Compliance and enable PII Redaction. Make sure to update settings before exiting the page to save the change.

### Transcript Forwarding

Admins also have the option to forward every transcript created in CustomerIQ to a central email address. This is helpful for populating compliance databases and other tools where you store conversation data.&#x20;

#### Enable Transcript Forwarding

To enable this feature, go to Settings > Compliance then enable Transcript Forwarding and add the email address to which you would like transcripts sent.


# CRM & AMS Integration


# AMS 360

How the CustomerIQ + AMS360 Integration Works

CustomerIQ can update activities in AMS360 based on activity in CustomerIQ.

This document describes what activity is created and how it works.

## Setup and Authentication

This will be a three step process:

1. Create a new WSAPI connection
2. Configure system notifications so that AMS360 and CustomerIQ can communicate
3. Finalize the configuration in CustomerIQ

Let's get started...

#### 1. Locate the AMS360 integration and information in CustomerIQ

1. In CustomerIQ, go to Settings > Apps & Integrations > AMS360
2. On the integration page find your&#x20;
   1. Destination Address
   2. Authentication Code
3. These will be used in the following steps

#### 2. Create a new Web Service API in AMS360

1. As an admin, log in to AMS360
2. Click the “Administration” tab
3. Click “Web Service API”
4. Click “New” in the pop up window
5. Web Service Application: leave as “Custom”
6. WSAPI Login ID: CustomerIQ
7. Choose a Password and Verify
   1. This is the password you will use to integrate with CustomerIQ. You create this yourself.
8. Under the “Data Security Based On” section, choose “Entity Access Security Only”
9. On the bottom half of the window under “Entity Access”, choose “Check All”
10. At the top right of the window select “Add”

#### 3. Complete Notification Service Setup in AMS360

1. In AMS360 click on “Administration”
2. Click “Notification Service Setup”
3. Click “New”
4. Enter “CustomerIQ” on the Notification Client field
5. Under Contact Info, enter your first and last name
6. Click "Add" on the right side of the "Recipient Information" banner
7. Recipient Name = CustomerIQNotificationClientService
8. Destination Address = the destination address in CustomerIQ's AMS360 integration page
9. Authentication Code = the authentication code in CustomerIQ's AMS360 integration page
10. Version = 2.0
11. Make sure Delivery Status is “On”
12. Retry Method is "Single Retry"
13. At the bottom of the window there is a section for Notification Types. Go through and check the boxes to Grant All Notifications
14. Click the “Save” icon

## What to expect

### Conversations

#### When a call conversation is created in CustomerIQ

* We'll record an activity in AMS360 and include:
  * Call summary
  * Link to call conversation in CustomerIQ
  * The activity type can be mapped to call types in CustomerIQ
  * For example, billing call can be a “billing inquiry activity”
* We will update any available customer properties found in the conversation

#### When a meeting conversation is created in CustomerIQ

* We'll record an activity in AMS360 and put the entire call summary in the activity
* We will update any available contact properties found in the conversation

#### When an email conversation is created in CustomerIQ

* We'll record an activity in AMS360 and put the entire email in the activity along with attachments (where possible)
* We will update any available customer properties found in the conversation

#### When a voice note conversation is created in CustomerIQ

* We'll record an activity in AMS360 and put the entire call summary in the activity
* We will update any available customer properties found in the conversation

### Tickets

#### When a ticket is created in CustomerIQ

* We'll create a suspense in AMS360 set for the same date/time
* We'll also record an activity in AMS360 based on the conversation from which the ticket originated (see above)

#### When a ticket is marked complete in CustomerIQ

* We'll mark the suspense completed in AMS360

### Deals

#### When a deal is created in CustomerIQ

* We'll create a prospect in AMS360

#### When you move a deal to Closed/Won in CustomerIQ

* We'll update the prospect to a Customer in AMS360 AND create a customer in AMS360
* We'll create a policy shell in AMS360

### Contacts

#### When a contact is created in CustomerIQ

* We'll create a suspect in AMS360
* We will search to avoid duplicates
* If it's a Commercial suspect, we'll update the firm name in AMS360 with the associated Account name from CustomerIQ
* We will update all possible contact properties found from any conversation logged in CustomerIQ


# AgencyZoom

How the CustomerIQ + AgencyZoom Integration Works

CustomerIQ can automatically add notes in AgencyZoom based on activity in CustomerIQ.

This document describes what activity is created and how it works.

## Setup and Authentication

1. In CustomerIQ, go to Settings > Apps & Integrations > AgencyZoom
2. Add credentials of the admin user to update AgencyZoom with notes&#x20;
   1. These credentials are always encrypted in transit and at rest
   2. Notes added in AgencyZoom will appear to have been added by this user
3. Once you've saved the credentials, enable the integration
4. Now you'll start to see call and email summaries logged to the correct lead or customer record in AgencyZoom

{% hint style="info" %}
**User Credentials:** Since CustomerIQ uses the authenticated user to update records, we recommend creating a dedicated admin user for CustomerIQ so that all updated records appear as updated by CustomerIQ (or the name of the user you create). This way, you can manage the CustomerIQ integration separately of how you manage human users in the case of employment change or password changes.
{% endhint %}

## What to expect

### Conversations

#### When a call conversation is created in CustomerIQ

* We search for available lead and customer records to match the contact in CustomerIQ.
* We'll record an activity note in AgencyZoom and include:
  * Call summary
  * Link to call conversation in CustomerIQ

#### When a meeting conversation is created in CustomerIQ

* We search for available lead and customer records to match the contact in CustomerIQ.
* We'll record an activity note in AgencyZoom and include:
  * Meeting summary
  * Link to call conversation in CustomerIQ

#### When an email conversation is logged in CustomerIQ

* We search for available lead and customer records to match the contact in CustomerIQ.
* We'll record an activity note in AgencyZoom and include:
  * Email summary
  * Link to email conversation in CustomerIQ

#### When a voice note conversation is created in CustomerIQ

* We search for available lead and customer records to match the contact in CustomerIQ.
* We'll record an activity note in AgencyZoom and include:
  * Note summary
  * Link to note conversation in CustomerIQ

### Contacts

#### When a contact is created in CustomerIQ

* We don't do anything in AgencyZoom. Notes are only logged to existing lead and customer records


# HubSpot

Automate data entry in your HubSpot CRM

## Setup and Authentication

#### Step 1: Go to workspace settings

1. From workspace settings, go to Apps and integrations
2. On the HubSpot card, select Configure

**Note**: You must be a HubSpot admin to connect this integration

#### Step 2: Authenticate HubSpot

1. Under configuration, select Authenticate, choose the correct HubSpot account, and authorize CustomerIQ to access the required objects

#### Step 3: Configure properties

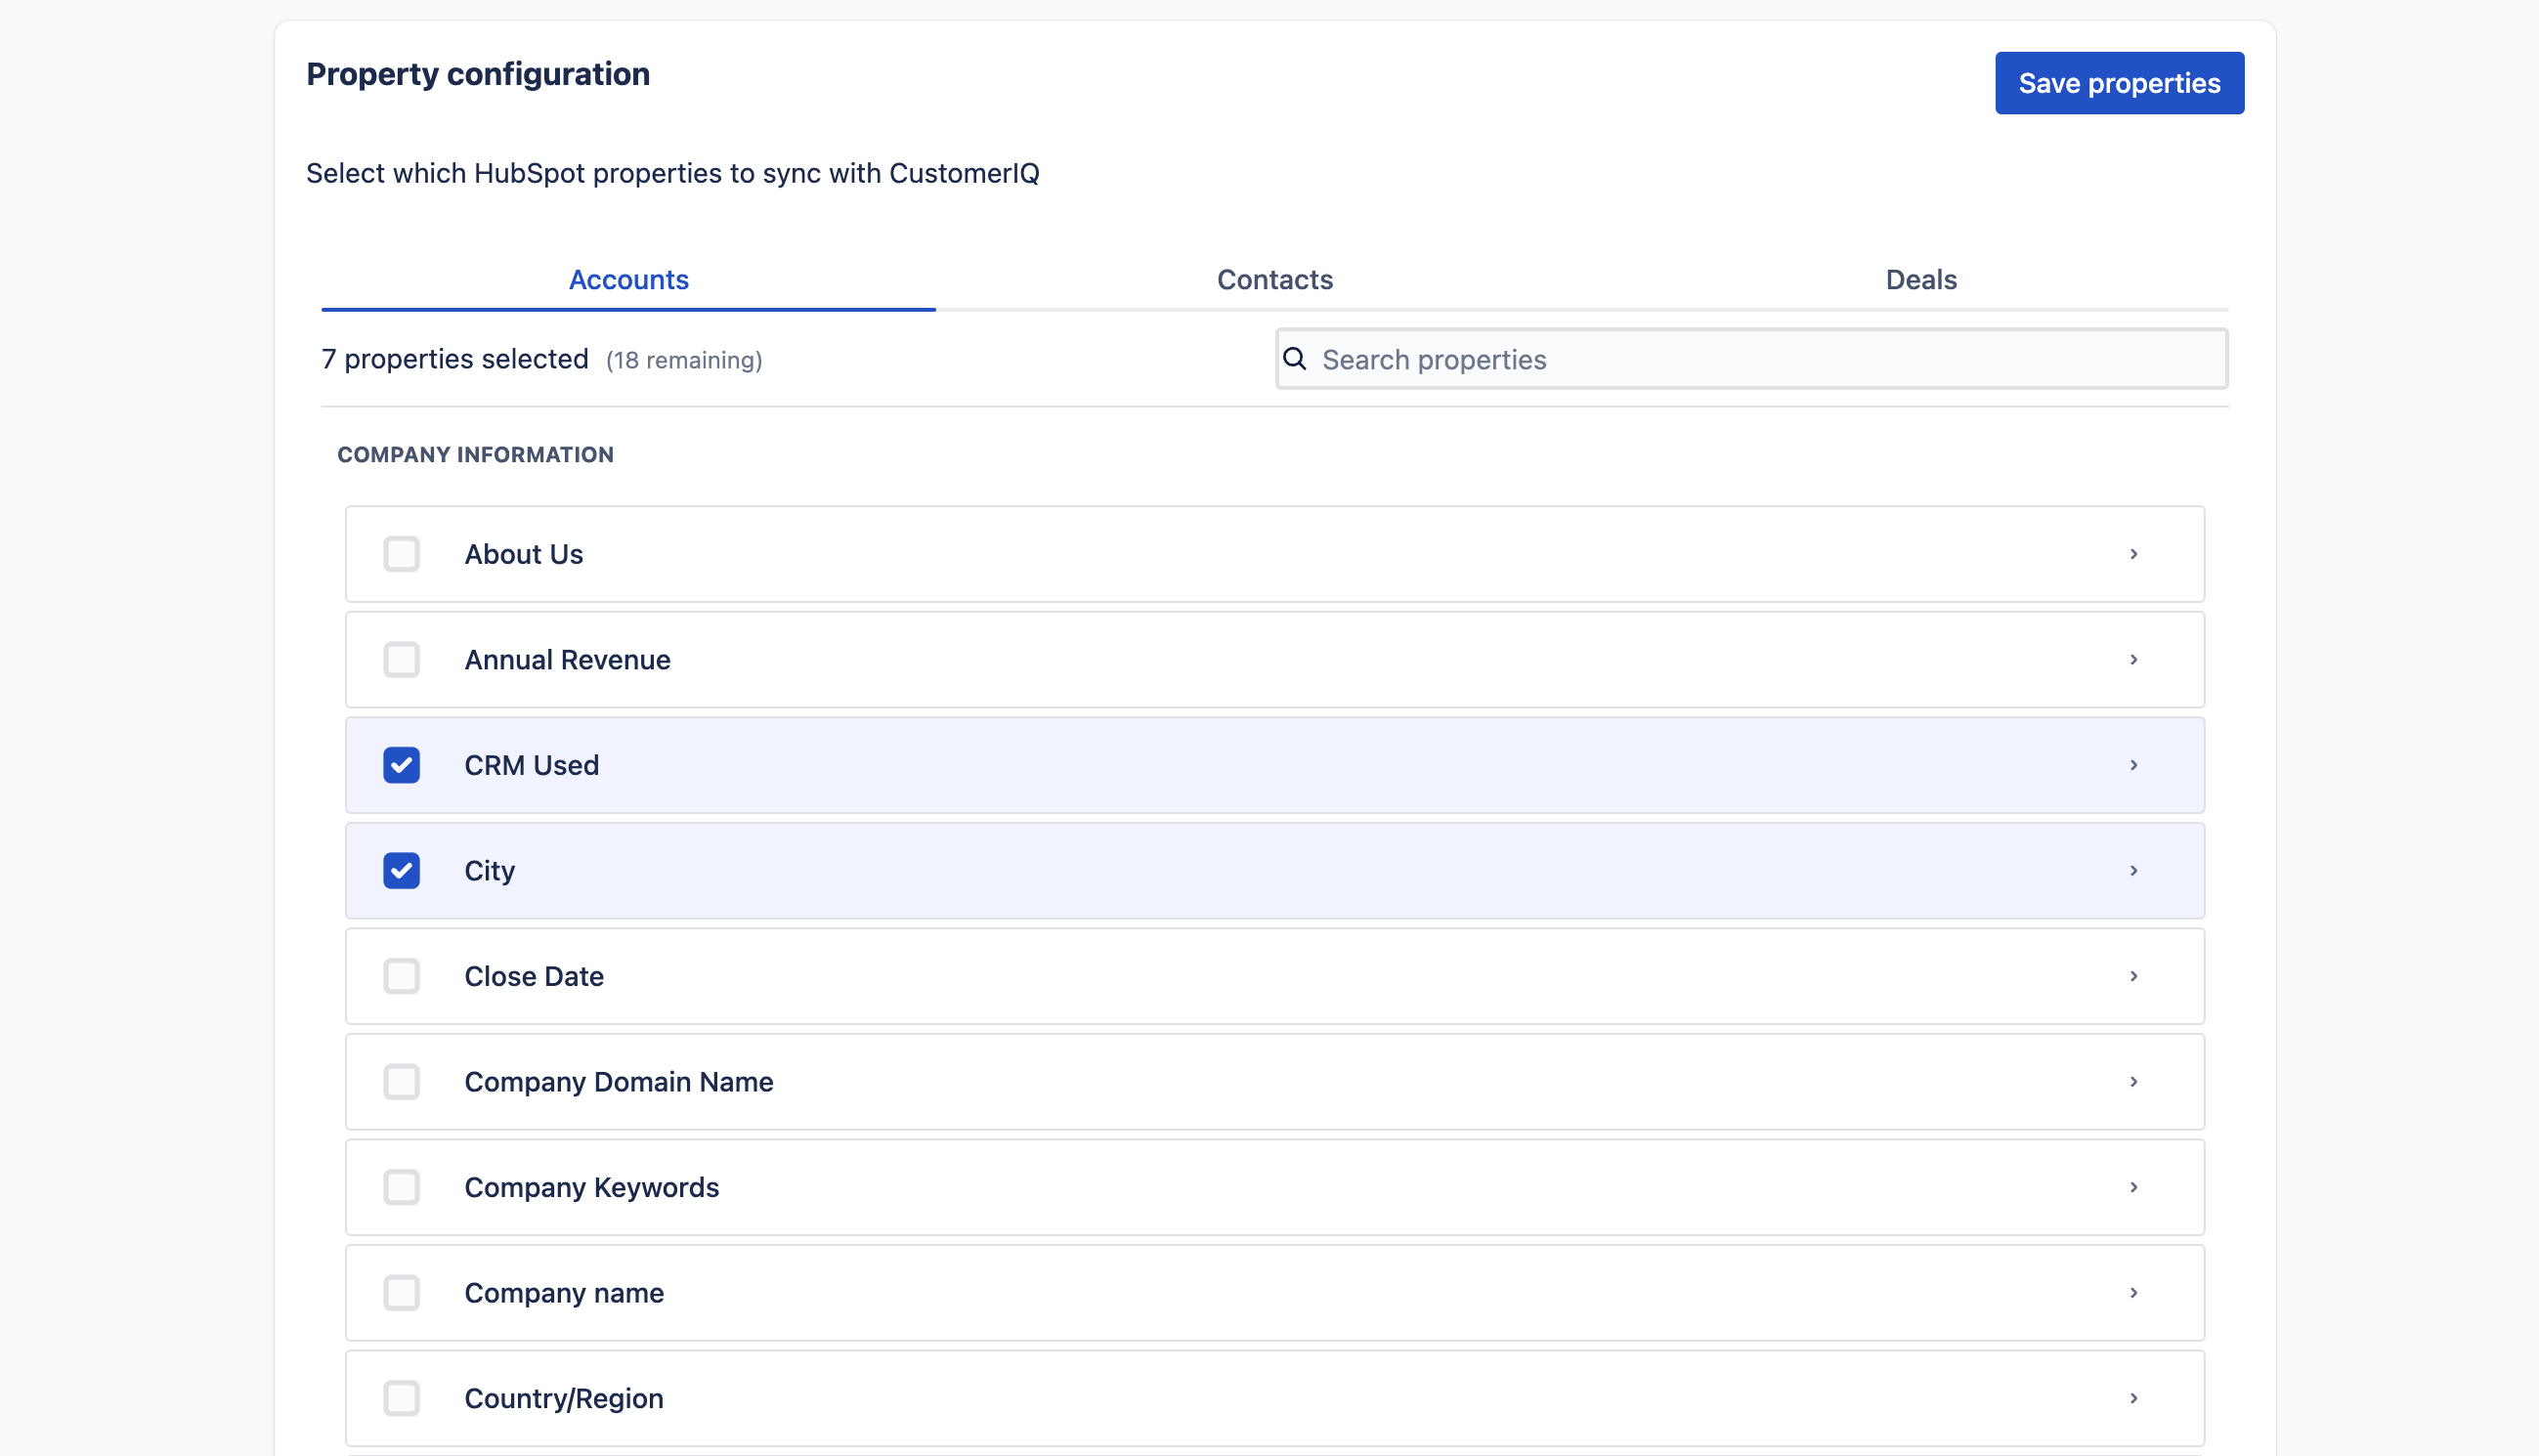
Now that you're connected, scroll down through the HubSpot configuration page to the Property Configuration tab.

For each object (Contacts, Accounts, Deals), select the properties you'd like CustomerIQ to update from logged conversations such as emails, virtual meetings, calls, or voice notes.

By selecting a property, CustomerIQ will listen for possible property values within each conversation.

When you're done selecting properties, click "Save Properties"

{% hint style="info" %}
**Property Descriptions**: CustomerIQ's AI uses your CRM property descriptions as instructions for how to complete each property. Make sure that descriptions are clear, concise, and provide context where necessary. For example, if you're asking CustomerIQ to capture a dropdown value that uses language specific to your business, like pricing plans, make sure you provide the necessary context for the AI to make the best choice.
{% endhint %}

## What to expect

### Conversations

#### When a voice note is created in CustomerIQ

* We will summarize the note and add as a note in HubSpot on the contact record
* We will search existing contact records by email in order to prevent duplicates
* Any relevant contact, account, and deal properties will be updated

#### When a meeting is created in CustomerIQ

* We will summarize the conversation and add as an internal note on the meeting activity
* We will search existing contact records by email in order to prevent duplicates
* If there is no existing meeting activity, we will create one
* Any relevant contact, account, and deal properties will be updated


# Salesforce

If you haven't already, review our Zapier integration docs to get access to the Zapier integration for CustomerIQ:

{% content-ref url="/pages/x3pCASJHvCCoxJYsfkOR" %}
[Zapier](/data-guides/other-integrations/zapier)
{% endcontent-ref %}

### Step 1: Create/update a CustomerIQ folder for your Salesforce data

1. Go to your [folders page](https://app.getcustomeriq.com/folders) and make sure you've setup the folder you'd like to store your Salesforce data

**Note**: Make sure the folder settings are set to extract or not extract as you'd like. You can always change this later but it's helpful to have it right now for testing.

### Step 2: Connect Zapier to Salesforce as the Trigger

1. Go to your [Zaps page](https://zapier.com/app/zaps) and create a new Zap
2. Click on the Trigger card and search for Salesforce
3. Use "Updated field on record" as the event
4. Authenticate your Salesforce app with Zapier

### Step 3: Connect CustomerIQ as the Action

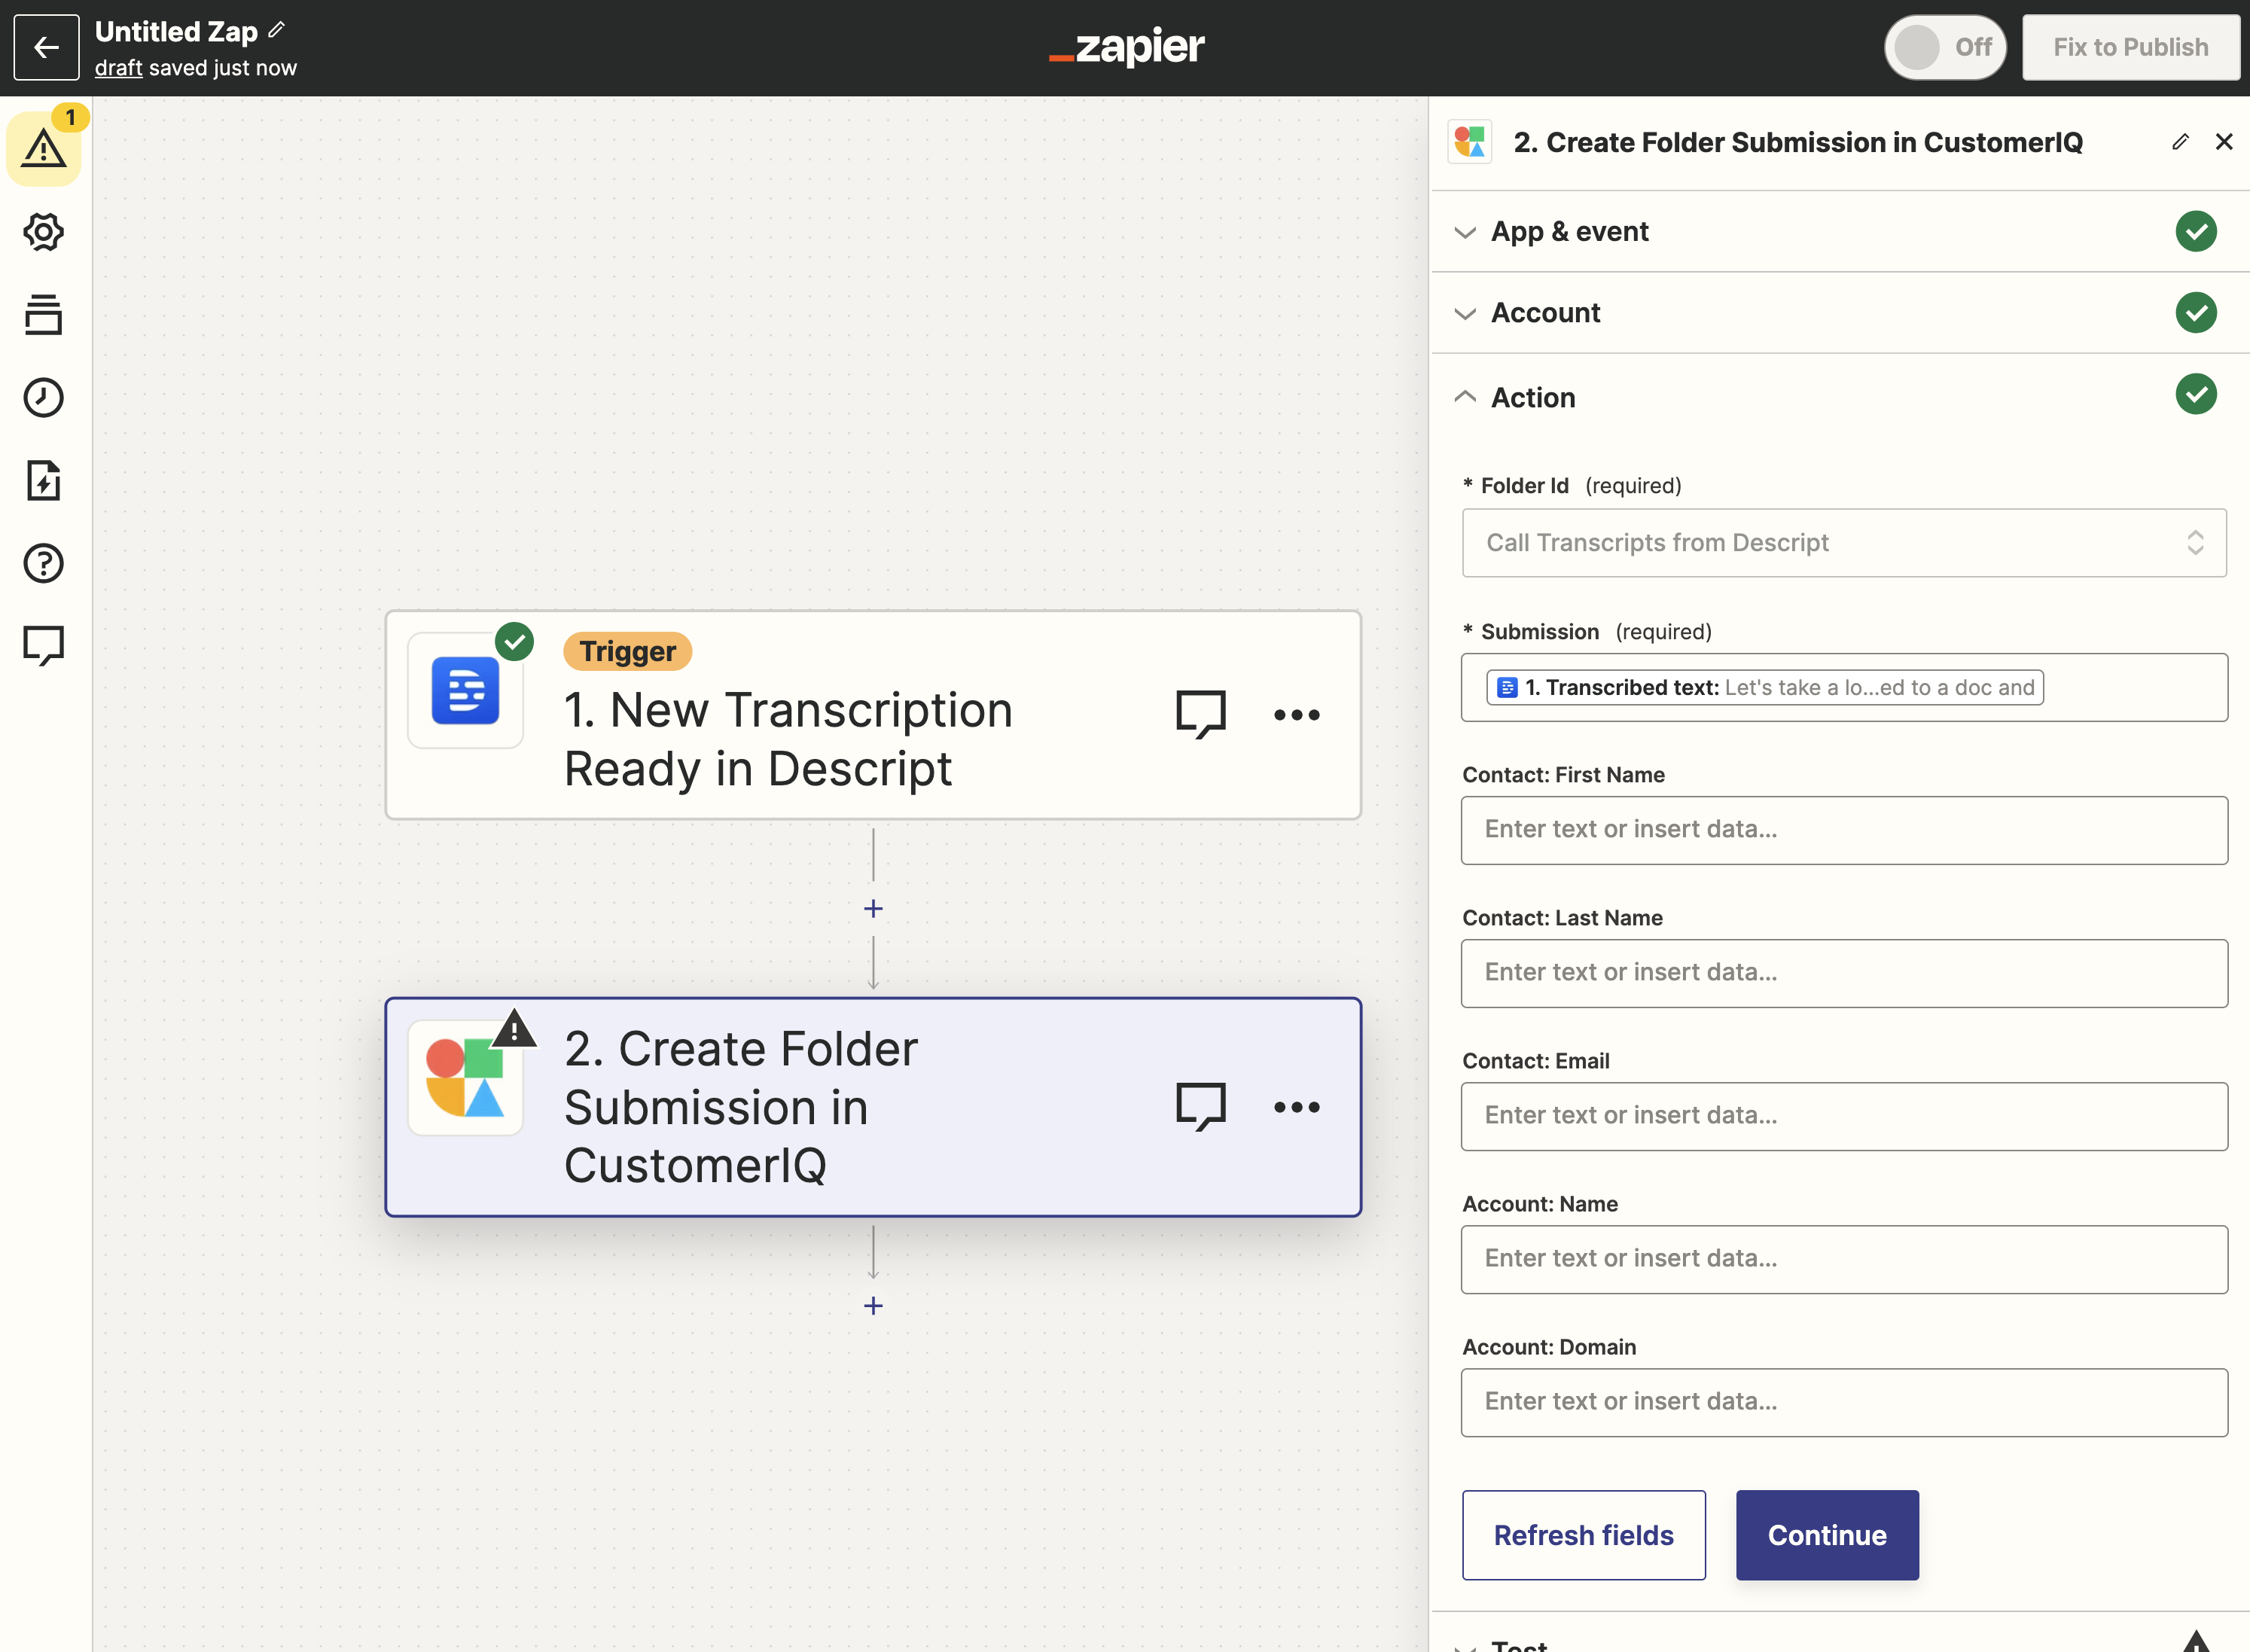
1. If you haven't already, join the CustomerIQ Zapier integration using this link (<https://zapier.com/developer/public-invite/190520/bb64cfd83c0861b92d7f316fa9b3080b/>).
2. Click on the Action card and search for CustomerIQ.&#x20;
3. Set the Action event to "Create Folder Submission"
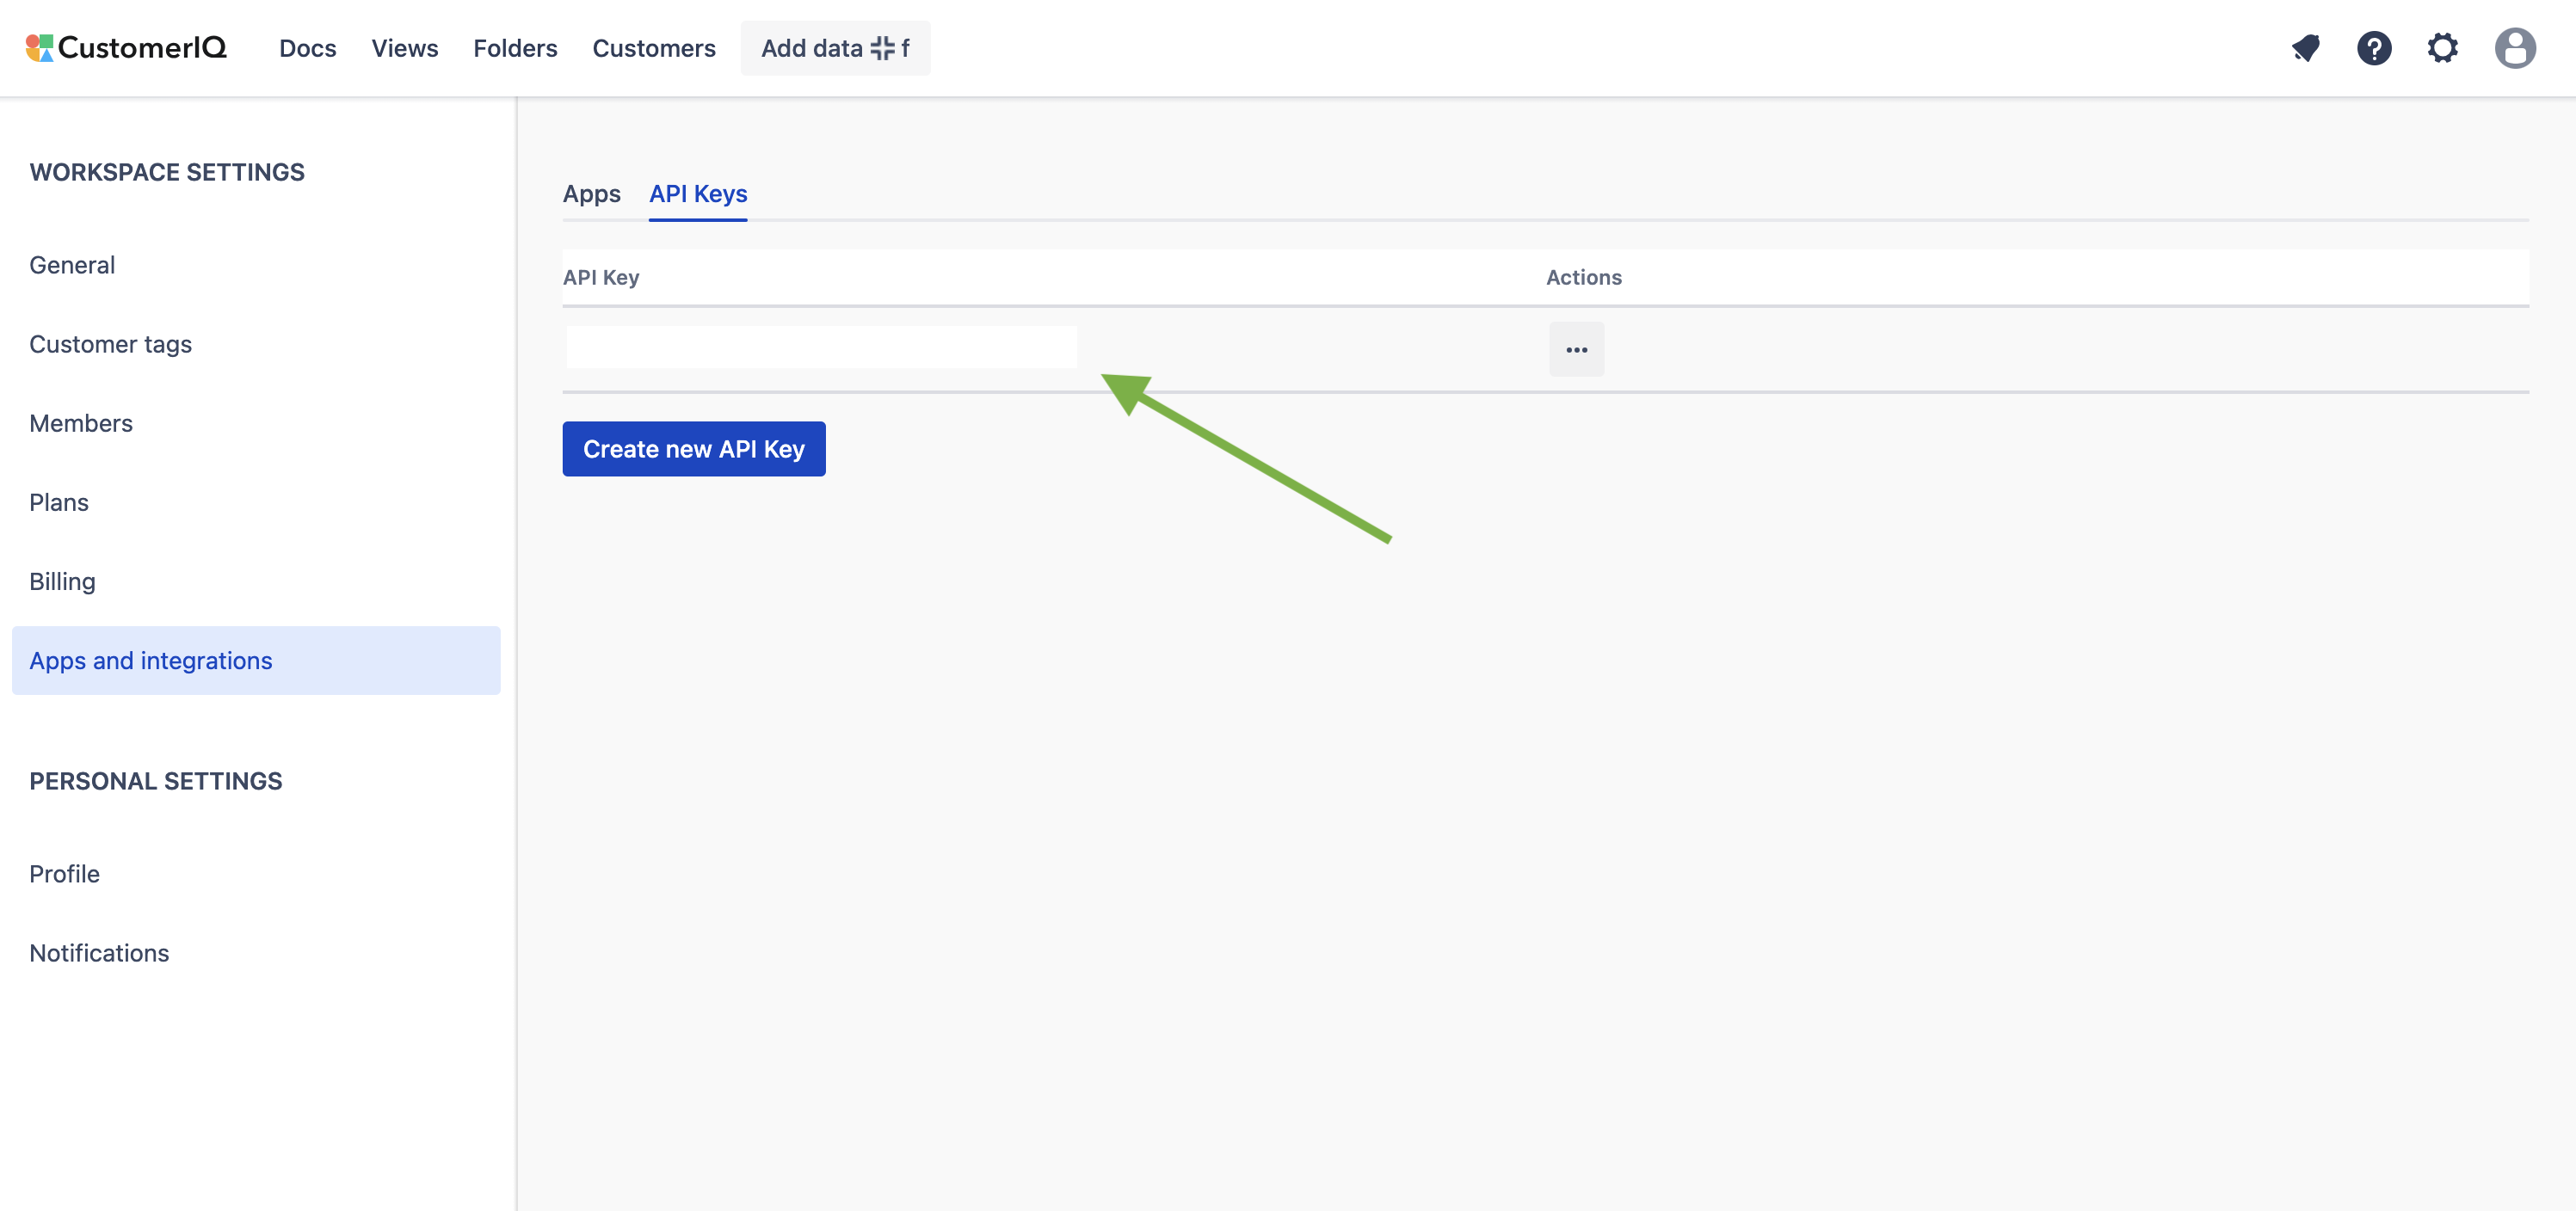
4. If you haven't already, authenticate your CustomerIQ workspace using an API key from your [Apps and integrations page > API Keys](https://app.getcustomeriq.com/settings/integrations)
5. Choose the folder to send submissions to
6. Map your desired submission field from Salesforce to the Folder submission field
7. Map remaining fields
8. Test your integration. After refreshing the CustomerIQ window you should see the submission.

### Step 4: Publish your workflow and transfer data (where possible)

1. Publish your Zap. Now new data in Salesforce will flow into your CustomerIQ folders!
2. Some integrations allow you to initiate a transfer of historical data. When prompted, we recommend doing this so you can get a jumpstart on your analysis.

**Note**: Where transfers are unavailable, we recommend importing historical data via CSV:

{% content-ref url="/pages/n795y0fLZDv5bWxx5UCp" %}
[CSV Import](/data-guides/other-integrations/csv-import)
{% endcontent-ref %}


# Redtail

Connect your Redtail CRM to your CustomerIQ workspace to automate meeting notes and other data entry

As a workspace admin:

1. Go to Settings > Apps & Integrations > Redtail
2. Follow the instructions on the page to authenticate with Redtail


# VoIP Integrations


# Lightspeed Voice

How to setup the CustomerIQ integration with Lightspeed Voice

The Lightspeed Voice integration automatically syncs your call recordings to CustomerIQ immediately after the call.

### Prerequisites

Before you begin, you'll need:

* Admin access to your Lightspeed Voice account
* Permission to create new users in Lightspeed Voice
* Admin or integration setup permissions in CustomerIQ

### Step 1: Choose or Create a Lightspeed User

You have two options for connecting CustomerIQ to Lightspeed Voice:

#### Option A: Use an Existing User

Use your own Lightspeed user account or another team member's user account. This is the quickest option if the user already has the necessary permissions.

#### Option B: Create a New User (Recommended)

Create a dedicated user for the integration. We recommend using an email alias that routes to your inbox, such as:

* `yourname+customeriq@yourcompany.com`

**Why use an email alias?**

* You'll receive the password setup email directly
* Maintains separation between the integration and personal accounts
* Easy to manage without creating a separate email inbox

To create the user:

1. Log into Lightspeed Voice as an admin
2. Navigate to **Flyout Menu > Management > Account Settings > Users**
3. Create a new user with your email alias
4. Check your inbox for the password setup email from Lightspeed
5. Complete the password setup process
6. Note the email address and password—you'll need these for CustomerIQ

### Step 2: Authenticate Lightspeed in CustomerIQ

**In CustomerIQ:**

1. Navigate to [**Settings > Integrations > Lightspeed Voice**](https://app.getcustomeriq.com/settings/integrations/lightspeed)
2. Enter the email address and password of your Lightspeed user
3. Click **Save**
4. Now, copy the Webhook URL to your clipboard and head to Lightspeed

**In Lightspeed**

1. Login as an admin
2. Go to: Management > Integrations > Zapier.&#x20;
3. Create a new integration named "CustomerIQ"
4. Then scroll down to "Triggers" and find "Send Call Data on Hangup" and click to expand.
5. Paste the webhook from CustomerIQ
6. Click **Save**

### What to Expect

* **First sync:** Your call recordings should appear in your CustomerIQ workspace within the next hour
* **Ongoing syncs:** CustomerIQ will automatically receive recordings as they're available

### Troubleshooting

**Authentication failed?**

* Verify the email and password are correct
* Ensure the user account is active in Lightspeed Voice

**No recordings appearing?**

* Check that calls were actually recorded in Lightspeed Voice during the sync period
* Verify your CustomerIQ workspace settings aren't filtering out the recordings
* Wait up to one hour after initial setup for the first automated sync to complete

**Need to update credentials?** You can update the password or switch to a different Lightspeed user at any time in **Settings > Integrations > Lightspeed Voice**.

### Security Considerations

* Use a strong, unique password for your integration user
* Regularly audit which users have bulk recording permissions
* If using a dedicated user, consider disabling it if you need to temporarily pause the integration
* Review your integrated recordings periodically to ensure sync is working as expected

***

**Questions?** Contact our support team at <support@getcustomeriq.com>&#x20;


# RingCentral

How to setup the CustomerIQ integration with RingCentral

The RingCentral integration automatically syncs your call recordings to CustomerIQ immediately after the call.

Before you being, make sure:

1. All people who participate in calls via RingCentral are members of your workspace. This includes people who make calls from the same phone number.

{% hint style="info" %}
**Members in CustomerIQ**: Many features within CustomerIQ, like Call Performance Reports, rely on each conversation having a member associated within CustomerIQ. For teams who have multiple people using the same phone line, CustomerIQ's AI will use the available member list to assign the correct member with the correct call. This improves reports and visibility.
{% endhint %}

**Authenticate with CustomerIQ**

1. Within CustomerIQ, go to Settings > Apps & Integrations > Ring Central
2. Authenticate with RingCentral

You're now connected! All recorded calls from RingCentral will start to appear and process within CustomerIQ

**Set phone numbers for each workspace member**

1. In order to improve user mapping to conversations, set the phone number assigned to each user
2. As a workspace admin, go to members
3. Masquerade as the user
4. Once masquerading as the user, go to their Profile Settings
5. Set their phone number here

Now all calls from this phone number will be mapped to this user.


# Meeting Integrations


# Google Meet

How to capture Google Meet meetings with CustomerIQ

CustomerIQ's meeting assistant can automatically join and record any Google Meet meeting.

To integrate Google Meet meetings, please [configure your meeting assistant](/start-guide/user-setup-guide/my-assistant).


# Microsoft Teams

CustomerIQ automatically records any MS Teams meeting where the meeting assistant is present

CustomerIQ's meeting assistant can automatically join and record any MS Teams meeting.

To integrate Microsoft Teams meetings, please [configure your meeting assistant](/start-guide/user-setup-guide/my-assistant).


# Zoom

A step-by-step guide to managing your Zoom meetings with CustomerIQ

CustomerIQ's meeting assistant can automatically join and record any Zoom meeting.

To integrate Zoom meetings, please [configure your meeting assistant](/start-guide/user-setup-guide/my-assistant).

### Troubleshooting

{% hint style="info" %}
**Set Zoom to Automatically Record Meetings**

Automatically recording meetings is the easiest way to get transcripts into CustomerIQ

* **Sign in to the Zoom web portal:** Go to the Zoom web portal (<https://zoom.us/>) and sign in with your admin credentials.
* **Navigate to Account Settings:**
  * In the navigation menu, click on "Account Management" and then "Account Settings" (or just "Settings" depending on your Zoom version).
* **Enable Automatic Recording:**
  * Under the "Recording" tab, look for the "Automatic Recording" option.
  * Toggle the switch to enable it.
  * Either "Record to computer files" or "Cloud recording" is required to integrate with CustomerIQ
    {% endhint %}


# Other Integrations


# CSV Import

The CSV import modal is a powerful way to load data to folders

Launch the CSV Import modal by:

* Click "Add data" in the top bar navigation
* Click "Import" from any folder page

Follow these steps to initiate your import:

### Step 1: Choose a CSV or [download our template](https://static.getcustomeriq.com/CustomerIQ_CSV_Upload_Template.csv)

<figure><img src="/files/W60D3cKl4o8KYQoCInlX" alt=""><figcaption></figcaption></figure>

### Step 2: Map the columns in the CSV to CustomerIQ Fields

<figure><img src="/files/TjkTKvzdYzyAlSp5UGZj" alt=""><figcaption></figcaption></figure>

The only required field is to map at least 1 folder submission.&#x20;

**Find the column with the text you want analyzed and map it to the correct folder in CustomerIQ.**

Beyond folder submissions, it is recommended to add as many available CustomerIQ fields as possible to make for more thorough analysis in the future.

### Step 3: Confirm import

Confirm the import name and select "Finish import"

### Step 4: Go to the folder where you imported data

You should see the data flowing in and highlights being extracted automatically where applicable.


# Webhooks

Use webhook events from CustomerIQ to power any workflow

Webhooks in CustomerIQ let you automatically send data to external tools — like Slack, Zapier, or Make — whenever a specific event occurs. Currently, webhooks can be triggered when a meeting transcript is completed.

### Setup Instructions

To create a webhook in CustomerIQ, follow these steps:

1. **Log into your CustomerIQ workspace**
2. Navigate to **Settings > Apps & Integrations > Webhooks**
3. Go to **"Add a New Webhook"**
4. In the form:
   * Enter your **Webhook Name**
   * Enter your **Webhook URL** (this is the endpoint where you want CustomerIQ to send data)
   * Choose the **Event** you want to trigger the webhook (`meeting.transcript.completed`)
5. Click **Save**

> ⚠️ You must be a workspace admin to configure webhooks.

***

### Webhook Event & Payload

#### Supported Event

* `meeting.transcript.completed`

This event fires when a meeting transcript is finished processing and includes all associated metadata.

#### Sample Payload

After creating a webhook, you can click **"View Sample Payload"** to see the exact JSON structure that will be sent.

Example:

```json
{
  "id": "evt_12345",
  "event_type": "meeting.transcript.completed",
  "timestamp": "2025-05-02T12:26:41.688Z",
  "data": {
    "account_name": "Acme",
    "contact_email": "email@acme.com",
    "folder_name": "Sales Meetings",
    "submission_url": "https://app.getcustomeriq.com/folders/2049d088/submissions/cbfdd995",
    "title": "Sales Call",
    "transcript": "[00:00:02] Sarah (Acme):\n Hi Mike, thanks for jumping on today..."
  }
}
```

***

### Working with Webhooks (Zapier / Make)

While the payload cannot be customized inside CustomerIQ, you can filter, transform, and route webhook data using tools like:

* [Zapier](https://zapier.com/)
* [Make (formerly Integromat)](https://www.make.com/)

Simply connect your webhook trigger in those platforms and map the fields as needed.

***

### Learn More

Visit our full guides library at:\
👉 <https://www.getcustomeriq.com/guides>

Need help building workflows? [Reach out to support](https://www.getcustomeriq.com/contact/support).


# Zendesk

How to send tickets in Zendesk to CustomerIQ folders for analysis

By connecting Zendesk you can find themes and track topics across all your tickets.

After connecting Zendesk you'll have a dedicated Zendesk folder

<figure><img src="/files/lkSlsyGx5sLctM17paiR" alt=""><figcaption><p>Folders automatically created by Hubspot</p></figcaption></figure>

### Step 1: Go to workspace settings

1. From workspace settings, go to [Apps and integrations](https://app.getcustomeriq.com/settings/integrations)
2. On the Zendesk card, select Configure

**Note**: You must be a Zendesk admin to connect this integration

### Step 2: Authenticate Zendesk

1. Under configuration, select Authenticate,&#x20;
2. You will need your Zendesk sub domain to authenticate. [Here's where to find it.](https://support.zendesk.com/hc/en-us/articles/4409381383578-Where-can-I-find-my-Zendesk-subdomain-)
3. Enter your user Zendesk email and password in the modal that pops up, select sign in, and grant the necessary permissions

<figure><img src="/files/UXHYfoTSTvEwzGMhvpUy" alt=""><figcaption><p>Zendesk configure modal</p></figcaption></figure>

<figure><img src="/files/gyfGJPawx3RYhbg6fwsf" alt=""><figcaption><p>Zendesk authentication modal</p></figcaption></figure>

### Step 3: Save configuration

1. After authentication, CustomerIQ will automatically configure a default folder to store your Zendesk tickets. You will see this reflected in the configuration modal.
2. Select Save

You're all set! Tickets will automatically start streaming from Zendesk. You can see this now by heading over to folders.

## Zendesk FAQ

#### How much data is pulled on the first sync?

After the first connection we sync any tickets created/updated in the last 30 days. For larger accounts on a free plan, this may use most or all of your free credits. You can track this usage in your workspace settings > billing > usage

#### How long until the first sync is ready for analysis?

This depends on the number of tickets in your account. For most accounts this initial data is ready for analysis in views in \~30 minutes. For larger accounts this could take a few hours. You can monitor the progress of your sync from folders.

#### When does data update?

We sync new data from your Zendesk account every 60 minutes. This includes updated threads to tickets.


# Zapier

How to send data from any app to CustomerIQ folders using Zapier

In this guide we'll discuss how to use CustomerIQ's Zapier integration to send data from over 5,000 applications to any folder in CustomerIQ.

### Step 1: Join the CustomerIQ Zapier Integration Beta

Follow this link to get access to the integration: <https://zapier.com/developer/public-invite/190520/bb64cfd83c0861b92d7f316fa9b3080b/>

### Step 2: Create a Zap

<figure><img src="/files/z89qKbVhDMqYZt2WhzOp" alt=""><figcaption></figcaption></figure>

From your Zapier dashboard, click Create a Zap

### Step 3: Select your application as the Trigger

<figure><img src="/files/oUzmVgBP2EI77sEA6syp" alt=""><figcaption></figcaption></figure>

Click on the trigger option and search for the app you want to connect.

Select the event you want to trigger a submission to CustomerIQ

Authenticate with the application and continue to the action step.

### Step 4: Search CustomerIQ as the action

<figure><img src="/files/j41i9wwFV3ht5JmviGnL" alt=""><figcaption></figcaption></figure>

Search for CustomerIQ as the action. If you joined the beta invite (above) you should see it with a "By Invite" tag.

Choose the events: Create a folder submission

### Step 5: Get your CustomerIQ API Key

<figure><img src="/files/Dc1Ki6QIPtB4piDJdviR" alt=""><figcaption></figcaption></figure>

Go to the [Apps and Integrations page](https://app.getcustomeriq.com/settings/integrations) of your workspace settings.

Select the API Keys tab

Create an API key and copy it to your clipboard.

Go back to Zapier to authenticate your CustomerIQ account

### Step 6: Authenticate your app and map fields

<figure><img src="/files/Jfnrb42mdJJqK6kXS0vW" alt=""><figcaption></figcaption></figure>

**Note**: Make sure you've created the folder in CustomerIQ you want to send submissions to

1. In Zapier, Select the Folder to send submissions to in Zapier
2. Map the text from your application to the submission field of the folder. This is the text CustomerIQ will analyze
3. Test your integration. Refresh your CustomerIQ window, you should see the submission in the folder.
4. Give your Zap a name and click Publish!

Now data will automatically send from your application to the mapped CustomerIQ folder

### (Optional) Step 7: Transfer historical data

Some integrations support Zapier transfers, which lets you zap historical records into your selected folders. We recommend using this feature where possible to get a jumpstart on your analysis in CustomerIQ


# Slack

If you haven't already, review our Zapier integration docs to get access to the Zapier integration for CustomerIQ:

{% content-ref url="/pages/x3pCASJHvCCoxJYsfkOR" %}
[Zapier](/data-guides/other-integrations/zapier)
{% endcontent-ref %}

### Step 1: Create/update a CustomerIQ folder for your Slack data

1. Go to your [folders page](https://app.getcustomeriq.com/folders) and make sure you've setup the folder you'd like to store your Slack data

**Note**: Make sure the folder settings are set to extract or not extract as you'd like. You can always change this later but it's helpful to have it right now for testing.

### Step 2: Connect Zapier to Slack as the Trigger

1. Go to your [Zaps page](https://zapier.com/app/zaps) and create a new Zap
2. Click on the Trigger card and search for Slack
3. Use "New message posted to channel" as the event
4. Authenticate your Slack app with Zapier

### Step 3: Connect CustomerIQ as the Action

1. If you haven't already, join the CustomerIQ Zapier integration using this link (<https://zapier.com/developer/public-invite/190520/bb64cfd83c0861b92d7f316fa9b3080b/>).
2. Click on the Action card and search for CustomerIQ.&#x20;
3. Set the Action event to "Create Folder Submission"
4. If you haven't already, authenticate your CustomerIQ workspace using an API key from your [Apps and integrations page > API Keys](https://app.getcustomeriq.com/settings/integrations)
5. Choose the folder to send submissions to
6. Map the text field from the Slack message to the Folder submission field
7. Map remaining fields
8. Test your integration. After refreshing the CustomerIQ window you should see the submission.

### Step 4: Publish your workflow and transfer data (where possible)

1. Publish your Zap. Now new data in Slack will flow into your CustomerIQ folders!
2. Some integrations allow you to initiate a transfer of historical data. When prompted, we recommend doing this so you can get a jumpstart on your analysis.

**Note**: Where transfers are unavailable, we recommend importing historical data via CSV:

{% content-ref url="/pages/n795y0fLZDv5bWxx5UCp" %}
[CSV Import](/data-guides/other-integrations/csv-import)
{% endcontent-ref %}


# Outlook Shared Inboxes

Connect your shared mailbox to CustomerIQ and be sure every message you send from it is also saved in the mailbox’s Sent Items for full conversation history.

#### 1. Before you start

* **Permissions you need**
  * *Microsoft 365 Global Admin* — to grant OAuth consent and change the shared-mailbox settings.
  * *Shared-mailbox member* with **Send As** or **Send on Behalf of** rights.
* **What we’ll cover**
  1. Authenticate the shared mailbox in CustomerIQ.
  2. Turn on the two “Copy to Sent Items” switches in Microsoft 365 so sent mail lands in the mailbox’s own Sent Items.

***

#### 2. Authenticate the shared mailbox

1. **In CustomerIQ**
   * Go to **Settings ▸ Apps & Integrations ▸  Shared Outlook Inbox**
   * Follow the prompts to configure
2. **Back in CustomerIQ**
   * Confirm the mailbox now shows the status **Connected**.

***

#### 3. Enable “Copy to Sent Items” for the mailbox

Microsoft 365 doesn’t save *Send As* or *Send on Behalf* messages to the shared mailbox unless you flip two switches:

1. **Open the Microsoft 365 admin center** and navigate to\
   **Teams & groups ▸ Shared mailboxes**.
2. Select the mailbox, then choose **Sent items**.
3. Turn **ON** both options:
   * **Copy items sent as this mailbox**
   * **Copy items sent on behalf of this mailbox**
4. Click **Save**.\
   (PowerShell alternative:\
   `Set-Mailbox "<shared@domain>" -MessageCopyForSentAsEnabled $true -MessageCopyForSendOnBehalfEnabled $true`) [learn.microsoft.com](https://learn.microsoft.com/en-us/microsoft-365/admin/email/configure-a-shared-mailbox?view=o365-worldwide\&utm_source=chatgpt.com)[learn.microsoft.com](https://learn.microsoft.com/en-us/exchange/recipients-in-exchange-online/manage-user-mailboxes/automatically-save-sent-items-in-delegator-s-mailbox?utm_source=chatgpt.com)

All future mail you send from CustomerIQ—or Outlook—will now appear in **Sent Items** for both the shared mailbox *and* the user who sent it.

***

#### 4. Verify everything works

1. Send a quick test email **from CustomerIQ** using the shared address.
2. In Outlook (or OWA) open the shared mailbox → **Sent Items**.
   * You should see the test message.
3. Open **Sent Items** in your personal mailbox—you’ll see the same message there too.

***

#### 5. Troubleshooting

| Symptom                                           | Fix                                                                                                                     |
| ------------------------------------------------- | ----------------------------------------------------------------------------------------------------------------------- |
| **Message isn’t in shared Sent Items**            | Re-check that both “Copy items…” toggles are **On** (it’s mailbox-specific).                                            |
| **Duplicate entries in Sent Items**               | Normal—one copy in your mailbox, one in the shared mailbox. (Remove the personal copy with an Outlook rule if desired.) |
| **OAuth consent fails**                           | Make sure you’re logged in as a Global Admin when you grant consent.                                                    |
| **Drafts don’t appear inline in Outlook desktop** | Outlook’s conversation view for shared mailboxes ignores Drafts; open the mailbox in OWA to see inline drafts.          |

***

#### 6. You’re done

Your shared inbox is now live in CustomerIQ, and every reply you send will be captured in the mailbox’s own **Sent Items** for a complete audit trail.


# Email Assistant FAQs

Frequently asked questions about CustomerIQ's email assistant

### Why don't I see drafts?

In order to organize drafts CustomerIQ generates you need to enable Conversation View in your inbox.

<details>

<summary>How to enable conversation view for Outlook</summary>

**For Classic Outlook:**

1. Open Outlook and go to the **View** tab on the ribbon.​
2. Check the box labeled **Show as Conversations**.​
3. Choose either **All mailboxes** or **This folder** to apply the setting accordingly.

**For New Outlook:**

1. Click on the **Settings** icon (gear-shaped) at the top of the page.​
2. Select **Mail** and then choose **Layout**.
3. Under **Message organization**, select **Show email grouped by conversation**.

**For Outlook on the Web or Outlook.com:**

1. Click on the **Settings** icon at the top of the page.​
2. Select **Mail**, then choose **Layout**
3. Under **Message organization**, choose **Show email grouped by conversation**

</details>

<details>

<summary>How to enable conversation view for Gmail</summary>

**On a Computer:**

1. Open Gmail
2. At the top right, click the **Settings** gear icon and then select **See all settings**.
3. In the **General** tab, scroll down to the **Conversation View** section.​
4. Select **Conversation view on.**
5. Scroll to the bottom and click **Save Changes**.​

**On an Android Device:**

1. Open the Gmail app.​
2. Tap the **Menu** icon (three horizontal lines) in the top left corner, then select **Settings**.​
3. Tap **General settings.**
4. Check the box for **Conversation view** to enable it.​

**On an iOS Device:**

1. Open the Gmail app.
2. Tap the **Menu** icon (three horizontal lines) in the top left corner, then select **Settings**.​
3. Tap your account.​
4. Toggle **Conversation view** on.

</details>

### How does the assistant learn my style?

When you connect your inbox CustomerIQ analyzes a sample of your previously sent emails to understand your tone and style.  As you continue to use CustomerIQ, the assistant continues to learn and adapt to your style, improving with every send. As you continue, you should expect the emails drafts to require less and less editing.

### How do I add my signature to replies \[Outlook]?

From Outlook go to:

1. Settings > Account > Signatures
2. Copy your entire signature, included the image, to your clipboard

Now, go to CustomerIQ

1. Login to CustomerIQ
2. Go to settings > my apps: <https://app.getcustomeriq.com/settings/my-apps>
3. Scroll down to email signature and paste in the outlook signature
4. You should see it in the preview

Then save and you're good to go!

### How does the assistant draft replies?

Assistant replies are powered by CustomerIQ's contextual AI engine. As you have meetings, trade emails, and generate tickets, CustomerIQ captures important conversation highlights to use in your workflow. When the assistant goes to draft a reply or meeting follow-up it intelligently references this context to make sure every email is perfectly relevant.

### How can I get CustomerIQ to write in a specific format?

The assistant continues to improve the more you use it, so if you want emails to follow a specific format or style you can simply edit and send emails in that style. As you continue, the assistant should learn enough that you do less and less editing of drafts.

### How do I disable or customize the inbox labels/folders?

At this time you cannot edit or adjust labels; however, you can disable the email categorization feature altogether. Just go to [Settings > My Apps](https://app.getcustomeriq.com/settings/my-apps) and scroll to the email categorization card.

### Can I use CustomerIQ to categorize past emails?

At this time the assistant will only categorize new emails as they arrive in the inbox. If you would like to clean up your entire inbox [send us a note](https://www.getcustomeriq.com/contact/support) and we'll see what we can do.

### What content does the email assistant have access to?

The assistant can access and reference any content in your content library. [Learn more about your content library here](/start-guide/workspace-setup-guide/knowledge-base)


# Meeting Recording FAQs

Frequently asked questions by customers setting up CustomerIQ

## General FAQ

### Is CustomerIQ (and the notetaker) secure? How do I respond to meeting participants who ask about data security?

Data security is our number one priority. Here is a helpful response you can send to any meeting participant concerned about CustomerIQ's data security practice.

> Totally understand and appreciate your concerns around security - we take data protection seriously, and so does our AI assistant, CustomerIQ.
>
> Just to clarify, the AI notetaker is used strictly for internal note-taking purposes, and your data is handled with enterprise-grade security. Here are a few key points that may help address your concerns:
>
> * **No Data Is Shared Publicly**: Notes and transcripts are only visible to our team and are never shared externally.
> * **Enterprise-Grade Security**: CustomerIQ is built with security and privacy in mind — using encrypted storage, SOC 2-compliant infrastructure, and rigorous access controls.
> * **Data Residency & Retention**: Data is stored in the U.S. and can be deleted upon request. Only meetings we explicitly record are processed.
> * **No Training on Your Data**: None of your data is used to train third-party models like OpenAI or other LLMs. It stays private and is only used to support our work with you.
>
> If you'd still prefer not to use the AI assistant in our meetings, that’s completely fine - just let me know and we’ll turn it off for our calls.

And feel free to review [our security practice here](https://www.getcustomeriq.com/security-overview).

### How do I adjust which meetings the assistant joins?

By default, the Meeting Assistant is set to automatically join any meeting with a web conference link. This includes Zoom, Google Meet, and Microsoft Teams.

In any meeting, you can simply remove the bot (or deny it entry) if you don't want it to record, but we also have a few settings:

Select which one is best for your use case.

#### Manually adding the assistant to meetings

Invite `notetaker@getcustomeriq.com` to any meeting to have it join manually.

{% hint style="info" %}
**Note**: Even when adding the assistant manually you need to connect your calendar. This is how CustomerIQ knows who the participants are and which CustomerIQ workspace to send the meeting transcription
{% endhint %}

#### Configure your meeting recap settings

Seconds after each meeting CustomerIQ will send a wonderful summary to your inbox or Slack. This is often helpful for every participant, so you should choose who it's sent to by default

<figure><img src="/files/Ekky98j7iPnwv1dbLwMW" alt=""><figcaption></figcaption></figure>

First, head over to Settings > My Apps > [Meeting Assistant](https://app.getcustomeriq.com/settings/my-apps/assistant)

### How long does it take for my assistant to join a meeting?

The assistant will attempt to join the meeting at the start time. This can sometimes take 10-15 seconds. If you do not see the meeting assistant in the meeting make sure to check the waiting room.

### How can I add my assistant after a meeting starts?

Add your assistant to any meeting from the "Join my meeting" button on the home page

<figure><img src="/files/lW8Qxb7mLTrtsD7VXAwF" alt=""><figcaption></figcaption></figure>

After submitting the required link and information in the modal, the assistant will join within about 10 seconds.

## Google Meet FAQ

### The assistant shows as in waiting room, but I don't see the pop-up?

If the Google Meet meeting is configured with "Host management" mode enabled, only the "Hosts" will see popups to let participants in from the waiting room.

If none of the Hosts are in the call yet, nobody will see a pop-up to let the bot in. Once the host joins, then the host will see the pop-up appear.

Participants whose email address is on the event invite are able to join with no host present, so other invited participants may join before the host and wonder why the bot is not joining.

## Microsoft Teams FAQ

### Joining Behavior

By default, Microsoft Teams bots will need to be let in from the lobby.


# Calendar Integration FAQs

Calendar Integration FAQ

## How far into the future are calendar events synced?

4 weeks.

## How long does CustomerIQ store calendar data?

CustomerIQ will retain calendar data up to 60 days in the past. Calendar events past 60 days are automatically removed and not available via the assistant.

## How do I add the assistant to a calendar event via email?

You may prefer a user flow where you can invite an email (eg. <notetaker@getcustomeriq.com>) to any meeting, and the assistant will join.

## Does the calendar integration support team/shared calendars?

Currently only the primary calendar of connected users are supported.

## Why do I need to connect my calendar? I'm going to manually invite the notetaker

CustomerIQ requires each workspace member connect their calendar for a few crucial reasons:

1. **To know when meetings are coming up and who is participating**. As you'll see, CustomerIQ is packed with many wonderful features like meeting summaries and pre-meeting briefs. The calendar is key to all of this.
2. **To determine which meetings the meeting assistant should join.** After you connect your calendar you can adjust rules for when the CustomerIQ Meeting Assistant should automatically join to take notes.
3. **To determine which workspace to send recordings.** Even if you set the Meeting Assistant to only join when invited, you need to integrate your calendar so that we know which CustomerIQ workspace to link with meeting recordings.

## Troubleshooting

***

### I connected my calendar but my assistant didn't join

This happens when the user is connecting their calendar for the first time, and doesn't select the checkbox to allow your app to view their calendar events.

<figure><img src="/files/rqXNUfFijZpzJ8Ld0qau" alt=""><figcaption></figcaption></figure>

\
To resolve this, they should reconnect their calendar while ensuring to allow this scope.


# What languages does CustomerIQ support?

CustomerIQ supports many languages

CustomerIQ can record, understand, and analyze many different languages including:

* Global English
* Australian English&#x20;
* British English&#x20;
* US English&#x20;
* Spanish&#x20;
* French&#x20;
* German&#x20;
* Italian&#x20;
* Portuguese&#x20;
* Dutch&#x20;
* Hindi&#x20;
* Japanese&#x20;
* Chinese&#x20;
* Finnish&#x20;
* Korean&#x20;
* Polish&#x20;
* Russian&#x20;
* Turkish&#x20;
* Ukrainian&#x20;
* Vietnamese

**Note**: While CustomerIQ can ingest these languages as inputs and understand the context, responses are always in US English by default